There is something grounding about the countryside, isn’t there? The smell of turned earth and the promise of a harvest. Today, we channel that sturdy, honest spirit into our hooks. We are not just making a doll; we are crafting a character who looks as though he has just finished a morning of apple picking.
This project combines the sweet, innocent “chibi” proportions we adore with the textured delight of a fully crocheted wardrobe. No fabric here—every strap of his overalls and every weave of his hat is created by your hands.
About The Chibi Farm Boy Fox
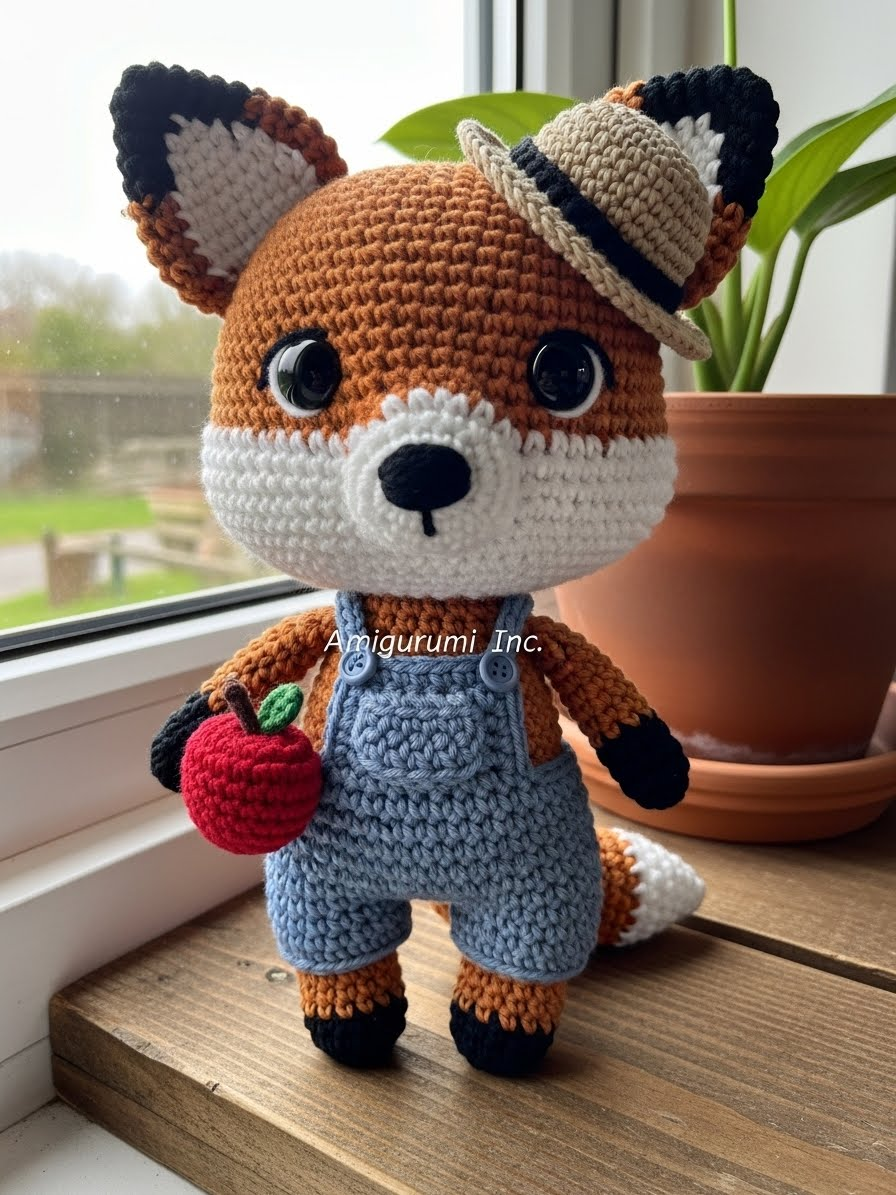
This little fox captures the essence of a sunny afternoon on the farm. While his massive head and wide-set eyes retain that signature “baby” look, his attire tells a story of hard work. The challenge—and the joy—of this piece lies in the textures. We contrast the smooth, matte cotton of his orange fur with the fuzzy, cloud-like texture of his muzzle patch, and then layer on the structured, slightly stiffer stitch work of his “denim” overalls. He stands ready to offer you a freshly picked apple, a symbol of the love we pour into every loop.
Project Snapshot
📊 Difficulty: Intermediate
⏰ Est. Time: 5-7 Hours
📏 Size: 20cm (Standing)
“The soul of amigurumi lies in the details. A single stitch changes an expression; a tiny hat changes a story.” — Patricia Poltera
Materials & Tools Needed
🧶 Yarn (Body): Matte 100% Cotton (DK/Light Worsted) in Fox Orange and Black.
🧶 Yarn (Muzzle/Tail Tip): White Fluffy/Brushed Acrylic or Faux Fur yarn.
🧶 Yarn (Wardrobe): Dusty Blue (Overalls), Cream (Shirt), Tan/Beige (Hat), Bright Red & Leaf Green (Apple).
🪡 Hook: 2.5mm (for body/clothes) and 3.0mm (for fluffy yarn if thick).
✨ Other Materials: 12mm or 14mm Safety Eyes, Polyfill stuffing, Stitch markers, Tapestry needle.

Abbreviations & Stitches Used
ch: chain
sl st: slip stitch
sc: single crochet
hdc: half double crochet
inc: increase (2 sc in one st)
dec: decrease (sc 2 together)
BLO: back loop only
FLO: front loop only
The Complete Chibi Fox Pattern
The Chibi Head (Fox Orange)
Work in continuous spirals.
🧶 R1: 6 sc in magic ring (6)
🧶 R2: inc in each st (12)
🧶 R3: (sc 1, inc) x6 (18)
🧶 R4: (sc 2, inc) x6 (24)
🧶 R5: (sc 3, inc) x6 (30)
🧶 R6: (sc 4, inc) x6 (36)
🧶 R7: (sc 5, inc) x6 (42)
🧶 R8: (sc 6, inc) x6 (48)
🧶 R9: (sc 7, inc) x6 (54)
🧶 R10: (sc 8, inc) x6 (60)
🧶 R11-22: sc in each st around (60) This creates the large forehead.
🧶 R23: (sc 8, dec) x6 (54)
🧶 R24: (sc 7, dec) x6 (48)
🧶 R25: (sc 6, dec) x6 (42)
🧶 Insert Safety Eyes between R18 and R19, roughly 11 stitches apart.
🧶 R26: (sc 5, dec) x6 (36)
🧶 R27: (sc 4, dec) x6 (30)
🧶 R28: (sc 3, dec) x6 (24)
🧶 Stuff the head firmly. It must be very round.
🧶 R29: (sc 2, dec) x6 (18). Fasten off, leaving a long tail for sewing.
The Fluffy Muzzle Patch (White Fluffy Yarn)
This is a separate piece sewn onto the face.
🧶 R1: Ch 5. Starting in 2nd ch from hook: sc 3, 3 sc in last ch. Turn to work on other side: sc 2, inc in last ch (10)
🧶 R2: inc, sc 2, (inc) x3, sc 2, (inc) x2 (16)
🧶 R3: sc 1, inc, sc 3, (sc 1, inc) x3, sc 3, (sc 1, inc) x2 (22)
🧶 R4: sc around loosely to create a soft edge. Fasten off.
The Stubby Body (Fox Orange)
🧶 R1: 6 sc in magic ring (6)
🧶 R2: inc in each st (12)
🧶 R3: (sc 1, inc) x6 (18)
🧶 R4: (sc 2, inc) x6 (24)
🧶 R5: (sc 3, inc) x6 (30)
🧶 R6-10: sc in each st around (30)
🧶 R11: (sc 3, dec) x6 (24)
🧶 R12-13: sc in each st around (24)
🧶 R14: (sc 2, dec) x6 (18)
🧶 Stuff firmly and fasten off.
Fox Ears (Make 2 – Fox Orange)
🧶 R1: 4 sc in magic ring (4)
🧶 R2: (sc 1, inc) x2 (6)
🧶 R3: (sc 2, inc) x2 (8)
🧶 R4: (sc 3, inc) x2 (10)
🧶 R5: (sc 4, inc) x2 (12)
🧶 R6: (sc 5, inc) x2 (14)
🧶 Fasten off. Artisan’s Note: Embroider the inner ear with white yarn before sewing.
The Farm Wardrobe: Crocheted “Denim” Overalls (Dusty Blue)
Legs (Make 2):
🪡 R1: Ch 12, join to form ring. sc around (12)
🪡 R2-3: sc around (12). Fasten off first leg, do not fasten off second.
Join:
🪡 R4: Ch 2 (crotch), join to first leg. sc 12 (leg 1), sc 2 (along ch), sc 12 (leg 2), sc 2 (other side of ch) (28)
🪡 R5-8: sc around (28)
🪡 R9: (sc 5, dec) x4 (24)
🪡 Bib: Work flat on the front 8 stitches.
🪡 Rows 1-4: ch 1, turn, sc 8.
🪡 Straps: Ch 15 from the top corners of the bib, cross them at the back, and sew to the back of the pants waistband.
The Farm Wardrobe: Crocheted Straw Hat (Tan)
🪡 R1: 6 sc in magic ring (6)
🪡 R2: inc around (12)
🪡 R3: (sc 1, inc) around (18)
🪡 R4: (sc 2, inc) around (24)
🪡 R5-7: sc around (24) Crown of hat
🪡 R8: FLO (Front Loop Only) (sc 1, inc) around (36) Brim start
🪡 R9: (sc 2, inc) around (48). Fasten off. Shape the brim with your fingers.
The Crocheted Apple (Red)
🪡 R1: 6 sc in magic ring (6)
🪡 R2: inc around (12)
🪡 R3-5: sc around (12)
🪡 R6: dec around (6). Stuff lightly. Sew shut. Add a tiny green chain loop for the leaf.
Assembly & Final Touches
➡️ The Face: Sew the fluffy muzzle patch onto the lower half of the head before attaching the body. Place the safety nose directly in the center of the patch.
➡️ The Outfit: Dress the body in the shirt (if made separately) and overalls before sewing the head to the body. This saves you from struggling to pull clothes over that giant chibi head!
➡️ The Hat: You may sew the hat slightly askew for a casual look, or leave it removable.
➡️ The Apple: Tack the apple to one of his small hand-nubs using a matching thread.
Tips & FAQs
Q: Can I use real denim for the overalls?
A: To stay true to the amigurumi art form, we avoid fabric. Using a smaller hook size for the blue yarn creates a stiff, dense fabric that mimics denim beautifully!
Q: The muzzle yarn is hard to see.
A: Feel the stitches with your fingers rather than relying on sight. If it is too difficult, hold the fluffy yarn together with a thin strand of white cotton to guide you.
A Final Word
There is a quiet dignity in a handmade toy. When you place that tiny hat on his head, you are finishing a story. I hope this Farm Boy brings a harvest of smiles to your home.
Yours in stitches,
Patricia

