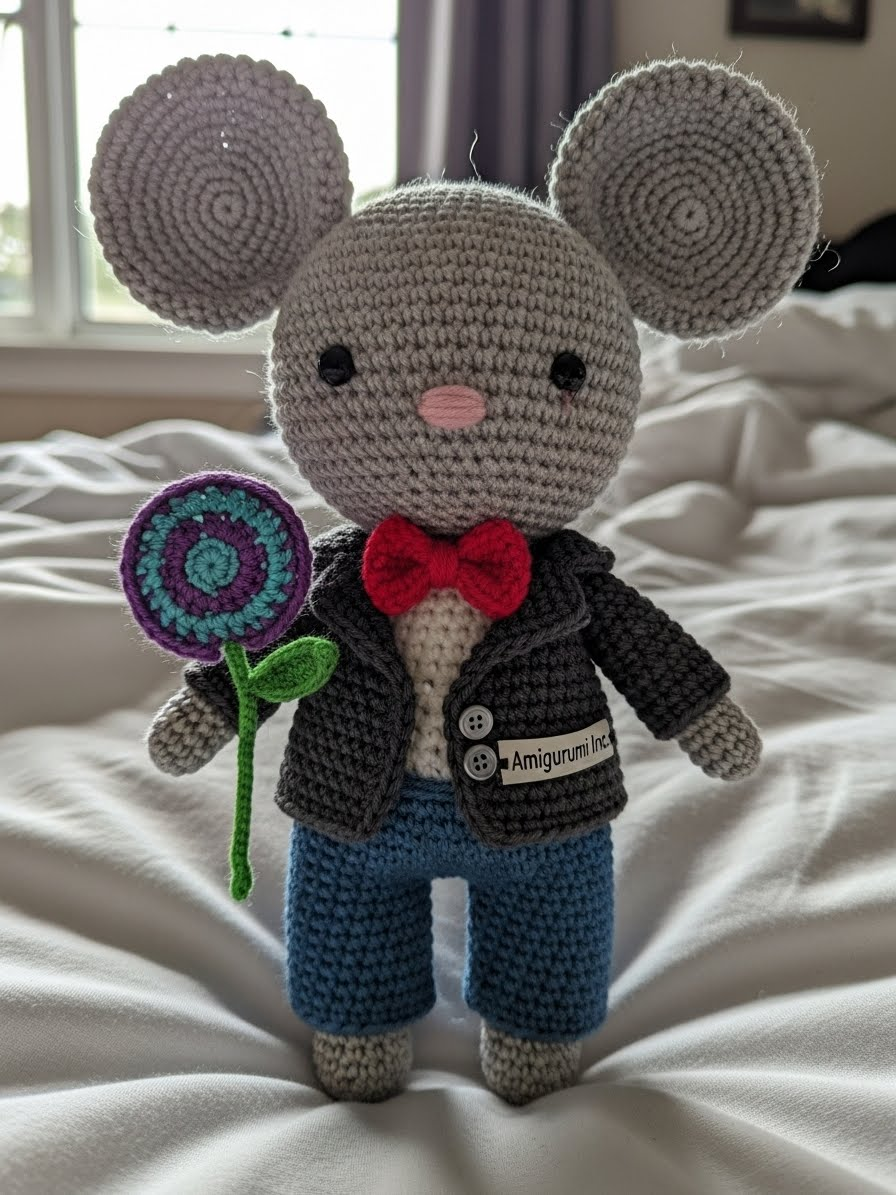
There is something undeniably precious about a small creature trying their very best to be brave. Today, we are channeling that energy into Barnaby. He is not just a mouse; he is a gentleman. We are skipping the fabric and the felt today. Every inch of his dashing little outfit—from his textured tweed-style jacket to his tiny red bowtie—is created with your hook and yarn. It is tactile, it is cozy, and frankly, it is adorable. He has even picked a flower for you. Let us make him come to life.

About The Bashful Mouse (Dapper Gentleman Edition)
Barnaby is a listener, not a talker. He spends his mornings dusting the baseboards with his tail and his afternoons reading poetry. Today, he has dressed up in his absolute Sunday best because he wants to make a good first impression. The challenge with this design was creating a “suit” look without using fabric. We achieve this by using a modified moss stitch for the jacket to give it that “woven” look, and high-contrast slate blue for the trousers. The flower in his paw is a Spiral Moon-Orchid, a fantasy bloom that adds a pop of magical color to his greyscale world.
Project Snapshot:
📊 Difficulty: Intermediate (Those tiny clothes require patience!)
⏰ Est. Time: 5-6 Hours
📏 Size: 20cm (Approx. 8 inches)
“A gentleman never forgets his manners, and a crafter never forgets their stitch count.” — Patricia Poltera
Materials & Tools Needed
🧶 Yarn: Matte Cotton (DK Weight). Colors: Mouse Grey (Body), Charcoal (Jacket), Slate Blue (Pants), Crimson Red (Bowtie), Cream (Ear lining), Purple & Teal (Flower).
🪡 Hook: 2.5mm (Keep stitches TIGHT so stuffing doesn’t show).
✨ Other Materials: Pink embroidery thread (for the nose), 10mm Safety Eyes, Polyfill stuffing, tapestry needle, stitch markers.
Abbreviations & Stitches Used
ch (chain), sl st (slip stitch), sc (single crochet), hdc (half double crochet), inc (increase), dec (decrease), BLO (back loop only).
The Complete Bashful Mouse Pattern
Phase 1: The Head (Mouse Grey)
The head must be oversized. We want him to look like a toddler who hasn’t grown into his ears yet.
R1: 6 sc in Magic Ring (6)
R2: Inc in every st (12)
R3: Sc 1, Inc (18)
R4: Sc 2, Inc (24)
R5: Sc 3, Inc (30)
R6: Sc 4, Inc (36)
R7: Sc 5, Inc (42)
R8: Sc 6, Inc (48)
R9-R18: Sc around (48) — This creates the large, round forehead.
R19: Sc 6, Dec (42)
R20: Sc 5, Dec (36)
Insert Safety Eyes between R15 and R16, spaced 8 stitches apart. Embroider the tiny PINK triangle nose centered between eyes one row lower.
R21: Sc 4, Dec (30)
R22: Sc 3, Dec (24)
R23: Sc 2, Dec (18)
Fasten off. Stuff firmly. The head should be hard, not squishy.
Phase 2: The Saucer Ears (Make 2 Grey, 2 Cream)
The secret to the “Bashful” look is ears that are too big for his head.
R1: 6 sc in Magic Ring (6)
R2: Inc in every st (12)
R3: Sc 1, Inc (18)
R4: Sc 2, Inc (24)
R5: Sc 3, Inc (30)
R6: Sc 4, Inc (36)
Fasten off. Place a Cream circle on top of a Grey circle. Crochet them together around the edge using Grey yarn. This makes the ear thick and stiff so it stands up.
Phase 3: The Gentleman’s Trousers & Body
Start with Slate Blue (Pants).
Legs (Make 2): 6 sc in MR. Inc to 12. Sc 4 rows.
Join legs together with a ch-2 bridge.
R1-R5: Sc around in Slate Blue (The Pants).
Change color to Charcoal (The Shirt/Jacket base).
R6-R12: Sc around in Charcoal.
R13: Sc 2, Dec (18).
Fasten off. Stuff body.
Phase 4: The Tweed Jacket (Charcoal)
This is worked flat and sewn onto the body for realism.
Ch 21.
R1: Sc across (20).
R2-R6: Sc 1, ch 1, skip 1 repeat across. (This creates the “Tweed” texture).
R7: Sc dec at start and end for lapel shaping.
Sew onto the body. Add tiny French Knots in black yarn for “buttons.”
Phase 5: The Spiral Moon-Orchid
Use Purple and Teal yarn.
Ch 15.
In 2nd ch from hook, 3 hdc in same st. Repeat across.
The strip will curl naturally into a spiral flower. Sew a green yarn “stem” to the bottom.
Assembly & Final Touches
- Sew the heavy head onto the body. It will look wobbly; add extra stitches in the neck to support it.
- Attach ears HIGH on the head. They should look like satellite dishes.
- Crochet a tiny red rectangle (ch 4, sc 2 rows) and tie the center with yarn to make the Bowtie. Sew to neck.
- Sew the flower to his right hand (paw).
- Attach the long thin tail to the lower back.
Tips & FAQs
Q: My ears are flopping! A: Did you crochet the two layers together? If they still flop, you can insert a thin circle of plastic canvas inside the layers.
Q: Can I use felt for the jacket? A: Absolutely not! The charm of Amigurumi Inc patterns is the “100% Yarn” texture. Felt looks too flat in photos.
A Final Word
There is a little gentleman in all of us, waiting for the right moment to present a flower. I hope Barnaby brings a little politeness to your feed today. Don’t forget to tag us if you make him!

