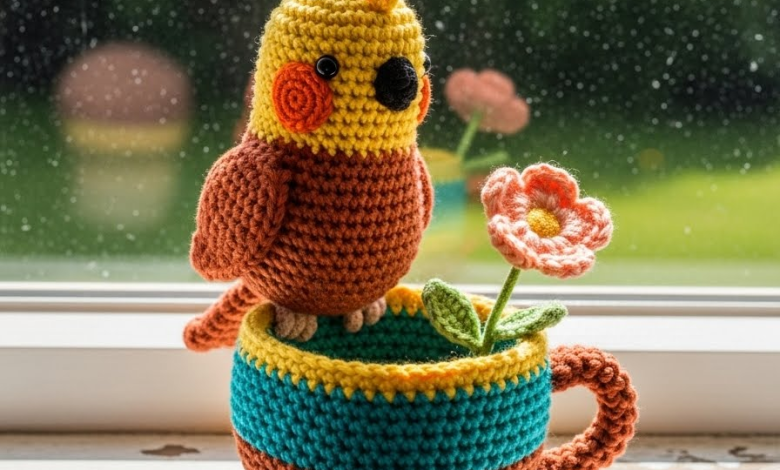
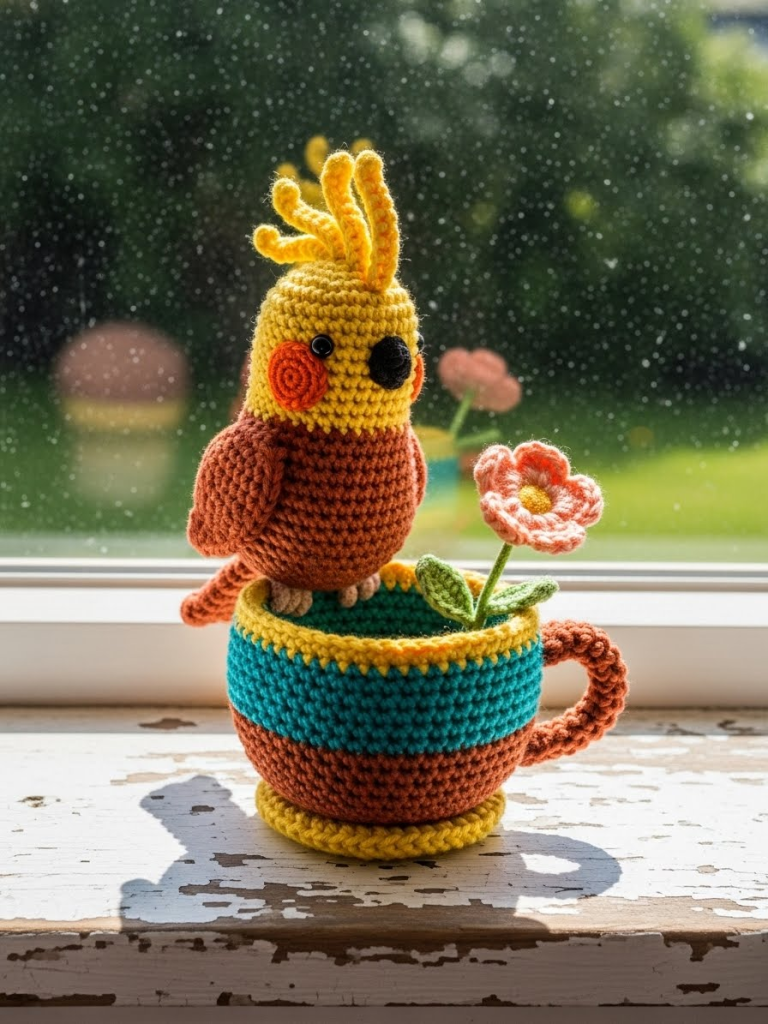
Come in, set down your basket, and let us sit by the window. There is a specific kind of joy in capturing the morning light in yarn, isn’t there? This project, “Marmalade,” is a celebration of that feeling—warm tea, the scent of orange peel, and the quiet company of a little bird. We are not just making a toy; we are crafting a moment frozen in time.
About This Creation & Angle
This piece balances structural integrity with organic softness. The challenge—and the delight—lies in the interaction between the bird and the vessel. Unlike standard dolls that stand alone, Marmalade relies on the teacup for his stage. We are using a split-complementary color scheme (burnt orange and teal) to make the bird pop against the china. It is designed to sit heavily and securely, making it a perfect desk companion that won’t topple over at the slightest breeze.
Project Snapshot
📊 Difficulty: Intermediate (requires shaping and component assembly) ⏰ Est. Time: 8–10 Hours 📏 Size: Approximately 14cm (5.5 inches) tall including cup “A single stitch holds the tension of the whole; craft with patience, not haste.” — Patricia
Materials & Tools Needed
🧶 Yarn: Sport or DK weight cotton yarn. Colors: Burnt Orange (Body), Teal (Cup Upper/Saucer), Mustard Yellow (Cup Lower/Crest), Bright Yellow (Wings), Taupe/Grey (Beak/Feet), Peach (Flowers), Sage Green (Stems). 🪡 Hook: 2.5mm (or size to obtain tight gauge) ✨ Other Materials: Polyester fiberfill, 8mm safety eyes, tapestry needle, stitch markers, pipe cleaners (optional for posable feet), small weighted pouch (poly pellets) for the teacup base.
Abbreviations & Stitches Used
ch: chain sl st: slip stitch sc: single crochet inc: increase (2 sc in one st) dec: decrease (sc 2 together, preferably invisible decrease) hdc: half double crochet dc: double crochet BLO: back loop only
The Complete Marmalade Pattern
I. Marmalade’s Head & Body (Burnt Orange)
We work from the top down, shaping the neck carefully to give him that charming, chubby posture.
R1: Start with a magic ring, 6 sc into ring (6)
R2: Inc in each st around (12)
R3: 🧶 1 sc, inc 🧶 rep 6 times (18)
R4: 🧶 2 sc, inc 🧶 rep 6 times (24)
R5: 🧶 3 sc, inc 🧶 rep 6 times (30)
R6: 🧶 4 sc, inc 🧶 rep 6 times (36)
R7–14: Sc in each st around (36) [Forming the round head]
R15: 🧶 4 sc, dec 🧶 rep 6 times (30)
R16: 🧶 3 sc, dec 🧶 rep 6 times (24) [The Neck definition]
R17: 🧶 3 sc, inc 🧶 rep 6 times (30)
R18: 🧶 4 sc, inc 🧶 rep 6 times (36)
R19: 🧶 5 sc, inc 🧶 rep 6 times (42) [Widening for the chest]
R20–28: Sc in each st around (42)
Insert safety eyes between R11 and R12, about 7 stitches apart.
R29: 🧶 5 sc, dec 🧶 rep 6 times (36)
R30: 🧶 4 sc, dec 🧶 rep 6 times (30)
R31: 🧶 3 sc, dec 🧶 rep 6 times (24)
Stuff the head firmly and the body moderately.
R32: 🧶 2 sc, dec 🧶 rep 6 times (18)
R33: 🧶 1 sc, dec 🧶 rep 6 times (12)
R34: Dec around (6). Fasten off and weave in end.
II. The Crest (Mustard/Bright Yellow)
Make 3 separate plumes of varying lengths.
Plume A (Tallest): Ch 8, sl st in 2nd ch from hook, sc in next 2, hdc in next 4. Fasten off.
Plume B (Medium): Ch 6, sl st in 2nd ch from hook, sc in next 2, hdc in next 2. Fasten off.
Plume C (Small): Ch 5, sl st in 2nd ch from hook, sc in next 3. Fasten off.
III. The Beak (Taupe/Grey)
R1: Magic ring, 4 sc (4)
R2: 🧶 1 sc, inc 🧶 rep 2 times (6)
R3: 🧶 2 sc, inc 🧶 rep 2 times (8)
R4: Sc around. Fasten off, leaving a tail for sewing.
IV. The Wings (Make 2 – Bright Yellow)
R1: Magic ring, 6 sc (6)
R2: Inc around (12)
R3: 🧶 1 sc, inc 🧶 rep 6 times (18)
R4–6: Sc around (18)
R7: 🧶 4 sc, dec 🧶 rep 3 times (15)
R8: Sc around (15)
R9: 🧶 3 sc, dec 🧶 rep 3 times (12)
R10: 🧶 2 sc, dec 🧶 rep 3 times (9)
R11: Flatten the piece and sc through both layers to close. Do not stuff.
V. The Tail Feathers (Burnt Orange)
Make 2 Long and 1 Short.
Long Feather: Ch 16. Sc in 2nd ch, sc in next 13, 3 sc in last ch. Rotate to work other side of chain: sc 14. Fasten off.
Short Feather: Ch 10. Sc in 2nd ch, sc in next 7, 3 sc in last ch. Rotate/work other side: sc 8. Fasten off.
VI. The Teacup (Start with Burnt Orange)
R1: Magic ring, 6 sc (6)
R2: Inc around (12)
R3: 🧶 1 sc, inc 🧶 rep 6 times (18)
R4: 🧶 2 sc, inc 🧶 rep 6 times (24)
R5: 🧶 3 sc, inc 🧶 rep 6 times (30)
R6: 🧶 4 sc, inc 🧶 rep 6 times (36)
R7: 🧶 5 sc, inc 🧶 rep 6 times (42)
R8: BLO sc around (42) [This creates the crisp edge of the base]
R9–14: Sc around (42)
Change color to Teal.
R15: BLO sc around (42) [Creates the ridge between cup sections]
R16–20: Sc around (42)
R21: 🧶 6 sc, inc 🧶 rep 6 times (48)
R22: Sc around.
R23: Change to Yellow for the rim. Sl st around loosely. Fasten off.
Artisan’s Note: Place a small pouch of beans or plastic pellets in the bottom of the cup before adding stuffing to lower the center of gravity.
VII. The Saucer (Teal)
R1: Magic ring, 6 sc (6)
R2: Inc around (12)
R3: 🧶 1 sc, inc 🧶 rep 6 times (18)
R4: 🧶 2 sc, inc 🧶 rep 6 times (24)
R5: 🧶 3 sc, inc 🧶 rep 6 times (30)
R6: 🧶 4 sc, inc 🧶 rep 6 times (36)
R7: 🧶 5 sc, inc 🧶 rep 6 times (42)
R8: 🧶 6 sc, inc 🧶 rep 6 times (48)
R9: 🧶 7 sc, inc 🧶 rep 6 times (54)
R10: Change to Yellow. Sl st around. Fasten off.
VIII. Accessories (Handle, Feet, Flowers)
Handle (Teal): Ch 15. Start in 2nd ch, sc across. Turn, ch 1, sc across. Fold into an ‘S’ shape and sew to cup.
Feet (Taupe): Ch 6. Sl st back down chain. Repeat 3 times to create three “toes” branching from a central point. Make 2.
Blossoms (Peach): Magic ring. * (Ch 2, dc, ch 2, sl st into ring) repeat 5 times. Tighten ring.
Assembly & Final Touches
- The Face: Sew the beak centrally between the eyes. Blush the cheeks by sewing small circles of Mustard yarn just below the eyes.
- The Crown: Sew the three crest plumes to the top of the head; the tallest should be in the center.
- The Posture: Sew the wings to the sides of the body at a slight angle. Attach the tail feathers to the lower back.
- The Perch: This is crucial. Sew the feet to the rim of the teacup first. Then, place Marmalade onto the feet and sew his body securely to the feet and the inner rim of the cup. He must look like he is gripping the edge.
- The Garden: Sew the saucer to the bottom of the cup (optional, but adds stability). Attach the flowers and a small green chain (stem) rising from the inside of the cup.
Tips & FAQs
Q: My bird keeps falling backward. A: Ensure the tail is not too heavy, or add more weight (beads/coins) into the very bottom of the teacup before stuffing.
Q: Can I brush the yarn? A: Absolutely. Brushing the yellow crest gently with a pet slicker brush will give it a feathery, realistic texture.
A Final Word
You have created a small pocket of sunshine. May Marmalade sit proudly on your shelf, a permanent reminder that creativity is the best way to greet the morning. Until we meet again at the crafting table.