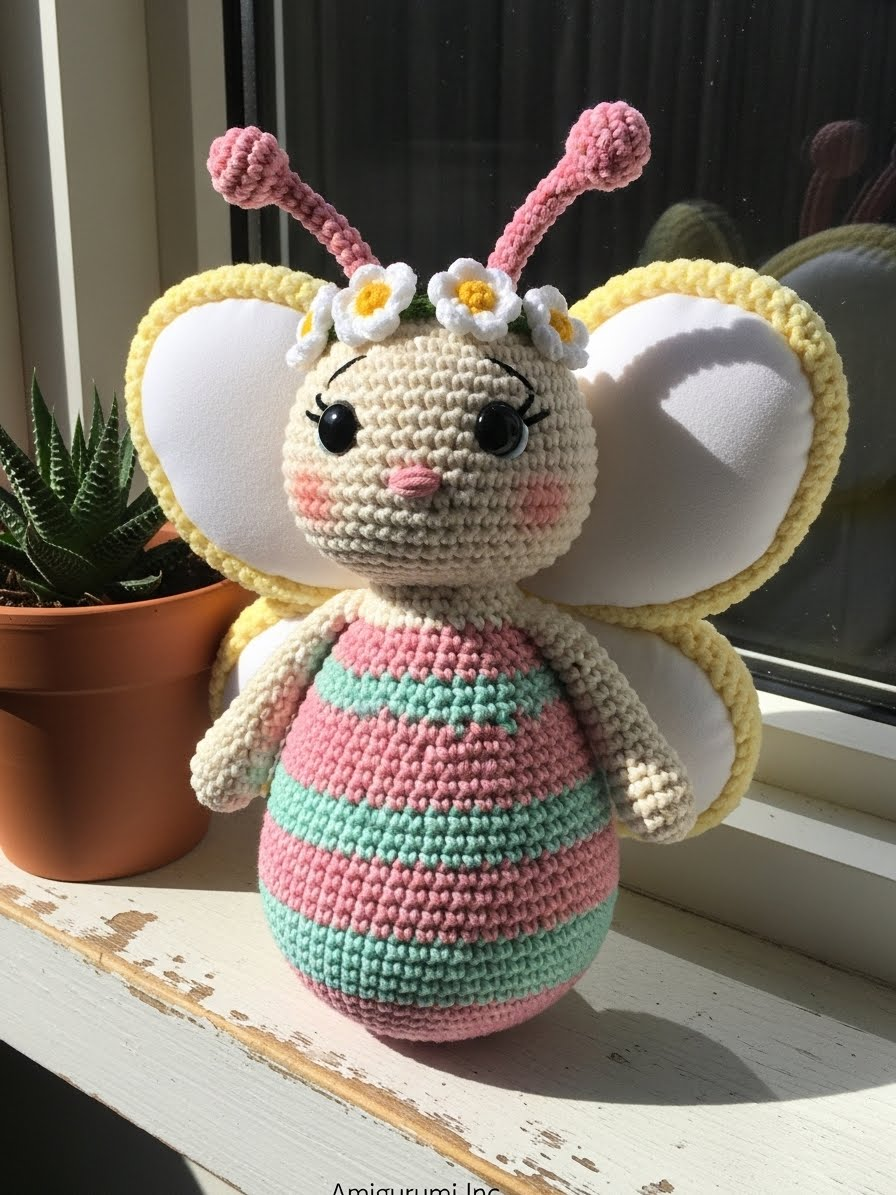
Spring has a way of arriving in the most unexpected moments, sometimes just when we need a splash of color the most. Bella was born from that desire for renewal—a little creature that carries the sunshine on her wings. She is not merely a toy; she is a companion designed to sit quietly on a shelf or be held by small, eager hands. Let us pick up our hooks and breathe life into this joyful design.
About This Creation
Bella is designed with the “Embrace of Softness” philosophy. We avoid sharp edges here. Her wings are rounded and pillowy, and her body carries a gentle weight that feels substantial. This project is excellent for using up leftover pastel yarns, allowing you to paint with fiber. We focus on structural integrity—tight stitches that hold stuffing well, ensuring she keeps her chubby shape for years to come.
Project Snapshot:
📊 Difficulty: Intermediate (Requires precise color changes)
⏰ Est. Time: 6–8 Hours
📏 Size: Approx. 15cm Tall
“Patience is the quietest form of passion. Take your time with the wing shaping.” — Patricia Poltera
Materials & Tools Needed
🧶 Yarn: Cotton or Acrylic blend in DK weight (Light Pink, Cream, Soft Yellow, Mint Green)
🪡 Hook: 2.5mm or 2.75mm (depending on your tension)
✨ Safety Eyes: 10mm Black
✨ Polyester fiberfill stuffing
✨ Pipe cleaners (for antennae structure)
✨ Stitch markers, tapestry needle, pins
Abbreviations & Stitches Used
ch: chain
sl st: slip stitch
sc: single crochet
inc: increase (2 sc in one st)
dec: decrease (invisible decrease preferred)
blo: back loop only
The Complete Bella Pattern
The Head (In Cream Yarn)
We begin with the focal point of her charm. We need a large, bulbous shape to achieve the “Echo of Youth.”
🧶 R1: 6 sc in magic ring (6)
🧶 R2: inc in each st around (12)
🧶 R3: (sc 1, inc) x 6 (18)
🧶 R4: (sc 2, inc) x 6 (24)
🧶 R5: (sc 3, inc) x 6 (30)
🧶 R6: (sc 4, inc) x 6 (36)
🧶 R7: (sc 5, inc) x 6 (42)
🧶 R8: (sc 6, inc) x 6 (48)
🧶 R9: (sc 7, inc) x 6 (54)
🧶 R10–R16: sc in each st around (54)
➡️ Cheek Shaping Rounds:
🧶 R17: sc 18, (inc, sc 1) x 9, sc 18 (63) – This pushes the cheeks out.
🧶 R18–R22: sc in each st around (63)
➡️ Insert safety eyes between R17 and R18, spaced 11 stitches apart (centered on the cheek increases).
🧶 R23: sc 18, (dec, sc 1) x 9, sc 18 (54)
🧶 R24: (sc 7, dec) x 6 (48)
🧶 R25: (sc 6, dec) x 6 (42)
🧶 R26: (sc 5, dec) x 6 (36)
🧶 R27: (sc 4, dec) x 6 (30)
🧶 R28: (sc 3, dec) x 6 (24)
➡️ Start stuffing firmly, focusing on pushing filling into the cheek pockets.
🧶 R29: (sc 2, dec) x 6 (18)
🧶 R30: (sc 1, dec) x 6 (12)
🧶 R31: dec x 6 (6). Fasten off, weave in end.
The Body (Striped – Pink & Mint)
Start with Pink.
🧶 R1: 6 sc in magic ring (6)
🧶 R2: inc in each st around (12)
🧶 R3: (sc 1, inc) x 6 (18)
🧶 R4: (sc 2, inc) x 6 (24)
🧶 R5: (sc 3, inc) x 6 (30)
🧶 R6: (sc 4, inc) x 6 (36)
🧶 R7: (sc 5, inc) x 6 (42)
🧶 R8–R10: sc in each st around (42)
➡️ Change to Mint Green
🧶 R11–R12: sc in each st around (42)
➡️ Change to Pink
🧶 R13: (sc 5, dec) x 6 (36)
🧶 R14: sc in each st around (36)
➡️ Change to Mint Green
🧶 R15: (sc 4, dec) x 6 (30)
🧶 R16: sc in each st around (30)
➡️ Change to Pink
🧶 R17: (sc 3, dec) x 6 (24)
🧶 R18–R19: sc in each st around (24) – Creating a neck.
➡️ Fasten off, leaving a long tail for sewing. Stuff firmly.
Upper Wings (Make 2 – Soft Yellow)
We work in rounds but flatten them.
🧶 R1: 6 sc in magic ring (6)
🧶 R2: inc in each st around (12)
🧶 R3: (sc 1, inc) x 6 (18)
🧶 R4: (sc 2, inc) x 6 (24)
🧶 R5: (sc 3, inc) x 6 (30)
🧶 R6: (sc 4, inc) x 6 (36)
🧶 R7: (sc 5, inc) x 6 (42)
🧶 R8–R12: sc in each st around (42)
🧶 R13: (sc 5, dec) x 6 (36)
🧶 R14: (sc 4, dec) x 6 (30)
🧶 R15: (sc 3, dec) x 6 (24)
🧶 R16: (sc 2, dec) x 6 (18)
➡️ Flatten the piece. Do not stuff. Sc across the opening to close it.
Lower Wings (Make 2 – Soft Yellow)
Similar to upper wings but smaller.
🧶 R1: 6 sc in magic ring (6)
🧶 R2: inc in each st around (12)
🧶 R3: (sc 1, inc) x 6 (18)
🧶 R4: (sc 2, inc) x 6 (24)
🧶 R5–R8: sc in each st around (24)
🧶 R9: (sc 2, dec) x 6 (18)
➡️ Flatten and sc across the opening to close.
Arms & Legs (Make 4 – Cream)
🧶 R1: 5 sc in magic ring (5)
🧶 R2: inc in each st around (10)
🧶 R3–R5: sc in each st around (10)
🧶 R6: (sc 3, dec) x 2 (8)
🧶 R7–R9: sc in each st around (8)
➡️ Lightly stuff only the bottom half. Flatten top and sc across to close.
Antennae (Make 2 – Pink)
🧶 R1: 6 sc in magic ring (6)
🧶 R2: inc around (12)
🧶 R3–R4: sc around (12)
🧶 R5: dec around (6)
➡️ Stuff this “bobble” tip.
🧶 R6–R12: sc around (6)
➡️ Insert a small piece of pipe cleaner. Fasten off.
Daisy Crown (White & Yellow)
Base Chain: Ch 30 (or enough to fit around the head), sl st to join.
Flowers (Make 3): In a magic ring using Yellow: 5 sc. Switch to White: (sl st into next st, ch 2, dc in same st, ch 2, sl st in same st) x 5 petals. Sew these to the base chain.
Assembly & Final Touches
- Head to Body: Pin the head to the body. Ensure the “cheeks” are facing forward. Sew firmly using the whip stitch.
- Wings: Sew the Lower Wings to the bottom of the Upper Wings first. Then, attach the combined wing set to the back of the body, centered between the shoulder blades.
- Limbs: Attach legs at rounds 5–6 of the body (sitting position). Attach arms at rounds 16–17.
- Face: Embroider a small “v” shape for the mouth between the eyes using pink thread. Add blush under the eyes.
- Crown: Place the daisy crown on the head and tack it down with a few hidden stitches.
Tips & FAQs
My wings are floppy. What should I do?
If your yarn is soft, you can crochet a second layer for the wings or insert a piece of plastic canvas cut to shape inside before closing the wing seam.
Can I brush the yarn?
Absolutely. Gently brushing the yarn with a pet slicker brush gives Bella a fuzzy, moth-like texture that is very charming.
A Final Word
Creating Bella is an exercise in joy. She represents the potential within a simple strand of yarn to become a character with soul. May she bring a smile to whoever holds her.

