My dearest maker, welcome back to the circle. There is a profound joy in creating a character with a story, isn’t there? Finnegan is not merely a toy; he is a silent confidant for your workspace, a soft presence during long study sessions, and a reminder that even the busiest among us deserve a moment of softness. We shall work with velvet yarn to ensure his huggability is absolute. Let us begin.
About This Creation & The Velvet Touch
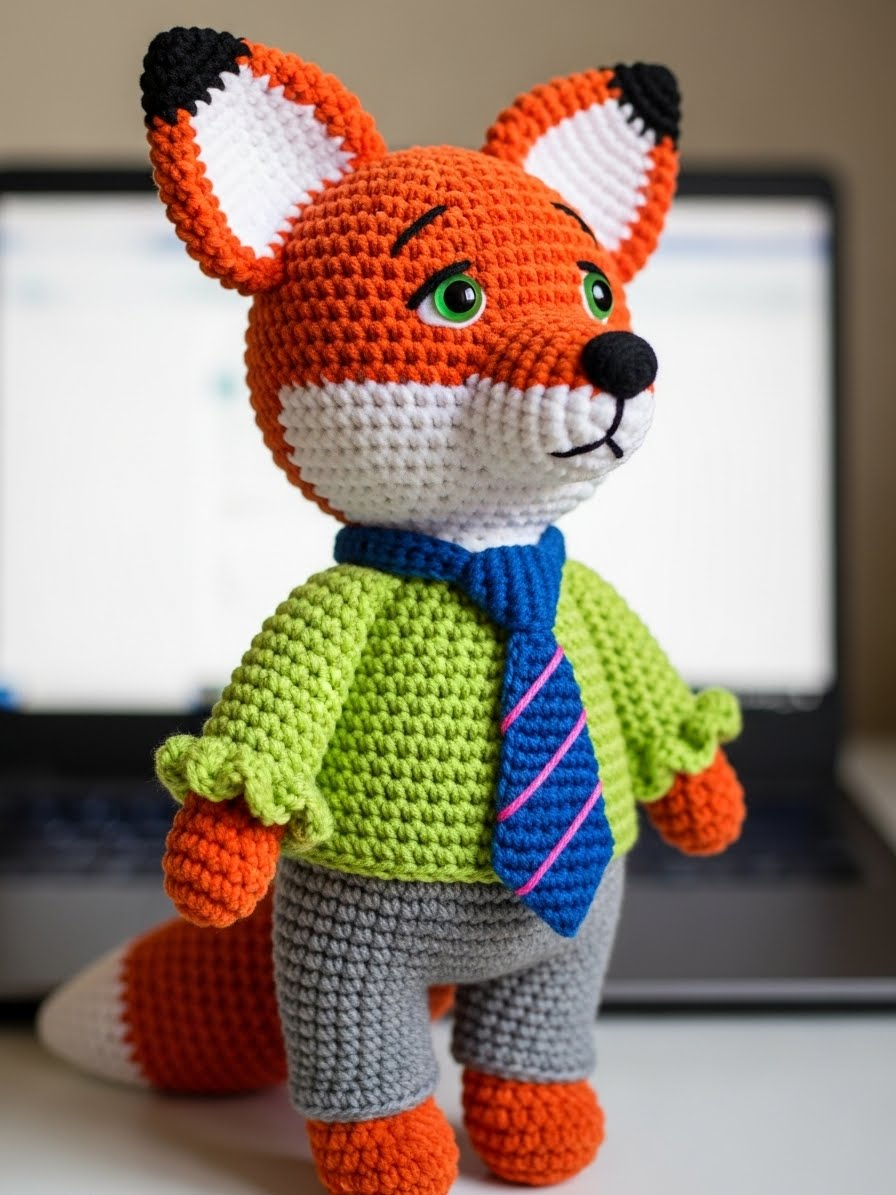
Finnegan, the Junior Analyst Fox, was born from a desire to mix professional charm with the “Embrace of Softness.” While many amigurumi projects utilize cotton for rigidity, we are choosing chenille or velvet yarn for this project. This choice transforms the texture completely, giving Finnegan a premium, store-bought feel while retaining the soul of a handmade treasure.
The challenge with velvet yarn is visibility, but the reward is a seamless, plush finish that hides increase lines beautifully. He wears his “business casual” greens and greys with pride, making him an ideal gift for colleagues, students, or anyone needing a morale boost.
Project Snapshot:
📊 Difficulty: Intermediate (Working with velvet yarn requires feeling stitches)
⏰ Est. Time: 5–7 Hours
📏 Size: Approx. 24cm (9.5 inches) seated
“To create with one’s hands is to anchor the soul in the present moment.” — Patricia Poltera
Materials & Tools Needed
🧶 Yarn: Super Bulky (Category 6) Velvet/Chenille yarn. Colors needed: burnt orange (approx. 100g) sage green (approx. 30g) light grey (approx. 30g) cream/white (approx. 20g) black (scrap amount for ear tips) dark blue (scrap for tie)
🪡 Hook: 4.0mm or 4.5mm (depending on your tension; keep it tight)
✨ Other Materials: 18mm Green Safety Eyes 20mm Triangular Safety Nose (Black) Polyester fiberfill stuffing Black and Pink cotton embroidery thread Yarn needle (large eye) Stitch markers
Abbreviations & Stitches Used
ch: chain
sl st: slip stitch
sc: single crochet
inc: increase (2 sc in one st)
dec: decrease (invisible decrease preferred)
BLO: back loop only
FLO: front loop only
( … ) x 6: repeat instructions in brackets 6 times
The Complete Finnegan Pattern
Head (In Orange Velvet)
We begin with the seat of his intellect. The head is large to capture the “Echo of Youth.”
R1: 6 sc in a magic ring (6)
R2: inc in every st (12)
R3: (1 sc, inc) x 6 (18)
R4: (2 sc, inc) x 6 (24)
R5: (3 sc, inc) x 6 (30)
R6: (4 sc, inc) x 6 (36)
R7: (5 sc, inc) x 6 (42)
R8-R13: sc in each st around (42) [6 rounds of plain sculpting]
R14: (6 sc, inc) x 6 (48)
R15-R18: sc in each st around (48)
R19: (6 sc, dec) x 6 (42)
R20: (5 sc, dec) x 6 (36)
Insert safety eyes between R13 and R14, roughly 7 stitches apart. Ensure they are wide-set for the innocent look.
R21: (4 sc, dec) x 6 (30)
R22: (3 sc, dec) x 6 (24)
Stuff the head firmly, paying attention to the cheeks.
R23: (2 sc, dec) x 6 (18)
R24: (1 sc, dec) x 6 (12)
R25: dec around (6)
Fasten off and weave in end.
Muzzle (In White/Cream)
R1: 6 sc in magic ring (6)
R2: (1 sc, inc) x 3 (9)
R3: (2 sc, inc) x 3 (12)
R4: (3 sc, inc) x 3 (15)
R5: (4 sc, inc) x 3 (18)
R6: sc in each st around (18)
Fasten off, leaving a long tail for sewing. Insert safety nose into the magic ring center before stuffing lightly.
Ears (Make 2 – Start with Black)
R1: 4 sc in magic ring (4)
R2: (1 sc, inc) x 2 (6)
R3: (2 sc, inc) x 2 (8)
Change color to Orange
R4: (3 sc, inc) x 2 (10)
R5: (4 sc, inc) x 2 (12)
R6: (5 sc, inc) x 2 (14)
R7: (6 sc, inc) x 2 (16)
R8: (7 sc, inc) x 2 (18)
Fasten off, leave a tail. Do not stuff ears; fold them flat.
Body (Start with Grey for Pants)
R1: 6 sc in magic ring (6)
R2: inc in every st (12)
R3: (1 sc, inc) x 6 (18)
R4: (2 sc, inc) x 6 (24)
R5: (3 sc, inc) x 6 (30)
R6: (4 sc, inc) x 6 (36)
R7-R9: sc in each st around (36)
Change color to Green (Shirt)
R10: BLO sc in each st around (36) [Creates the waistline definition]
R11-R13: sc in each st around (36)
R14: (4 sc, dec) x 6 (30)
R15: sc in each st around (30)
R16: (3 sc, dec) x 6 (24)
R17: sc in each st around (24)
R18: (2 sc, dec) x 6 (18)
Fasten off, leave long tail for sewing head. Stuff firmly.
Shirt Detail (Collar/Hem): Join green yarn to the front loops of R10. sl st around loosely to create the bottom hem of the shirt.
Legs (Make 2 – Start with Orange)
R1: 6 sc in magic ring (6)
R2: inc in every st (12)
R3: (1 sc, inc) x 6 (18)
R4-R5: sc in each st around (18)
R6: (dec) x 4, 10 sc (14) [Shapes the foot]
R7: (dec) x 2, 10 sc (12)
Change to Grey (Pants)
R8-R11: sc in each st around (12)
Stuff the foot firmly, stuff the leg lightly. Fasten off.
Arms (Make 2 – Start with Orange)
R1: 6 sc in magic ring (6)
R2: (1 sc, inc) x 3 (9)
R3: sc in each st around (9)
Change to Green (Sleeves)
R4: BLO sc in each st around (9)
R5-R9: sc in each st around (9)
Stuff lightly. Fasten off.
Ruffle Detail: Join green yarn to FL of R4, (ch 2, sl st in next st) around to create the ruffled sleeve cuff seen in the muse’s image.
Tail (In Orange)
R1: 4 sc in magic ring (4)
R2: (1 sc, inc) x 2 (6)
R3: (1 sc, inc) x 3 (9)
R4: (2 sc, inc) x 3 (12)
R5-R7: sc in each st around (12)
R8: (2 sc, dec) x 3 (9)
R9: (1 sc, dec) x 3 (6)
Fasten off. Stuff lightly.
The Analyst’s Tie (In Dark Blue)
Row 1: Ch 12.
Row 2: Starting 2nd ch from hook, sl st 11.
Fasten off. Using Pink embroidery thread, stitch 3-4 small horizontal lines across the lower part of the tie.
Assembly & Final Touches
- Face Sculpting: Before attaching the muzzle, use a strand of orange yarn to “sculpt” the eye sockets. Enter through the neck opening, exit near the inner corner of the left eye, go across to the outer corner, back in, and pull tight. Repeat for the right eye. This sinks the eyes and creates that sweet, worried expression.
- Muzzle: Sew the white muzzle between the eyes, centred on rounds 14-18 of the head.
- Ears: Sew ears on top of the head at R6, slightly curved forward.
- Limbs: Sew the legs to the bottom sides of the body so he sits in a “V” shape. Sew arms to R16 of the body.
- Eyebrows: Using black thread, embroider thin, slanted eyebrows above the eyes. Slanting them upwards in the center adds to the “innocent/worried” charm.
- Dressing: Sew the tie to the center of the chest.
Tips & FAQs
My velvet yarn is “worming” (loops coming loose). Velvet is slippery! Ensure your tension is tighter than usual, or switch to a hook one size smaller (e.g., 3.5mm).
Can I brush the yarn? No, velvet yarn does not fluff up like acrylic; it might bald if brushed. Keep it smooth.
How do I make him sit up straight? Because the head is large, ensure the neck is stuffed very firmly. You can also place a small pouch of weighted beads in the bottom of the body before stuffing.
A Final Word
And there he is—Finnegan, ready to analyze your spreadsheets or simply offer a soft paw of support. Remember, imperfection is part of the charm; if his tie is slightly crooked, it only means he was in a rush to meet you.
Happy stitching, my creative friend.
— Patricia

