
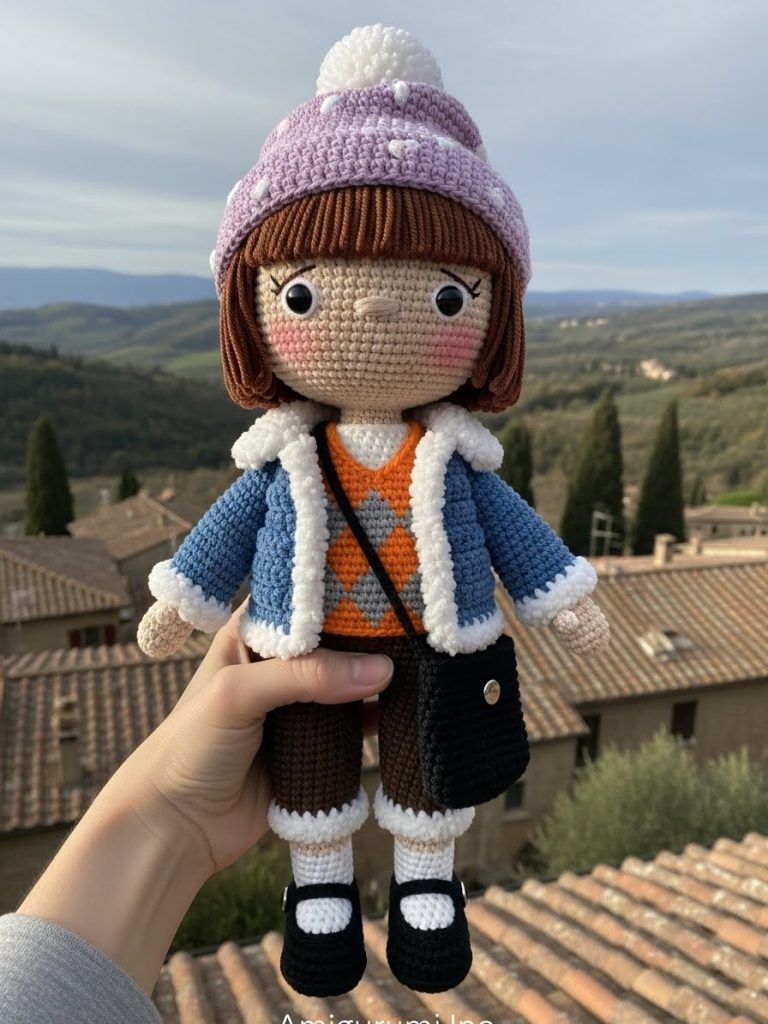
My dearest maker, welcome back to the worktable. Today we embrace the joy of miniature tailoring. Harper is not merely a doll; she is a study in texture and layering—a challenge to your skills in colorwork and shaping. Let us breathe life into this stylish little soul, one stitch at a time.
About This Creation & Angle We often focus solely on the doll’s form, but Harper demands we become fashion designers. The “Mastering Miniature Fashion” angle of this project focuses on how to create clothing that fits snugly without adding bulk. We will be using tapestry crochet for her argyle vest and texture-work for her “denim” jacket. This project moves beyond basic amigurumi shapes into the world of structured garment construction.
Project Snapshot: 📊 Difficulty: Intermediate to Advanced (Colorwork required) ⏰ Est. Time: 15–20 Hours 📏 Size: Approx. 28cm (11 inches) standing “Fashion is art you can hold, and today, we sculpt it with yarn.” — Patricia
Materials & Tools Needed 🧶 Yarn: Sport or DK weight cotton.
- Skin Tone: Beige/Fair
- Hair: Cocoa Brown
- Clothing: Denim Blue, Burnt Orange, Charcoal Grey, Lilac, White (smooth), White (fluffy/sherpa), Dark Brown, Black. 🪡 Hook: 2.00mm or 2.25mm (keep tension tight) ✨ Other Materials: 10mm Safety Eyes, Fiberfill, 1mm craft wire (for neck stability), Tapestry needle, 2 small buttons (for pants), cardboard (for shoe soles).
Abbreviations & Stitches Used ch: chain sl st: slip stitch sc: single crochet hdc: half double crochet inc: increase dec: decrease BLO: back loop only FLO: front loop only
The Complete Harper Pattern
I. The Head (Work in Spiral) We begin with the seat of her expression. We want a youthful shape with low, wide cheeks. 🧶 Using Skin Tone R1: 6 sc in magic ring (6) R2: inc in each st (12) R3: (sc 1, inc) x 6 (18) R4: (sc 2, inc) x 6 (24) R5: (sc 3, inc) x 6 (30) R6: (sc 4, inc) x 6 (36) R7: (sc 5, inc) x 6 (42) R8: (sc 6, inc) x 6 (48) R9: (sc 7, inc) x 6 (54) R10: (sc 8, inc) x 6 (60) R11–R21: sc in each st around (60) [11 rounds of height] R22: (Cheek Shaping) sc 18, (inc, sc 1) x 6, sc 6, (sc 1, inc) x 6, sc 12 (72) R23–R26: sc in each st around (72) R27: (sc 10, dec) x 6 (66) R28: (sc 9, dec) x 6 (60) Insert safety eyes between R21 and R22, about 11 stitches apart. R29: (sc 8, dec) x 6 (54) R30: (sc 7, dec) x 6 (48) R31: (sc 6, dec) x 6 (42) R32: (sc 5, dec) x 6 (36) R33: (sc 4, dec) x 6 (30) R34: (sc 3, dec) x 6 (24) R35: (sc 2, dec) x 6 (18) Stuff firmly. Fasten off, leave long tail.
II. The Arms (Make 2) 🧶 Using Skin Tone R1: 5 sc in MR (5) R2: inc in each st (10) R3–R5: sc in each st (10) R6: dec, sc 8 (9) R7–R22: sc in each st (9) Stuff hands lightly, leave arms empty. Fasten off.
III. Legs & Body 🧶 Start with White (Socks) R1: 6 sc in MR (6) R2: inc in each st (12) R3: (sc 1, inc) x 6 (18) R4–R6: sc in each st (18) R7: (Heel) sc 6, ch 1 turn, sc 6 back, turn, sc 6 back. Continue to R8 working in round again. R8: sc around (18) R9–R12: sc in each st (18) Switch to Skin Tone R13–R28: sc in each st (18) Fasten off first leg. Make second leg, do not fasten off. R29: (Joining) ch 3, join to first leg with sl st. sc 18 around first leg, sc 3 on ch, sc 18 around second leg, sc 3 on other side of ch (42) R30–R38: sc in each st (42) Switch to White (Undershirt) R39: sc in each st (42) R40: (sc 5, dec) x 6 (36) R41–R45: sc in each st (36) R46: (sc 4, dec) x 6 (30) R47–R50: sc in each st (30) R51: Join arms: sc 5 (body), sc 9 (around arm 1), sc 10 (body), sc 9 (around arm 2), sc 5 (body). R52: (sc 3, dec) around (shoulders) R53: (sc 2, dec) around R54: (sc 1, dec) around R55: sc around (neck) Stuff firmly. Insert wire support.
IV. The Wardrobe Elements
The Trousers 🧶 Dark Brown Yarn Make 2 pant legs: ch 20, join. Work sc in rounds for 15 rounds. Join legs with ch 2. Work body of pants for 8 rounds. sc 1 row, ch 1, turn (to make fly opening). Work 2 more rows flat. Fasten off. Add buttons. Fold up cuffs at the bottom.
The Argyle Vest 🧶 Orange & Grey (Carry yarn behind) R1: ch 36, join. R2–R8: Work in sc, following graph: 3 orange, 3 grey. Shift pattern by 1 st each round to create diamonds. R9: Split for armholes. Work front panel and back panel separately for 4 rows. R10: Join at shoulders. Finish with a round of sl st in Grey around edges.
The Denim Jacket 🧶 Blue Yarn Work in rows (Top down raglan style). R1: ch 24. R2: (sc 3, inc) across. R3: (sc 4, inc) across. R4: Separate sleeves: sc front, skip for sleeve, sc back, skip for sleeve, sc front. R5–R12: sc across. R13: (Collar) Attach White Fluffy yarn to neck. sc around neck opening. R14: (Cuffs) Attach White Fluffy yarn to sleeve ends. sc around.
The Hat 🧶 Lilac Yarn R1: 60 sc foundation chain, join. R2: Ribbing (FPdc, BPdc) around for 3 rows. R3–R15: sc around. Every 3rd stitch, switch to White for 1 stitch to make “polka dots.” R16: dec around until closed. Add large white pom-pom.
V. Assembly & Final Touches
- Face: Embroider nose between eyes (R21). Add blush under eyes. Sew wig cap (Brown) to head. Attach hair strands one by one for the bangs and bob cut.
- Clothes: Dress the doll. Pants first, then vest, then jacket.
- Shoes: Make black ovals slightly larger than feet. Work up 3 rows. Add a strap across the instep. Button detail on side.
- Bag: Rectangle of black sc folded in half. Chain a long strap.
Tips & FAQs
- Color Changes: When working the vest, change color on the last yarn-over of the previous stitch for clean lines.
- The Hair: For a natural bob, cut the strands longer than needed, attach them, and then give her a haircut with sharp scissors.
A Final Word There she stands—Harper. Notice how the layers give her history, a personality. You have not just followed a pattern; you have constructed a character. I would be delighted to see how you style her.

