My dearest creator, welcome back. We are about to channel the spirit of the Night Fury, a creature of shadow and speed, yet here we shall render him in the softest velvet to capture his gentle heart. It is a joy to share this design with you; working with black yarn requires patience and good light, but the result is a companion of unparalleled loyalty.
About This Creation & Angle
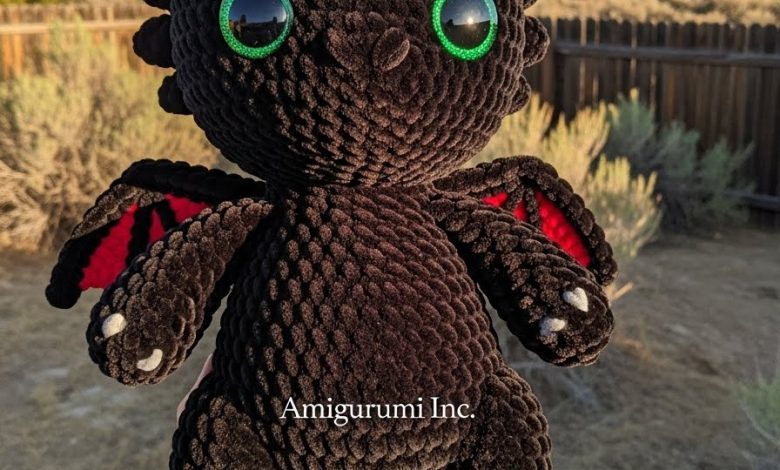
This project balances the “Echo of Youth”—with a large, expressive head—against the sleek, aerodynamic nature of a dragon. By utilizing chenille yarn, we transform a fearsome beast into a tactile comfort object. This is not merely a toy; it is a keepsake for those who dream of flying. We pay special homage to his story by including his signature prosthetic tail fin, a reminder that our imperfections make us unique.
Project Snapshot:
📊 Difficulty: Intermediate (Working with dark yarn & assembly)
⏰ Est. Time: 5–7 Hours
📏 Size: Approx. 14–15cm tall (Sitting)
“Shadows are not always to be feared; sometimes they are just waiting to be hugged.” — Patricia Poltera
Materials & Tools Needed
🧶 Yarn: Super Bulky Chenille/Velvet Yarn in Black (approx. 100g). Small amount of Red Chenille for the left tail fin.
🪡 Hook: 4.0 mm or 4.5 mm (We want tight stitches so the stuffing does not peek through the dark fabric).
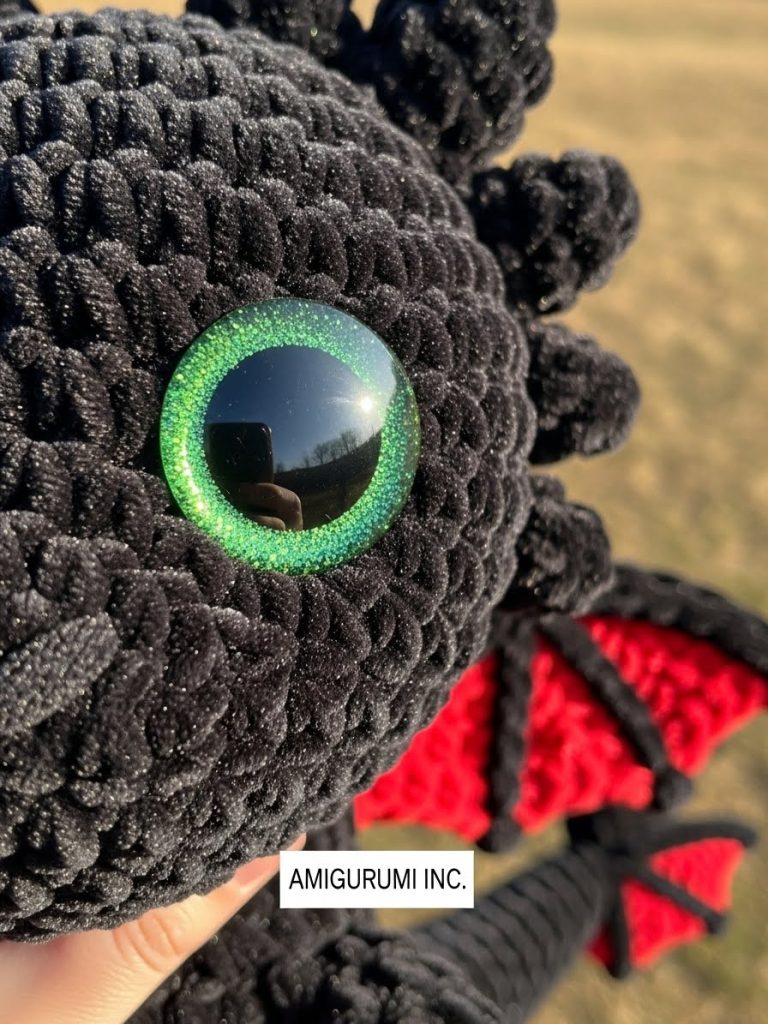
✨ Other Materials: 20mm Green Glitter Safety Eyes, Polyester Fiberfill, Yarn Needle (large eye), Stitch Markers, Sewing Pins.
Abbreviations & Stitches Used
ch: chain
sl st: slip stitch
sc: single crochet
inc: increase (2 sc in one stitch)
dec: decrease (invisible decrease preferred)
BLO: back loop only
The Complete Night Fury Pattern
Component 1: The Head (The Seat of Intelligence)
We begin here to establish the “Gaze of Innocence.” Stuff firmly as you go to shape the broad snout.
Rnd 1: Start 6 sc in a magic ring. (6)
Rnd 2: Inc in every st around. (12)
Rnd 3: (Sc 1, inc) x 6. (18)
Rnd 4: (Sc 2, inc) x 6. (24)
Rnd 5: (Sc 3, inc) x 6. (30)
Rnd 6: (Sc 4, inc) x 6. (36)
Rnd 7: (Sc 5, inc) x 6. (42)
Rnd 8–15: Sc in each st around. (42) [8 rounds of straight working to build the height]
Rnd 16: (Sc 5, dec) x 6. (36)
Rnd 17: (Sc 4, dec) x 6. (30)
➡️ Artisan’s Note: Insert the Safety Eyes between Rnds 12 and 13, spacing them about 7–8 stitches apart. They should be wide-set.
Rnd 18: (Sc 3, dec) x 6. (24)
Rnd 19: (Sc 2, dec) x 6. (18)
Rnd 20: (Sc 1, dec) x 6. (12)
Fasten off, leaving a long tail for sewing.
Component 2: The Body (The Core)
Rnd 1: Start 6 sc in a magic ring. (6)
Rnd 2: Inc in every st around. (12)
Rnd 3: (Sc 1, inc) x 6. (18)
Rnd 4: (Sc 2, inc) x 6. (24)
Rnd 5: (Sc 3, inc) x 6. (30)
Rnd 6–10: Sc in each st around. (30)
Rnd 11: (Sc 3, dec) x 6. (24)
Rnd 12–13: Sc in each st around. (24)
Rnd 14: (Sc 2, dec) x 6. (18)
Rnd 15: Sc in each st around. (18)
Fasten off. Stuff the body firmly, focusing on the bottom to give him a stable sitting posture.
Component 3: The Crown (Ears & Horns)
We need variety here to create his iconic silhouette.
Large Ears (Make 2):
Rnd 1: 4 sc in MR. (4)
Rnd 2: (Sc 1, inc) x 2. (6)
Rnd 3: (Sc 2, inc) x 2. (8)
Rnd 4: (Sc 3, inc) x 2. (10)
Rnd 5: Sc around. (10)
Fasten off. Do not stuff.
Medium Horns (Make 2):
Rnd 1: 4 sc in MR. (4)
Rnd 2: (Sc 1, inc) x 2. (6)
Rnd 3: Sc around. (6)
Fasten off. Do not stuff.
Small Nubs (Make 2):
Rnd 1: 5 sc in MR. (5)
Rnd 2: Sc around. (5)
Fasten off. Do not stuff.
Component 4: Legs (Make 4)
Arms (Front Legs):
Rnd 1: 6 sc in MR. (6)
Rnd 2: (Sc 1, inc) x 3. (9)
Rnd 3–7: Sc around. (9)
Fasten off, leave tail. Stuff lightly.
Legs (Hind Legs – Slightly Thicker):
Rnd 1: 6 sc in MR. (6)
Rnd 2: Inc in every st around. (12)
Rnd 3–7: Sc around. (12)
Fasten off, leave tail. Stuff lightly.
Component 5: The Wings (Make 2)
Worked flat in rows to create a bat-like texture.
Row 1: Ch 7, start in 2nd ch from hook. Sc 6. Ch 1, turn. (6)
Row 2: Sc 4, leave last 2 stitches unworked (creates the jagged edge). Ch 1, turn. (4)
Row 3: Sc 4. Ch 1, turn. (4)
Row 4: Sc 2, leave last 2 stitches unworked. Ch 1, turn. (2)
Row 5: Sc 2. (2)
Fasten off. Leave a long tail to sew the straight edge to the back.
Component 6: The Tail & Fins
Main Tail:
Rnd 1: 4 sc in MR. (4)
Rnd 2: (Sc 1, inc) x 2. (6)
Rnd 3–5: Sc around. (6)
Rnd 6: (Sc 2, inc) x 2. (8)
Rnd 7–12: Sc around. (8)
Fasten off. Stuff lightly.
Tail Fins (Make 1 Black, Make 1 Red):
Row 1: Ch 4, start in 2nd ch. Sc 3. Ch 1, turn.
Row 2: Sc 1, hdc 1, dc 1.
Fasten off.
[📸 PASTE IMAGE 3 HERE: Detail/Variation B]
Assembly & Final Touches
- The Crown: Pin the Large Ears to the sides of the head (Rnds 6–8). Place the Medium Horns slightly behind and above them. Place the Small Nubs at the very top back of the head. Sew securely.
- Head to Body: Align the neck openings. Use a whip stitch to secure the heavy head to the body. You may need to add extra stuffing in the neck area to prevent wobbling.
- Limbs: Sew the Hind Legs to the bottom sides of the body so he sits in a “tripod” stance with the tail. Sew the Arms below the neck, angling them slightly inward as if he is reaching out.
- Wings: Attach the straight edge of the wings to the upper back, spaced about 4 stitches apart.
- Tail: Sew the tail to the lower back/bottom center. Sew the Red Fin to the left side of the tail tip and the Black Fin to the right side.
Tips & FAQs
❓ “I can’t see my stitches with the black yarn!”
💡 Patricia’s Wisdom: Use a bright reading lamp directly over your hands. Alternatively, work with a white towel on your lap to create contrast through the stitch holes. You can also “feel” for the V-shape of the next stitch rather than looking for it.
❓ “The head is too heavy.”
💡 Ensure you support the neck with ample stuffing. You can also insert a small rolled-up piece of felt or a “stuffing bomb” (stuffing inside a pantyhose) into the neck for a stiffer spine.
A Final Word
There you have it—a shadow brought to life. He may be small, but his presence is mighty. May he guard your shelves and bring a touch of magic to your home. Craft on, my friend.