Welcome to the atelier, my dear creator. Today, we are not just making a toy; we are breathing life into an icon of elegance and mystique.
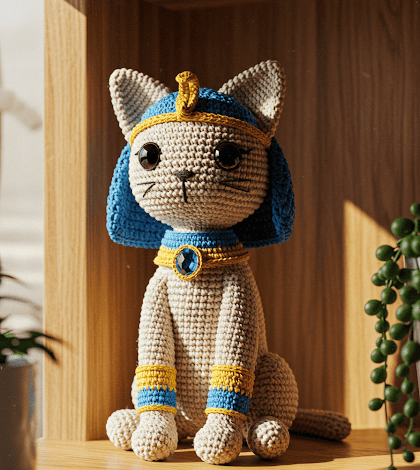
Together, we will breathe life into Bastet the Serene, a beautiful guardian inspired by the revered cats of ancient Egypt, a quiet companion crafted by your own two hands.
🎨 About This Creation & Our Angle
From the moment I envisioned this piece, I knew it had to be more than just a pattern. It had to be an heirloom. This is the heart of our “Regal Serenity” angle—we are crafting a piece that feels both ancient and alive.
The thematic core is woven into her elegant posture and golden details. From her proud, long neck to her majestic embroidered eyes, Bastet is the embodiment of a goddess.
This is the perfect project to create as a breathtaking, high-end piece of home decor or as a treasured, mystical guardian. It’s a creation that holds a story.
| Attribute | Detail |
| 🧶 Difficulty | Intermediate |
| 🕒 Est. Time | 6-8 Hours |
| 📏 Size | Approx. 10 inches (25 cm) tall |
Patience is key, my dear creator. Don’t be afraid to undo and redo a stitch until it feels perfect to you—this is where the soul enters the creation.
🧶 Materials & Tools Needed
To weave this creation, you will need to gather a few simple treasures. I recommend a worsted weight yarn to create a sturdy, elegant form.
- Yarn: Worsted Weight (e.g., a cotton blend) in the following colors:
- Soft Cream (Main Body)
- Lapis Blue (Ears & Accents)
- Rich Black (Collar)
- Hook: 2.75mm (C)
- Embroidery Floss: Metallic Gold, Lapis Blue, and Black.
- Other Materials: Fiberfill stuffing, tapestry needle, scissors, stitch marker, optional pipe cleaner/wire for tail.
[Image Placeholder: A flat-lay of the cream, lapis blue, and gold yarns with a 2.75mm hook]
💡 Abbreviations & Stitches Used
We will be working in continuous rounds. Use a stitch marker to mark the first stitch of each round.
- ch – chain
- sl st – slip stitch
- sc – single crochet
- inc – single crochet increase (2 sc in one stitch)
- dec – invisible decrease (sc 2 stitches together through front loops)
- MR – magic ring
- (…) – stitches in this round
📖 The Complete Bastet the Serene Pattern
Let us begin our creation. We will start with the head and body, which are worked separately to create a proud, elegant neck.
Head (in Soft Cream)
Stuff firmly as you go.
- Rnd 1: Start with 6 sc in a MR (6 sts)
- Rnd 2: [inc] x6 (12 sts)
- Rnd 3: [sc, inc] x6 (18 sts)
- Rnd 4: [2 sc, inc] x6 (24 sts)
- Rnd 5: [3 sc, inc] x6 (30 sts)
- Rnd 6: [4 sc, inc] x6 (36 sts)
- Rnd 7: [5 sc, inc] x6 (42 sts)
- Rnd 8: [6 sc, inc] x6 (48 sts)
- Rnd 9-16: (8 rounds) sc in all 48 stitches (48 sts)
- Rnd 17: [6 sc, dec] x6 (42 sts)
- Rnd 18: [5 sc, dec] x6 (36 sts)
- Rnd 19: [4 sc, dec] x6 (30 sts)
- Embroider the eyes between Rnds 13 and 16, about 8 stitches apart.
- Rnd 20: [3 sc, dec] x6 (24 sts)
- Rnd 21: [2 sc, dec] x6 (18 sts)
- Rnd 22: [sc, dec] x6 (12 sts)
- Finish stuffing. Fasten off, leaving a long tail for sewing.
Body (in Soft Cream)
Stuff firmly as you go, ensuring a flat base for sitting.
- Rnd 1: Start with 6 sc in a MR (6 sts)
- Rnd 2: [inc] x6 (12 sts)
- Rnd 3: [sc, inc] x6 (18 sts)
- Rnd 4: [2 sc, inc] x6 (24 sts)
- Rnd 5: [3 sc, inc] x6 (30 sts)
- Rnd 6: [4 sc, inc] x6 (36 sts)
- Rnd 7-12: (6 rounds) sc in all 36 stitches (36 sts)
- Rnd 13: [4 sc, dec] x6 (30 sts)
- Rnd 14-16: (3 rounds) sc in all 30 stitches (30 sts)
- Rnd 17: [3 sc, dec] x6 (24 sts)
- Rnd 18-22: (5 rounds) sc in all 24 stitches (24 sts)
- This forms the chest/neck area.
- Rnd 23: [2 sc, dec] x6 (18 sts)
- Rnd 24-25: (2 rounds) sc in all 18 stitches (18 sts)
- Fasten off. Stuff the body very firmly.
Artisan’s Note: To keep the neck stable, stuff the body and neck area *very* firmly. For extra support, you can insert a wooden dowel that runs from the mid-body up to the base of the head.
Ears (Make 2, in Lapis Blue)
- Rnd 1: Start with 4 sc in a MR (4 sts)
- Rnd 2: [sc, inc] x2 (6 sts)
- Rnd 3: [2 sc, inc] x2 (8 sts)
- Rnd 4: [3 sc, inc] x2 (10 sts)
- Rnd 5: [4 sc, inc] x2 (12 sts)
- Rnd 6: [5 sc, inc] x2 (14 sts)
- Fasten off, leaving a long tail for sewing. Do not stuff.
Front Legs & Paws (Make 2, start in Soft Cream)
- Rnd 1: Ch 5. In 2nd ch from hook: inc, 2 sc, 4 sc in last ch. Work down other side: 2 sc, inc in last ch. (12 sts)
- Rnd 2: [inc] x2, 2 sc, [inc] x4, 2 sc, [inc] x2 (20 sts)
- Rnd 3-4: (2 rounds) sc in all 20 stitches (20 sts)
- Rnd 5: 6 sc, [dec] x4, 6 sc (16 sts)
- Rnd 6: 4 sc, [dec] x4, 4 sc (12 sts)
- Stuff the paw firmly.
- Rnd 7-14: (8 rounds) sc in all 12 stitches (12 sts)
- Rnd 15: (Change to Lapis Blue) sc in all 12 stitches (12 sts)
- Rnd 16-17: (2 rounds) sc in all 12 stitches (12 sts)
- Lightly stuff the leg. Fasten off, leaving a long tail for sewing.
Tail (Start in Lapis Blue)
- Rnd 1: Start with 6 sc in a MR (6 sts)
- Rnd 2-5: (4 rounds) sc in all 6 stitches (6 sts)
- Rnd 6: (Change to Soft Cream) sc in all 6 stitches (6 sts)
- Rnd 7-25: (19 rounds) sc in all 6 stitches (6 sts)
- Fasten off, leaving a long tail for sewing. Insert optional wire and stuff lightly.
Collar (in Rich Black)
- Row 1: Ch 35. In 2nd ch from hook, sc 34. Ch 1, turn. (34 sts)
- Row 2-4: (3 rows) sc 34. Ch 1, turn. (34 sts)
- Fasten off, leaving a very long tail for sewing and embroidery.
🧵 Assembly & Final Touches
Here is where our creation truly comes to life. Be patient with your needle; this is where the soul is added.
- Body & Head: Sew the head securely onto the body opening (Rnd 25).
- Ears: Flatten the ears and sew them to the top of the head, between Rnds 4 and 10.
- Legs: Sew the front legs to the sides of the body, just below the neck, so the paws face forward.
- Tail: Attach the tail to the lower back of the body. If wired, pose it in a graceful curve.
- The Face (The Gaze of Innocence): This is the most important step.
- Eyes: Using Lapis Blue floss, satin-stitch the almond-shaped eyes. Outline them with Black floss.
- Nose: Embroider a small triangle nose with Black floss.
- Collar & Gems: Wrap the black collar around the neck and stitch it closed.
- Using Metallic Gold floss, embroider a decorative pattern on the collar.
- Create a teardrop-shaped “gem” with Lapis Blue floss on the front of the collar.
- Embroider a small golden circle on the forehead for the third eye.
- Final Details: Use Gold floss to add two lines to each Lapis Blue leg “bracer.” Use Black floss to add three straight stitches on each paw for toes.
💡 Tips & Frequently Asked Questions
Q: How do I get the embroidered eyes just right?
A: Patience is key. I recommend lightly sketching the almond shape on the head first. Use Lapis Blue floss to fill the shape with satin stitches, then outline it in black. Don’t be afraid to redo a stitch until it feels perfect.
Q: Any tips for keeping the neck stable?
A: The elegant long neck is a key feature. To ensure it remains proud, stuff the body and neck *very* firmly. Compacting the fiberfill is essential. For extra stability, you can also insert a wooden dowel that runs from the mid-body up to the head.
Q: Is the wire in the tail necessary?
A: It is optional but highly recommended for that final artistic flourish. A wired tail can be posed into a graceful curve that enhances the cat’s regal silhouette. Just be sure to fold the ends of the wire over to prevent sharp points.
💌 A Final Word
Your beautiful heirloom is complete. You have woven more than yarn; you have woven a story. Your Egyptian Cat is now complete, a silent guardian imbued with a regal serenity that could only have come from your hands.
May this little creation bring a whisper of magic to whomever it is destined for. Well done, my dear creator. Truly well done.