Dear creator,
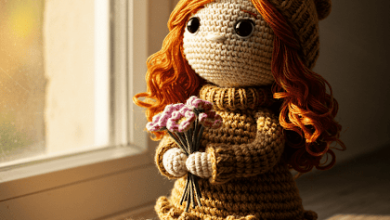
Some dolls are just for playing, and others are meant to look pretty on a shelf. But this one? She’s just… sweet. She’s the kind of project you finish, set down, and then find yourself smiling at every time you walk past her.
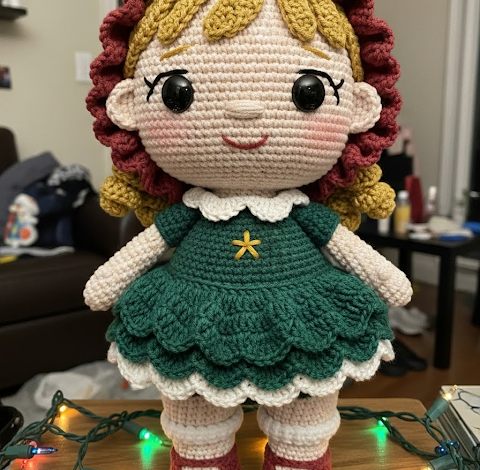
About This Creation & Our Angle
Meet my newest Christmas project! 🎄 Most dolls are either for play or for show, but this little girl is just pure comfort. She’s about 14cm tall—the perfect size to tuck onto a shelf where she can just sit and look cute.
I designed her with a soft, rounded shape and wide eyes because I wanted her to feel as gentle as possible. No stress, no rushed stitches, just a calm little soul. She’d be so sweet as a handmade gift or a nursery keepsake. If you’ve been wondering what to do with that special ‘good’ yarn you’ve been saving, this is a great way to use it!
Project Snapshot:
📊 Difficulty: Intermediate
⏰ Est. Time: 10 to 14 hours
📏 Size: Approx. 24 cm tall
“Cuteness is not excess decoration. It is restraint, proportion, and kindness in form.” — Patricia
Materials & Tools Needed
🧶 Yarn: DK weight cotton yarn in cream, evergreen, muted berry red, soft gold, and white
🪡 Hook: 2.5 mm
✨ Other Materials:
Safety eyes 8 mm
Polyester fiberfill
Embroidery thread in brown and pink
Stitch marker
Tapestry needle
Thin wire for glasses or embroidered glasses alternative

Abbreviations & Stitches Used
We will be working in continuous rounds.
📍 ch: chain
📍 sl st: slip stitch
📍 sc: single crochet
📍 inc: increase
📍 dec: invisible decrease
📍 BLO: back loop only
📍 FLO: front loop only
The Complete Christmas Doll Pattern
The Head
Using cream yarn.
Rnd 1: 6 sc in magic ring (6 sts)
Rnd 2: inc in each st (12 sts)
Rnd 3: (sc, inc) x6 (18 sts)
Rnd 4: (2 sc, inc) x6 (24 sts)
Rnd 5: (3 sc, inc) x6 (30 sts)
Rnd 6: (4 sc, inc) x6 (36 sts)
Rnd 7: (5 sc, inc) x6 (42 sts)
Rnd 8: (6 sc, inc) x6 (48 sts)
Rnd 9: (7 sc, inc) x6 (54 sts)
Rnd 10–16: sc around (54 sts)
Insert safety eyes between Rnds 11 and 12, 8 stitches apart.
Rnd 17: (7 sc, dec) x6 (48 sts)
Rnd 18: (6 sc, dec) x6 (42 sts)
Rnd 19: (5 sc, dec) x6 (36 sts)
Rnd 20: (4 sc, dec) x6 (30 sts)
Rnd 21: (3 sc, dec) x6 (24 sts)
Begin stuffing firmly, shaping cheeks outward.
Rnd 22: (2 sc, dec) x6 (18 sts)
Rnd 23: (sc, dec) x6 (12 sts)
Rnd 24: dec x6 (6 sts)
Fasten off and close.
Artisan’s Note: Do not under-stuff the cheeks. This is where her sweetness lives.
Hair Cap
Using soft gold yarn.
Rnd 1: 6 sc in magic ring (6 sts)
Rnd 2: inc x6 (12 sts)
Rnd 3: (sc, inc) x6 (18 sts)
Rnd 4: (2 sc, inc) x6 (24 sts)
Rnd 5: (3 sc, inc) x6 (30 sts)
Rnd 6: (4 sc, inc) x6 (36 sts)
Fasten off, leave long tail for sewing.
Front Hair Strands (Make 2)
Ch 10.
Row 1: sc in 2nd ch from hook, sc across (9 sts)
Row 2: inc, sc 7, inc (11 sts)
Fasten off.
Back Hair Section
Attach yarn at back of hair cap.
Work 18 chains evenly spaced, each chain 12 long.
Sl st back into base between each chain.
Bonnet
Using muted berry red yarn.
Rnd 1: 6 sc in magic ring (6 sts)
Rnd 2: inc x6 (12 sts)
Rnd 3: (sc, inc) x6 (18 sts)
Rnd 4: (2 sc, inc) x6 (24 sts)
Rnd 5: (3 sc, inc) x6 (30 sts)
Rnd 6: (4 sc, inc) x6 (36 sts)
Rnd 7–10: sc around (36 sts)
Rnd 11: FLO (sc, inc) x18 (54 sts)
Rnd 12: (sl st, ch 2, 2 dc) in each st for ruffle effect.
Fasten off.
The Body
Using cream yarn.
Rnd 1: 6 sc in magic ring (6 sts)
Rnd 2: inc x6 (12 sts)
Rnd 3: (sc, inc) x6 (18 sts)
Rnd 4: (2 sc, inc) x6 (24 sts)
Rnd 5–8: sc around (24 sts)
Rnd 9: (4 sc, dec) x4 (20 sts)
Rnd 10–12: sc around (20 sts)
Stuff lightly.
Rnd 13: (3 sc, dec) x4 (16 sts)
Fasten off leaving opening for legs.
Skirt Base
Using evergreen yarn. Attach to BLO of Rnd 8 of body.
Rnd 1: inc in each st (48 sts)
Rnd 2: (3 sc, inc) x12 (60 sts)
Rnd 3: sc around (60 sts)
Skirt Ruffle Layer
Attach white yarn to FLO of skirt base.
Rnd 1: (sl st, ch 2, 2 dc) in each st.
Fasten off.
Arms (Make 2)
Using cream yarn.
Rnd 1: 6 sc in magic ring (6 sts)
Rnd 2: inc x6 (12 sts)
Rnd 3–6: sc around (12 sts)
Rnd 7: (2 sc, dec) x3 (9 sts)
Rnd 8–12: sc around (9 sts)
Lightly stuff and fasten off.
Legs (Make 2)
Using cream yarn.
Rnd 1: 6 sc in magic ring (6 sts)
Rnd 2: inc x6 (12 sts)
Rnd 3: (sc, inc) x6 (18 sts)
Rnd 4–6: sc around (18 sts)
Rnd 7: (4 sc, dec) x3 (15 sts)
Rnd 8–12: sc around (15 sts)
Stuff firmly.
Sock Cuffs (Make 2)
Attach white yarn to leg.
Rnd 1: FLO sc around (15 sts)
Rnd 2: (sl st, ch 1) loosely around.
Shoes (Make 2)
Using muted berry red yarn.
Rnd 1: 6 sc in magic ring (6 sts)
Rnd 2: inc x6 (12 sts)
Rnd 3: (sc, inc) x6 (18 sts)
Rnd 4–6: sc around (18 sts)
Fasten off.
Chest Star Appliqué
Using yellow yarn.
Ch 5, sl st into first ch.
Ch 2, sl st in ring, repeat 5 times.
Fasten off.

Assembly & Final Touches
Sew head securely to body, ensuring chin tilts slightly downward. Attach arms just below neckline. Sew legs flat so she can stand. Position hair first, then bonnet. Stitch star neatly onto chest. Embroider a tiny nose and curved smile. Add blush stitches last.
Tips & Frequently Asked Questions
Q: Can I use acrylic yarn?
A: Yes, but cotton holds shape better and enhances softness.
Q: How do I make her even cuter?
A: Lower the eyes by one round and widen the spacing by one stitch.
A Final Word
This doll is not meant to impress quickly. She is meant to stay. Take your time. Let her grow slowly in your hands. That is where her charm is born.