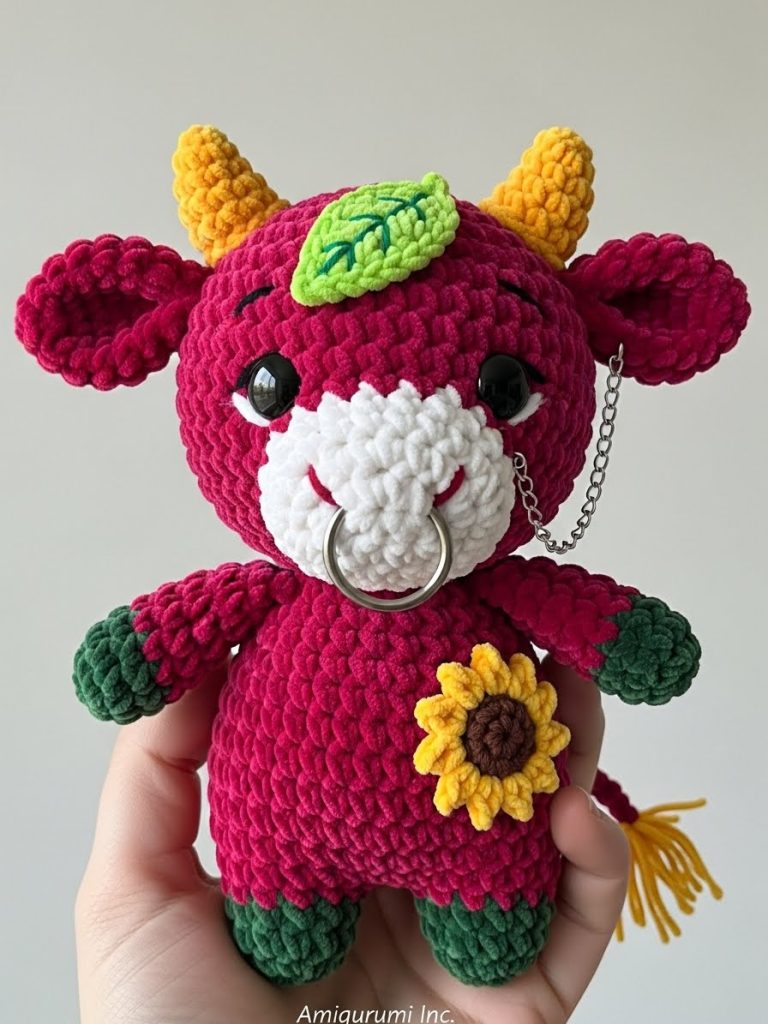
My dearest maker, welcome back to the worktable. Today we are not just looping yarn; we are sculpting attitude. Flora is a special creature—a soft, huggable friend who decided she needed a bit of armor against the world. That silver chain against the plush raspberry chenille creates a texture contrast that is simply delicious to the touch and the eye. Let us begin this journey of softness and steel.
About This Creation & Angle
Flora represents the balance we all strive for: soft on the inside, but tough enough to handle the pasture. While most cow patterns aim for pure sugar, Flora brings spice. By combining the “Cottagecore” aesthetic of the sunflowers with the “Grunge” element of the chain and piercings, we tap into a very modern, eclectic vibe. This project is perfect for using up scrap yarn for the flowers and horns, while the main body serves as a study in working with super-bulky velvet textures without losing stitch definition.
Project Snapshot:
📊 Difficulty: Intermediate (Working with Chenille requires feeling your stitches)
⏰ Est. Time: 6–8 Hours
📏 Size: Approx. 28cm (11 inches) tall
“Softness needs a little steel to protect it.” — Patricia Poltera
Materials & Tools Needed
🧶 Yarn: Super Bulky (Size 6) Chenille yarn.
Main Color: Raspberry Pink (approx. 150g) Contrast Color A: Dark Moss Green (Hooves/Leaves) Contrast Color B: White (Muzzle/Tail/Horns) Contrast Color C: Golden Yellow (Sunflowers/Horn Tips) Contrast Color D: Dark Brown (Sunflower Centers)
🪡 Hook: 5.0mm (or size needed to achieve tight tension with no holes)
✨ Other Materials:
Polyfill stuffing Tapestry needle (large eye) White felt for eyes (or 20mm plastic safety eyes) Silver jump rings and a 15cm length of silver chain 10mm Silver hoop earring (for the nose)
Abbreviations & Stitches Used
ch: chain
sl st: slip stitch
sc: single crochet
inc: increase (2 sc in one stitch)
dec: decrease (sc 2 together)
hdc: half double crochet
dc: double crochet
The Complete Flora Pattern
Component 1: The Head (Worked in Raspberry Pink)
We begin at the nose and work backward to the crown. The shaping here is crucial for that “baby face” look.
Row 1: 6 sc in a magic ring (6)
Row 2: inc in each st around (12)
Row 3: 🧶 sc 1, inc 🧶 repeat around (18)
Row 4: 🧶 sc 2, inc 🧶 repeat around (24)
Row 5: 🧶 sc 3, inc 🧶 repeat around (30)
Row 6: 🧶 sc 4, inc 🧶 repeat around (36)
Row 7: 🧶 sc 5, inc 🧶 repeat around (42)
Row 8: 🧶 sc 6, inc 🧶 repeat around (48)
Rows 9–18: sc in each st around (48) (10 rounds of even working to build the height)
Row 19: 🧶 sc 6, dec 🧶 repeat around (42)
Row 20: 🧶 sc 5, dec 🧶 repeat around (36)
Row 21: 🧶 sc 4, dec 🧶 repeat around (30)
Row 22: 🧶 sc 3, dec 🧶 repeat around (24)
Artisan’s Note: Begin stuffing firmly here. Focus on the cheeks to ensure they are round and full.
Row 23: 🧶 sc 2, dec 🧶 repeat around (18)
Row 24: 🧶 sc 1, dec 🧶 repeat around (12)
Row 25: dec around (6)
Fasten off and weave in the end.
Component 2: The Muzzle (Worked in White)
Row 1: Chain 6. Start in second ch from hook.
Row 2: inc, sc 3, 4 sc in last ch. Turn to work on the other side of the chain: sc 3, inc (14)
Row 3: inc, sc 5, inc, inc, sc 5, inc (18)
Row 4: sc 1, inc, sc 5, inc, sc 2, inc, sc 5, inc, sc 1 (22)
Row 5–6: sc in each st around (22)
Fasten off, leaving a long tail for sewing.
Component 3: The Body (Worked in Raspberry Pink)
We want a heavy, seated look, so the base is wide.
Row 1: 6 sc in a magic ring (6)
Row 2: inc in each st around (12)
Row 3: 🧶 sc 1, inc 🧶 repeat around (18)
Row 4: 🧶 sc 2, inc 🧶 repeat around (24)
Row 5: 🧶 sc 3, inc 🧶 repeat around (30)
Row 6: 🧶 sc 4, inc 🧶 repeat around (36)
Row 7: 🧶 sc 5, inc 🧶 repeat around (42)
Rows 8–15: sc in each st around (42) (8 rounds)
Row 16: 🧶 sc 5, dec 🧶 repeat around (36)
Row 17–18: sc in each st around (36)
Row 19: 🧶 sc 4, dec 🧶 repeat around (30)
Row 20: sc in each st around (30)
Row 21: 🧶 sc 3, dec 🧶 repeat around (24)
Row 22: sc in each st around (24)
Row 23: 🧶 sc 2, dec 🧶 repeat around (18)
Fasten off, leaving a long tail for sewing to the head. Stuff firmly, keeping the bottom flat so she sits well.
Component 4: The Chunky Legs (Make 4) (Start in Dark Moss Green)
Row 1: 6 sc in a magic ring (6)
Row 2: inc in each st around (12)
Row 3: 🧶 sc 1, inc 🧶 repeat around (18)
Row 4: In Back Loops Only (BLO), sc around (18) (This creates the hoof definition)
Row 5: sc around in both loops (18)
Change color to Raspberry Pink
Rows 6–10: sc in each st around (18)
Row 11: 🧶 sc 1, dec 🧶 repeat around (12)
Fasten off. Stuff firmly.
Component 5: The Ears (Make 2) (Worked in Raspberry Pink)
Row 1: 6 sc in a magic ring (6)
Row 2: 🧶 sc 2, inc 🧶 repeat around (8)
Row 3: 🧶 sc 3, inc 🧶 repeat around (10)
Row 4: 🧶 sc 4, inc 🧶 repeat around (12)
Row 5: 🧶 sc 5, inc 🧶 repeat around (14)
Row 6–8: sc in each st around (14)
Row 9: dec, sc 10, dec (12)
Row 10: dec, sc 8, dec (10)
Fasten off. Do not stuff. Flatten the ear.
Component 6: The Horns (Make 2) (Start in Golden Yellow)
Row 1: 4 sc in a magic ring (4)
Row 2: 🧶 sc 1, inc 🧶 repeat (6)
Change color to White
Row 3: sc in each st around (6)
Row 4: 🧶 sc 2, inc 🧶 repeat (8)
Row 5: sc in each st around (8)
Fasten off. Stuff lightly.
Component 7: Sunflower Appliqués (Make 2) (Start in Dark Brown)
Center: Row 1: 6 sc in a magic ring. Sl st to join.
Petals (Change to Golden Yellow): Row 2: 🧶 ch 2, 2 dc in same st, ch 2, sl st in same st, sl st into next st 🧶 Repeat 6 times for 6 petals. Fasten off, leave tail for sewing.
Component 8: Leaves (Make 2) (Lime/Olive Green)
Row 1: Ch 6. sc in 2nd ch from hook, hdc, dc, hdc, sc, sl st. Turn to other side: sc, hdc, dc, hdc, sc, sl st to join. Fasten off.

Assembly & Final Touches
- ➡️ Face: Sew the white muzzle onto the lower center of the face (rounds 12-18). Embroider a “Y” shape for the nose using dark brown yarn on the muzzle.
- ➡️ Eyes: Cut oval shapes from white felt (or use large safety eyes) and glue/sew them above the muzzle. They should be wide-set.
- ➡️ Ears & Horns: Sew horns at the top of the head (round 4-5). Sew ears just below the horns, slightly further back so they flop forward.
- ➡️ Body: Sew the head to the body. Attach legs: two angled forward at the bottom front, two angled outward at the bottom back.
- ➡️ Flora: Sew the green leaves to the forehead. Sew the sunflowers to the hips/flanks of the body.
- ➡️ The Edge: Insert the silver hoop earring through the septum of the muzzle. Attach the silver chain to the earring, drape it across the cheek, and sew the other end near the base of the ear.
Tips & FAQs
Q: My chenille yarn is shedding/worming. How do I stop it? A: Chenille can be tricky! Try going down a hook size to keep stitches tight. If the end is shedding, quickly burn the tip with a lighter to seal it (be careful!).
Q: Is this safe for children? A: Due to the chain and jewelry, this is an “art toy” or display piece. If making for a small child, crochet a grey chain using yarn and skip the metal hoop.
A Final Word
You have done it. You have birthed a creature of contrast and beauty. Flora is not just a cow; she is a statement that we can be blooming and bold all at once. I cannot wait to see your herd come to life.
Yours in stitches, Patricia