My dearest maker, welcome back to the worktable. Today, we are sculpting with pure softness to create a friend who is as stylish as she is snuggly. There is a profound joy in working with velvet yarn; it forgives our tension and rewards us with a texture that demands to be held. Let us begin this journey of transforming simple loops into a character full of personality.
About This Creation
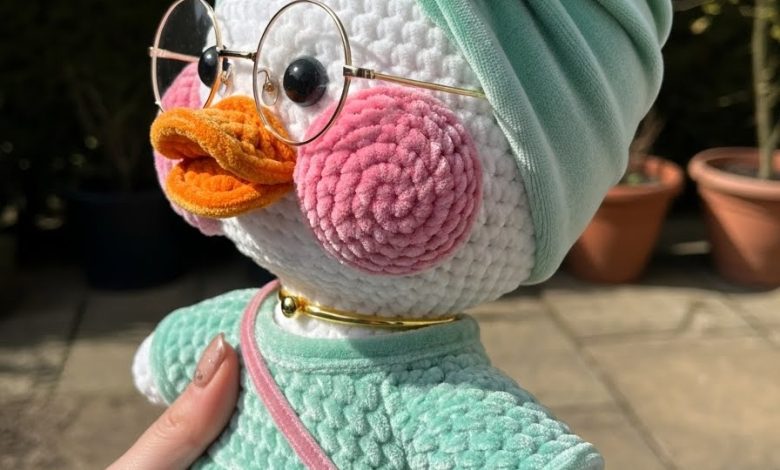
Daisy is inspired by the global “cheeky duck” trend that has captivated hearts with its rotund shape and customizable fashion. However, we are elevating the standard design. Instead of simple felt cutouts, we are crocheting every element to ensure longevity and an heirloom quality.
This project is designed for those who wish to master working with chenille or velvet yarn. The dense pile of the yarn hides stitches, creating a seamless, fabric-like finish. Daisy is not just a toy; she is a decor statement, perfect for gifting to teens or placing on a modern nursery shelf.
Project Snapshot
📊 Difficulty: Intermediate (Working with velvet yarn requires feeling stitches rather than seeing them)
⏰ Est. Time: 4–6 Hours
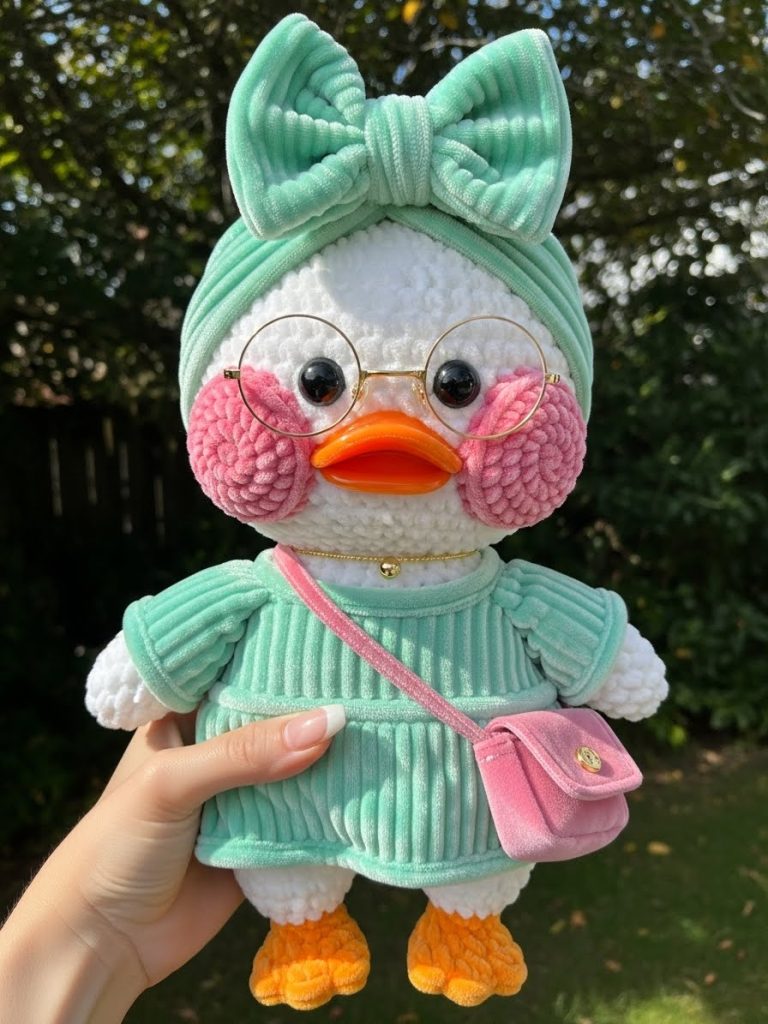
📏 Size: Approximately 30cm (12 inches) tall
“We do not rush the stitch; we allow the plush to reveal itself round by round.” — Patricia
Materials & Tools Needed
🧶 Yarn: Super Bulky (Category 6) Chenille/Velvet yarn. ➡️ White (approx. 100g) for Head/Body ➡️ Mint Green (approx. 50g) for Dress and Turban ➡️ Soft Pink (approx. 20g) for Cheeks and Bag ➡️ Bright Orange (approx. 15g) for Beak
🪡 Hook: 4.5mm or 5.0mm (depending on your tension; we want a tight fabric)
✨ Other Materials: ➡️ 12mm or 14mm Black Safety Eyes ➡️ Polyester Fiberfill stuffing ➡️ Tapestry needle (large eye for bulky yarn) ➡️ Craft wire (18 gauge) for the glasses (optional) ➡️ Two decorative heart buttons/charms for the turban ➡️ Stitch markers
Abbreviations & Stitches Used
ch: chain
sl st: slip stitch
sc: single crochet
inc: increase (2 sc in one stitch)
dec: decrease (invisible decrease preferred)
hdc: half double crochet
dc: double crochet
BLO: back loop only
The Complete Daisy the Daydream Duck Pattern
The Head (In White)
We begin with the focal point: that wonderfully oversized head.
R1: Start 6 sc in a magic ring (6)
R2: Inc in every st around (12)
R3: (Sc 1, inc) repeat 6 times (18)
R4: (Sc 2, inc) repeat 6 times (24)
R5: (Sc 3, inc) repeat 6 times (30)
R6: (Sc 4, inc) repeat 6 times (36)
R7: (Sc 5, inc) repeat 6 times (42)
R8: (Sc 6, inc) repeat 6 times (48)
R9–18: Sc in each st around (48) [10 rounds of height for that chubby look]
Insert safety eyes between R13 and R14, roughly 9 stitches apart.
R19: (Sc 6, dec) repeat 6 times (42)
R20: (Sc 5, dec) repeat 6 times (36)
R21: (Sc 4, dec) repeat 6 times (30)
R22: (Sc 3, dec) repeat 6 times (24)
Stuff the head firmly now. Focus on the cheeks to keep the shape round.
R23: (Sc 2, dec) repeat 6 times (18)
R24: (Sc 1, dec) repeat 6 times (12)
R25: Dec around (6). Fasten off and weave in end.
The Cheeks (Make 2, In Pink)
These must be large to create the “flushed” effect.
R1: Start 6 sc in a magic ring (6)
R2: Inc in every st around (12)
R3: (Sc 1, inc) repeat 6 times (18)
R4: Sc in each st around (18)
Fasten off, leaving a long tail for sewing.
The Pouty Beak (In Orange)
We construct this to look like a duck’s bill, not a simple cone.
R1: Ch 6. Start in 2nd ch from hook.
R2: Sc 4, 3 sc in last ch. Rotate to work on the other side of the chain. Sc 3, inc in last st (12)
R3: Inc, sc 3, inc x 3, sc 3, inc x 2 (18)
R4–5: Sc in each st around (18)
R6: (Sc 4, dec) repeat 3 times (15)
Fasten off, leave a tail. Stuff lightly before sewing.
The Body (In White)
R1: Start 6 sc in a magic ring (6)
R2: Inc in every st around (12)
R3: (Sc 1, inc) repeat 6 times (18)
R4: (Sc 2, inc) repeat 6 times (24)
R5: (Sc 3, inc) repeat 6 times (30)
R6: (Sc 4, inc) repeat 6 times (36)
R7–11: Sc in each st around (36) [This creates the “pot belly”]
R12: (Sc 4, dec) repeat 6 times (30)
R13–14: Sc in each st around (30)
R15: (Sc 3, dec) repeat 6 times (24)
R16: Sc in each st around (24)
R17: (Sc 2, dec) repeat 6 times (18)
Fasten off, leaving a long tail to sew to the head. Stuff firmly, especially the neck area to support the large head.
The Wings (Make 2, In White)
R1: Start 6 sc in a magic ring (6)
R2: Inc in every st around (12)
R3–6: Sc in each st around (12)
R7: (Sc 4, dec) repeat 2 times (10)
R8: Sc in each st around (10)
Flatten the top and sc through both layers to close. Do not stuff.
The Legs (Make 2, In White)
R1: Start 6 sc in a magic ring (6)
R2: Inc in every st around (12)
R3: (Sc 3, inc) repeat 3 times (15)
R4–8: Sc in each st around (15)
Stuff firmly. Fasten off.
The Couture: Mint Green Sweater Dress
Worked top-down so it can be removable.
R1: Ch 25, join to form a circle (ensure it fits over the body before joining).
R2: Ch 1, sc in each st around (25)
R3: (Sc 4, inc) repeat 5 times (30)
R4–8: Sc in each st around (30)
R9: Texture Round Work this round in BLO (Back Loop Only) to create a ridge. Sc around (30).
R10: The Ruffle Hem Ch 2, 2 dc in each st around. Join.
Fasten off and weave in ends.
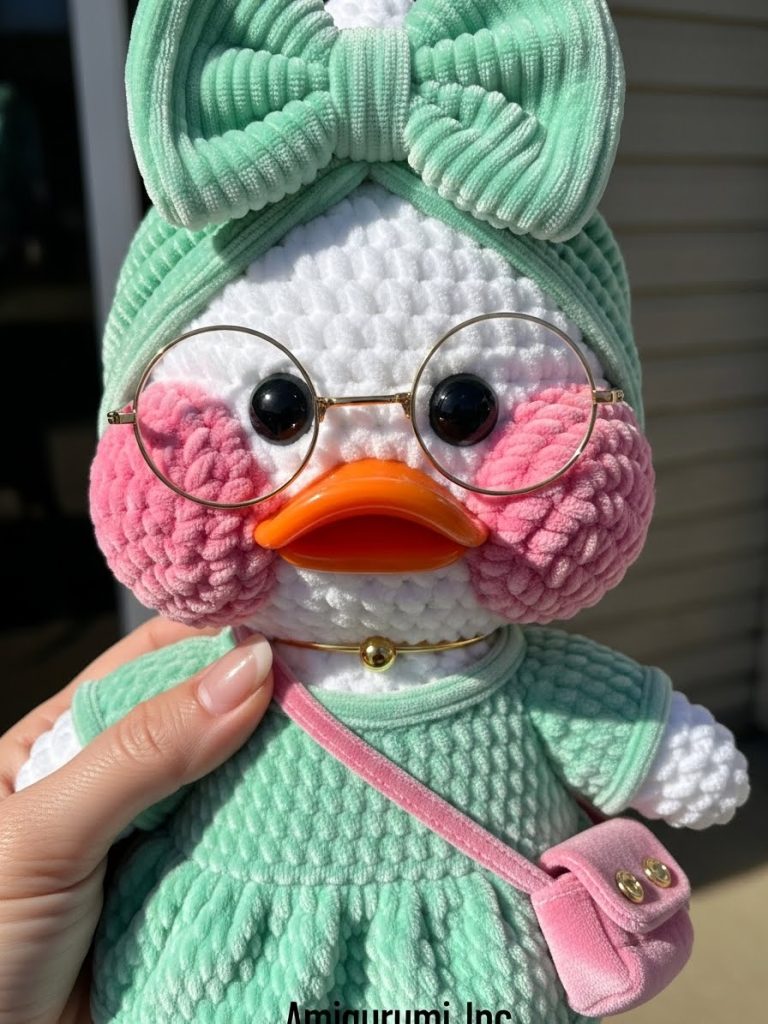
The Couture: Turban Headwrap (Mint Green)
The Band:
R1: Ch 10.
R2: Hdc in 2nd ch from hook and each across (9). Ch 1, turn.
R3–30: Hdc in BLO across (9). Repeat until the strip stretches comfortably around the head.
Join the two short ends with sl st to form a ring.
The Giant Bow:
R1: Ch 16.
R2: Hdc in 3rd ch from hook and across. Ch 2, turn.
R3–10: Hdc in each st across.
Fasten off. Pinch the center of the rectangle and wrap yarn tightly around it to create the bow shape. Sew this to the turban band.
The Couture: Pink Satchel
R1: Ch 6.
R2: Sc in 2nd ch and across (5). Ch 1, turn.
R3–10: Sc across (5).
Fold the bottom up to create a pocket and sew the sides.
Strap: Ch 40 (or length needed to cross body), attach to sides of bag.
Assembly & Final Touches
- Facial Features: Sew the orange beak centered between the eyes. Sew the large pink cheeks directly next to the beak, slightly overlapping the bottom of the eyes for maximum cuteness.
- Body: Sew the head to the body securely. Use extra yarn to stabilize the neck if needed.
- Limbs: Sew legs to the bottom of the body. Sew wings to the sides, just below the neck seam.
- Styling: Dress Daisy in her sweater. Place the turban on her head (covering the lack of ears!). Bend your craft wire into two circles connected by a bridge to make glasses, or purchase doll glasses.
Tips & FAQs
My velvet yarn is “worming” (loops pulling out). Try using a smaller hook size and tighter tension. Velvet yarn is slippery; a tighter gauge holds it in place.
Can I wash Daisy? Because of the safety eyes and wire glasses, spot cleaning is best. If she is for a small child, embroider the eyes and skip the wire glasses.
A Final Word
You have now brought a little bundle of joy into the world. Daisy is more than just a pattern; she is a canvas for your creativity. Change her sweater color, crochet her a scarf, or give her a different hat. The magic lies in the details you choose.
Happy stitching.


Thank you so much for sharing your patterns and tips. I have been working on some of them already. Thanks again. God bless and keep you