
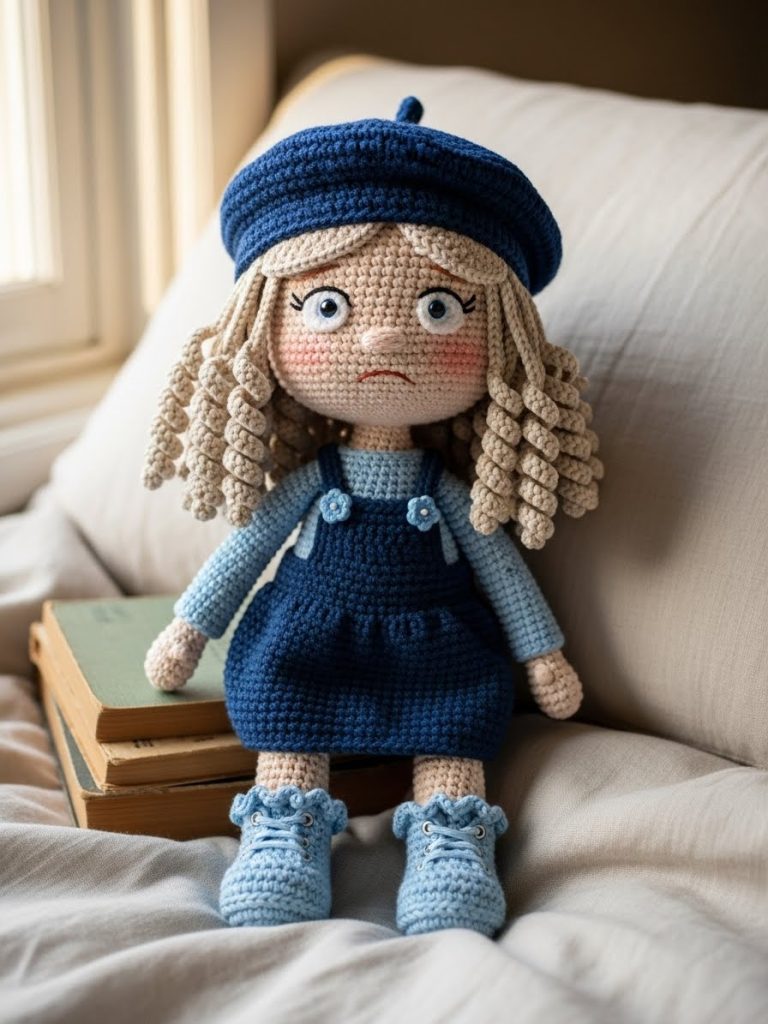
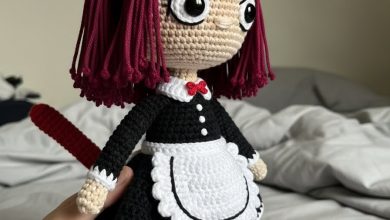
My dearest creator, welcome back to the workbench. Today we sculpt not just yarn, but a quiet personality. Amélie is a study in texture and gentle expression, a project that asks for your patience but rewards you with a companion of profound depth. She is waiting for your hands to bring her story to life, one stitch at a time.
About This Creation & Angle
Amélie represents the intersection of classic toy-making and modern fiber art. While many dolls focus solely on shape, this project emphasizes the “Touch Experience”—from the springy resilience of her corkscrew curls to the structured ribbing of her beret.
Commercially, dolls with removable wardrobes and high-texture hair command significantly higher value in the finished goods market. This project is designed to expand your portfolio by teaching you advanced layering techniques and facial sculpting that moves beyond the standard sphere.
Project Snapshot:
📊 Difficulty: Intermediate to Advanced (Focus on Hair & Layering)
⏰ Est. Time: 12–16 Hours
📏 Size: Approx. 25cm (10 inches) tall
“The soul of the doll lies not in the perfection of the stitch, but in the asymmetry of the smile.” — Patricia
Materials & Tools Needed
🧶 Yarn: Sport or DK weight cotton blend. Colors: Porcelain (Skin), Sandy Beige (Hair), Navy Blue (Dress/Hat), Cloud Blue (Sweater/Boots).
🪡 Hook: 2.00mm (for doll) and 2.50mm (for clothes).
✨ Other Materials: 8mm Safety Eyes, long tapestry needle, dark brown embroidery thread, fiberfill, 2 small buttons (6mm), wire or dowel for neck support.

Abbreviations & Stitches Used
ch: chain
sl st: slip stitch
sc: single crochet
inc: increase (2 sc in one st)
dec: decrease (invisible decrease preferred)
hdc: half double crochet
blo: back loop only
flo: front loop only
The Complete Amélie Project
Component 1: The Expressive Head
Artisan’s Note: We use the ‘Gaze of Innocence’ structure here. The eyes are placed lower than standard patterns to create a larger forehead, simulating early childhood proportions.
R1: Start with skin color. 6 sc in a magic ring (6)
R2: Inc in every st (12)
R3: (Sc 1, inc) x6 (18)
R4: (Sc 2, inc) x6 (24)
R5: (Sc 3, inc) x6 (30)
R6: (Sc 4, inc) x6 (36)
R7: (Sc 5, inc) x6 (42)
R8: (Sc 6, inc) x6 (48)
R9: (Sc 7, inc) x6 (54)
R10–R18: Sc in each st around (54) [9 rounds for forehead height]
R19 (Cheek Shaping): Sc 18, (inc, sc 1) x3, sc 6, (sc 1, inc) x3, sc 18 (60)
R20–R23: Sc in each st around (60)
R24: Insert safety eyes between R19 and R20, leaving 10 stitches between them. Ensure they align with the cheek increases.
R25: Sc 18, (dec, sc 1) x3, sc 6, (sc 1, dec) x3, sc 18 (54)
R26: (Sc 7, dec) x6 (48)
R27: (Sc 6, dec) x6 (42)
R28: (Sc 5, dec) x6 (36)
R29: (Sc 4, dec) x6 (30)
R30: (Sc 3, dec) x6 (24)
R31: (Sc 2, dec) x6 (18)
R32: (Sc 1, dec) x6 (12). Stuff firmly, focusing on cheeks. Do not fasten off; continue to neck if making one piece, or leave tail for sewing.
Component 2: Arms (Make 2)
R1: Skin color. 5 sc in MR (5)
R2: Inc in every st (10)
R3–R5: Sc in each st around (10)
R6 (Thumb): 3 dc cluster in first st, sc 9 (10)
R7: Dec, sc 8 (9)
R8–R10: Sc in each st around (9)
R11: Change to Cloud Blue (Sweater). Sc in each st (9)
R12: BLO, inc in every st (18) [This creates the puffy sleeve cuff]
R13–R15: Sc in each st around (18)
R16: (Sc 1, dec) x6 (12)
R17–R20: Sc in each st around (12)
R21: Dec x6 (6). Fasten off, leave tail.
Component 3: Legs & Body
Artisan’s Note: We shape the knees to ensure she sits naturally.
Legs (Make 2)
R1: Skin color. Ch 6. Start in 2nd ch from hook. Sc 4, 3 sc in last ch. Turn to other side. Sc 3, inc (12)
R2: Inc, sc 3, inc x3, sc 3, inc x2 (18)
R3–R6: Sc in each st around (18)
R7 (Heel): Sc 6, dec x3, sc 6 (15)
R8: Sc 6, 3 sc tog (decrease 3 sts into 1), sc 6 (13)
R9–R14: Sc in each st around (13)
R15 (Knee): Sc 4, inc x3, sc 6 (16)
R16: Sc 4, dec x3, sc 6 (13)
R17–R22: Sc in each st around (13)
R23: Sc around. Fasten off first leg. Do not fasten off second leg.
Body Connection
R24: From second leg, ch 3, join to first leg. Sc 13 (leg 1), sc 3 (on chain), sc 13 (leg 2), sc 3 (on chain) (32)
R25: (Sc 7, inc) x4 (36)
R26–R30: Sc in each st around (36) [Hips]
R31: Change to Cloud Blue (Sweater base). Sc in each st (36)
R32: BLO sc in each st (36) [Leave front loops for skirt attachment if desired, though we are making a separate dress]
R33–R38: Sc in each st around (36)
R39: (Sc 4, dec) x6 (30)
R40: Sc in each st around (30)
R41: (Sc 3, dec) x6 (24)
R42: (Sc 2, dec) x6 (18)
R43: Sc in each st around. Insert neck support/stuffing.
R44: (Sc 1, dec) x6 (12). Fasten off.
Component 4: The Corkscrew Wig
Artisan’s Note: This method consumes yarn but provides volume without gaps.
R1: Sandy Beige. 6 sc in MR (6)
R2: Inc in every st (12)
R3: (Sc 1, inc) x6 (18)
R4: (Sc 2, inc) x6 (24)
R5: (Sc 3, inc) x6 (30)
R6: (Sc 4, inc) x6 (36)
R7 (The Curls): Ch 35. Start in 2nd ch from hook. Sc 2 in each ch all the way back to base. Sl st into next stitch of R6. Repeat around.
Fasten off. Sew wig cap to head, arranging curls to frame the face.
Component 5: The Overall Dress
Worked in Navy Blue.
R1 (Skirt Waist): Ch 40, join to form ring. Sc in each st (40)
R2: (Sc 9, inc) x4 (44)
R3–R10: Sc in each st around (44) [Length of skirt]
R11: (Sc 10, inc) x4 (48)
R12: Sc around. Fasten off skirt bottom.
Bib:
Join yarn at R1 of skirt waist.
Row 1: Sc 12, ch 1, turn.
Row 2–6: Sc 12, ch 1, turn.
Row 7: Sc 2, ch 4 (buttonhole), skip 2, sc 4, ch 4 (buttonhole), skip 2, sc 2. Fasten off.
Straps: Ch 20 (measure against doll), sew to back of skirt waist. Cross them at the back and attach buttons to the front of straps to align with buttonholes.
Component 6: The Parisian Beret
Worked in Navy Blue.
R1: 6 sc in MR (6)
R2: Inc in every st (12)
R3: (Sc 1, inc) x6 (18)
R4: (Sc 2, inc) x6 (24)
R5: (Sc 3, inc) x6 (30)
R6: (Sc 4, inc) x6 (36)
R7: (Sc 5, inc) x6 (42)
R8: (Sc 6, inc) x6 (48)
R9: (Sc 7, inc) x6 (54)
R10–R12: Sc in each st around (54)
R13: (Sc 7, dec) x6 (48)
R14: (Sc 6, dec) x6 (42)
R15 (Brim): Ch 1. FPdc, BPdc around. Join.
R16: Repeat ribbing. Fasten off.
Component 7: Ruffle Boots
Worked in Cloud Blue with Navy soles.
R1: Navy. Ch 6. Oval start (see Leg R1). (12)
R2: Inc, sc 3, inc x3, sc 3, inc x2 (18)
R3: BLO sc in each st around (18)
R4–R5: Sc in each st around (18)
R6: Sc 5, dec x4, sc 5 (14)
R7: Change to Cloud Blue. Sc around (14)
R8: FLO (Ch 3, sl st in next st) around to create ruffle. Fasten off.
Assembly & Final Touches
➡️ Face: Using dark brown thread, embroider eyebrows slanting slightly downwards at the outer edges to create the “worried/innocent” look. Embroider a small nose between the eyes using skin color yarn (pass over 2 stitches 3 times).
➡️ Blush: Apply cosmetic blush gently under the eyes and over the nose bridge.
➡️ Hair: Pin the wig cap so the hairline is high (Baby Schema). Sew firmly. Twist curls with your fingers to define them.
➡️ Dressing: Put on the dress, button the straps, and place the beret at a jaunty angle.
Tips & FAQs
Q: My head is wobbling.
A: Insert a rolled piece of felt or a glue stick tube (cleaned) inside the neck before stuffing to create a rigid spine.
Q: The curls are messy.
A: Wet the curls slightly with water and twist them in the direction of the stitch, then let them air dry to set the shape.
A Final Word
You have not just followed a pattern; you have birthed a character. Amélie is now ready to sit upon your shelf or be gifted to someone who appreciates the quiet beauty of handmade art. May your hook always find the next loop.
Could I have a copy of the pattern via email please. I find them difficult to find later . It’s the doll wearing the beret.