Dearest creator,
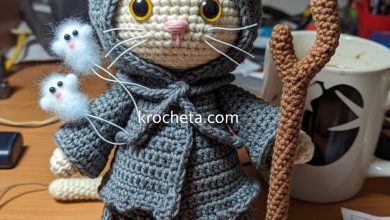
Welcome. In our hands, we hold not just yarn and hook, but the potential to create a soul. Today, we are not merely following a pattern; we are breathing life into a story—a quiet melody of friendship captured in stitches. This little songstress and her steadfast fox companion are waiting to be brought into the world, to become a cherished heirloom, a keeper of secrets, and a testament to the love woven into every loop.
Let us begin this beautiful work together.
Warmly,
Patricia
🎨 The Artisan’s Vision: Why This Project is Special
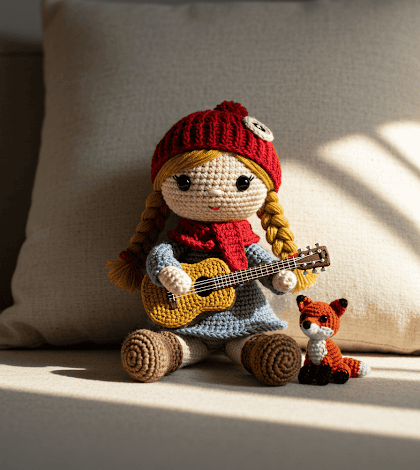
This creation is an exercise in narrative craft. We aim to capture the essence of ‘Whimsical Melody & Steadfast Friendship.’ The gentle curve of the songstress’s head, the careful crafting of her instrument, the alert posture of her fox—every detail is a word in a silent poem. This is your opportunity to create a character that feels alive, a piece of art that will be equally at home nestled on a nursery shelf or in the loving arms of a child.
🧶
DifficultyIntermediate
🕒
Time8-10 Hours
📏
SizeDoll: 14cm / 5.5″
✨ Skills You’ll Master (And Why They Matter)
With every heirloom, we grow as artisans. This project will allow you to refine several key skills:
- Detailed Accessory Creation: Crafting the miniature guitar is a rewarding challenge that teaches precision and shaping.
- Advanced Amigurumi Assembly: Learn to join limbs and shape the body for a professional, seamless finish.
- Removable Doll Clothing: Crocheting the tiny coat, hat, and scarf elevates your creation from a simple toy to an interactive treasure.
- Artful Hair Application: Master the technique of creating a hair cap and attaching individual strands for a lush, realistic hairstyle.
🧶 The Alchemist’s Trove: Materials & Tools
Yarn: DK weight (8-ply) cotton yarn is ideal for stitch definition.
- Light Peach (Skin)
- Black (Hair, Shoes)
- Bright Red (Hat, Scarf)
- Light Grey (Coat)
- Off-White (Trousers)
- Sky Blue (Shirt Collar)
- Burnt Orange (Fox)
- Creamy White (Fox Details)
- Mustard Yellow (Guitar Body)
- Dark Brown (Guitar Neck)
Hook: 2.5mm crochet hook (or size appropriate for your yarn).
Notions:
- High-quality polyester fiberfill for stuffing
- Black embroidery thread for facial features
- Yarn needle
- Scissors
- Stitch markers
- Two tiny 6mm buttons for the coat
💡 The Language of the Craft: Stitches & Abbreviations
We will work in continuous rounds unless stated otherwise. Use a stitch marker to mark the first stitch of each round.
- MR: Magic Ring
- sc: Single Crochet
- inc: Increase (2 sc in the same stitch)
- dec: Invisible Decrease (insert hook into front loops of next 2 stitches, yarn over, pull through both loops, yarn over, pull through 2 loops)
- sl st: Slip Stitch
- ch: Chain
- hdc: Half Double Crochet
- dc: Double Crochet
- BLO: Back Loop Only
- FLO: Front Loop Only
- […]: Repeat instructions in brackets for the specified number of times
- (…): Total number of stitches in the round
💡 The Artisan’s Advisor: Pro Tips & FAQs
How do I make the guitar flat and sturdy?▼
The pattern calls for making two identical flat panels for the guitar body. For added rigidity, you can trace the shape onto a thin piece of plastic canvas (like those used for needlepoint) or stiff felt, cut it slightly smaller than the crocheted piece, and sandwich it between the two panels before you crochet them together around the edge. This gives the guitar a wonderful, lasting structure. What is the best way to attach the hair?▼
We will first create a “hair cap” that is sewn directly onto the head. This provides a clean base and ensures no scalp shows through. Then, we will attach individual strands of yarn to the cap, focusing on the hairline and part. This method, while meticulous, yields a beautiful, full, and secure head of hair that can be styled into our signature pigtails. Can I use safety eyes for this doll?▼
Absolutely. While embroidery offers a softer, heirloom feel, safety eyes are a wonderful option. If you choose them, I recommend 8mm or 9mm eyes. You must insert them into the head *before* you finish stuffing and closing it. A good placement is typically between rounds 14 and 15 of the head pattern, about 8 stitches apart.
The full, step-by-step pattern begins below.

📖 Woven into Being: The Complete Little Songstress Pattern
Head (Light Peach Yarn)
Rnd 1: Start with 6 sc in a MR (6)
Rnd 2: [inc] 6 times (12)
Rnd 3: [sc, inc] 6 times (18)
Rnd 4: [2 sc, inc] 6 times (24)
Rnd 5: [3 sc, inc] 6 times (30)
Rnd 6: [4 sc, inc] 6 times (36)
Rnd 7: [5 sc, inc] 6 times (42)
Rnd 8: [6 sc, inc] 6 times (48)
Rnd 9-16: sc in each stitch around (48) – 8 rounds
Rnd 17: [6 sc, dec] 6 times (42)
Rnd 18: [5 sc, dec] 6 times (36)
Rnd 19: [4 sc, dec] 6 times (30)
Rnd 20: [3 sc, dec] 6 times (24)
Begin stuffing the head firmly. Continue stuffing as you go.
Rnd 21: [2 sc, dec] 6 times (18)
Fasten off, leaving a long tail for sewing.
Legs (Start with Black) & Body (Change to Off-White, then Light Grey)
Make two legs. The second leg will continue on to form the body.
First Leg:
Rnd 1: (In Black) 6 sc in MR (6)
Rnd 2: [inc] 6 times (12)
Rnd 3: BLO sc in each stitch around (12)
Rnd 4: sc around (12)
Rnd 5: Change to Off-White. sc around (12)
Rnd 6-11: sc around (12) – 6 rounds. Stuff the leg firmly.
Fasten off and weave in the end.
Second Leg & Body:
Repeat Rnd 1-11 of the first leg, but do not fasten off. Stuff the second leg.
Rnd 12: Ch 3. Join with a sl st to the first leg (any stitch is fine). sc in the same stitch and in the next 11 stitches around the first leg. sc in each of the 3 chains. sc in the 12 stitches of the second leg. sc in the other side of the 3 chains. (30)
Rnd 13-18: sc in each stitch around (30) – 6 rounds
Rnd 19: [3 sc, dec] 6 times (24)
Rnd 20: Change to Light Grey. sc around (24)
Rnd 21-26: sc around (24) – 6 rounds
Rnd 27: [2 sc, dec] 6 times (18)
Rnd 28: sc around (18)
Stuff the body firmly. Fasten off.
Arms (Make 2, Light Peach Yarn)
Rnd 1: Start with 6 sc in a MR (6)
Rnd 2: [sc, inc] 3 times (9)
Rnd 3-12: sc in each stitch around (9) – 10 rounds
Stuff lightly, leaving the top third unstuffed. Fasten off, leaving a long tail for sewing.
Coat (Light Grey Yarn)
Worked in rows, then joined.
Row 1: Ch 25, sc in 2nd ch from hook and across. Ch 1, turn (24)
Row 2-4: sc across. Ch 1, turn (24)
Row 5: (Armholes) 4 sc, ch 5, skip 4 sts, 8 sc, ch 5, skip 4 sts, 4 sc. Ch 1, turn (26)
Row 6-12: sc across. Ch 1, turn (26)
At the end of row 12, do not turn. Ch 1 and sc evenly around the entire coat opening (down one side, across the bottom, up the other side). In Sky Blue, sl st around the collar area to create a shirt detail. Fasten off and weave in ends.
Hat (Bright Red Yarn)
Rnd 1: 8 hdc in a MR (8)
Rnd 2: [hdc inc] 8 times (16)
Rnd 3: [hdc, hdc inc] 8 times (24)
Rnd 4: [2 hdc, hdc inc] 8 times (32)
Rnd 5: [3 hdc, hdc inc] 8 times (40)
Rnd 6: [4 hdc, hdc inc] 8 times (48)
Rnd 7-10: BLO hdc around (48)
Rnd 11-12: sc around (48)
Fasten off, weave in ends.
Scarf (Bright Red Yarn)
Ch 61, hdc in 3rd ch from hook and across. Fasten off. Cut small strands of yarn and add tassels to each end.
The Little Fox (Burnt Orange & Creamy White)
Head/Body (Start with Burnt Orange):
Rnd 1: 6 sc in MR (6)
Rnd 2: [inc] 6 times (12)
Rnd 3: [sc, inc] 6 times (18)
Rnd 4: Change to Creamy White. [2 sc, inc] 6 times (24)
Rnd 5-7: sc around (24)
Rnd 8: [2 sc, dec] 6 times (18)
Rnd 9: Change to Burnt Orange. sc around (18)
Rnd 10-12: sc around (18)
Stuff head and body firmly.
Rnd 13: [sc, dec] 6 times (12)
Rnd 14: [dec] 6 times (6)
Fasten off, sew remaining hole closed.
Ears (Make 2, Burnt Orange): 4 sc in MR, ch 1. Fasten off leaving tail to sew.
Tail (Start with Creamy White):
Rnd 1: 4 sc in MR (4)
Rnd 2: [sc, inc] 2 times (6)
Rnd 3: Change to Burnt Orange. sc around (6)
Rnd 4: [2 sc, inc] 2 times (8)
Rnd 5: sc around (8). Fasten off leaving tail to sew. Stuff lightly.
🧵 The Final Flourish: Assembly & Embellishment
Patience, dear creator. This is where the true magic happens.
- Doll Assembly: Sew the head to the body. Sew the arms to the sides of the body, just below the neck opening.
- Hair: Create a hair cap in black yarn (repeat rounds 1-6 of the Hat pattern). Sew this cap onto the doll’s head. Cut many strands of black yarn (approx. 20cm long). Fold each strand in half, and using your hook, pull the loop through a stitch on the hair cap and pull the tails through the loop to secure. Repeat until the hair is full. Style into two low pigtails and trim.
- Face: Using black embroidery thread, embroider eyes over round 14, about 7 stitches apart. Add a small nose and a hint of a mouth.
- Coat Details: Sew the two tiny buttons onto the front of the coat.
- Fox Assembly: Sew the ears to the top of the fox’s head. Sew the tail to the lower back. Use black thread to embroider a nose and closed, happy eyes.
- Guitar: The pattern for the guitar is a work of art in itself and will be released in our premium collection. For this free version, you can create a simplified version by crocheting two flat figure-8 panels in Mustard Yellow, sandwiching a sturdy insert, and single-crocheting around the edge in Dark Brown. Add a long rectangle for the neck. Use white yarn to embroider the strings.
💌 From Patricia’s Hook & Heart: A Final Word
You have done it. You have taken simple strands of fiber and transformed them into a character with a story to tell. This little songstress is now a part of your own story, a tangible piece of your creative spirit. May she bring a quiet song and a gentle joy wherever she finds her home. You are a true alchemist of the craft.