Welcome to the worktable, my friend. Today we shape shadow and light into a form of pure comfort. This project is dear to my heart because it combines the structural simplicity of flat crochet with the tactile joy of mixed media. It is a perfect study in contrast—deep black yarn meeting soft fabric. Let us begin.
About This Creation & Angle
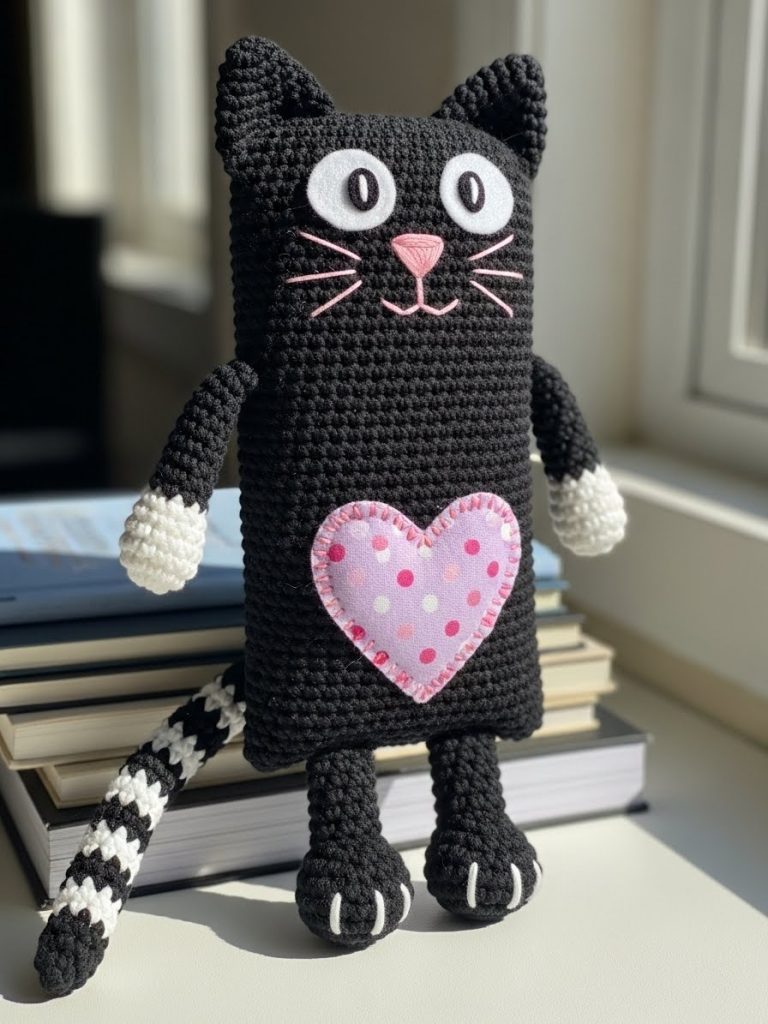
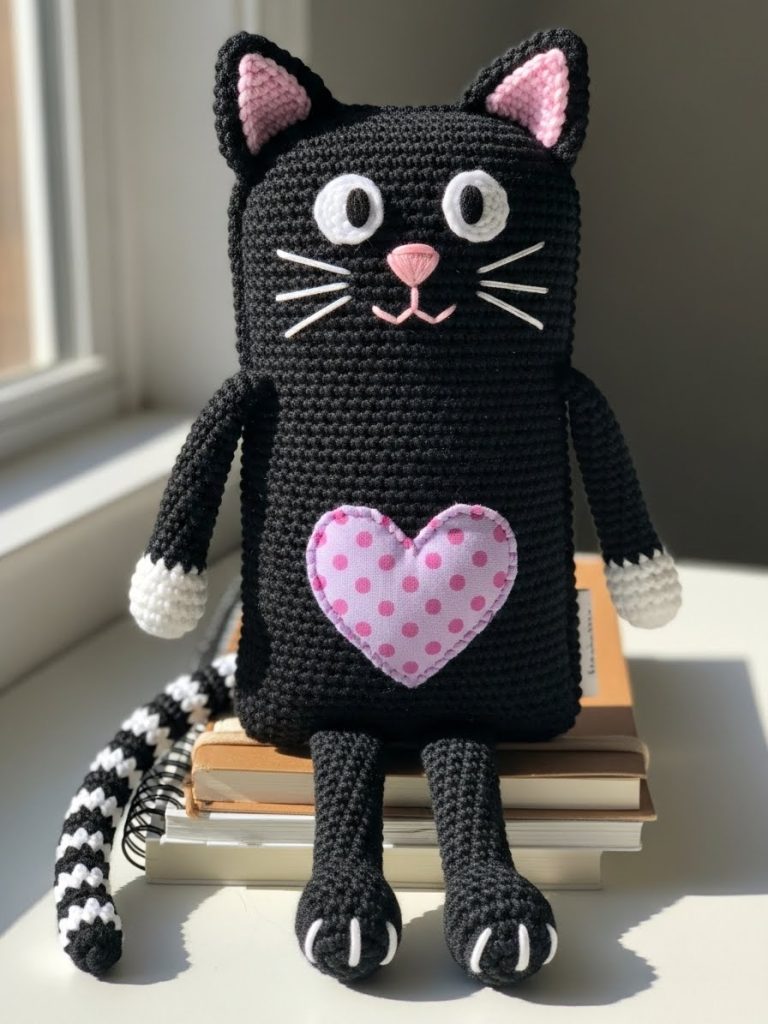
This project utilizes the “Ragdoll” technique, where we crochet flat rows rather than continuous rounds for the main body. This creates a distinct, modern silhouette that looks like a 2D illustration brought to life. It is perfect for beginners who struggle with the magic ring or complex shaping, yet the result is sophisticated enough for boutique sales.
Project Snapshot:
📊 Difficulty: Beginner to Intermediate
⏰ Est. Time: 3–4 Hours
📏 Size: Approx. 18cm Tall
“The beauty of the ragdoll style lies in its imperfect perfection; do not overstuff, for it must remain soft to the touch.” — Patricia Poltera
Materials & Tools Needed
🧶 Yarn: Black Cotton or Acrylic (DK/Light Worsted weight); Small amount of White for tail stripes.
🪡 Hook: 2.5mm or 2.75mm (keep tension tight).
✨ Other Materials: Lilac/Pink fabric scrap (polka dot pattern preferred), White and Pink felt, White embroidery thread, Fiberfill stuffing, Fabric glue or needle/thread for appliqué.
Abbreviations & Stitches Used
ch: chain
sl st: slip stitch
sc: single crochet
inc: increase (2 sc in one stitch)
dec: decrease (sc 2 together)
st: stitch
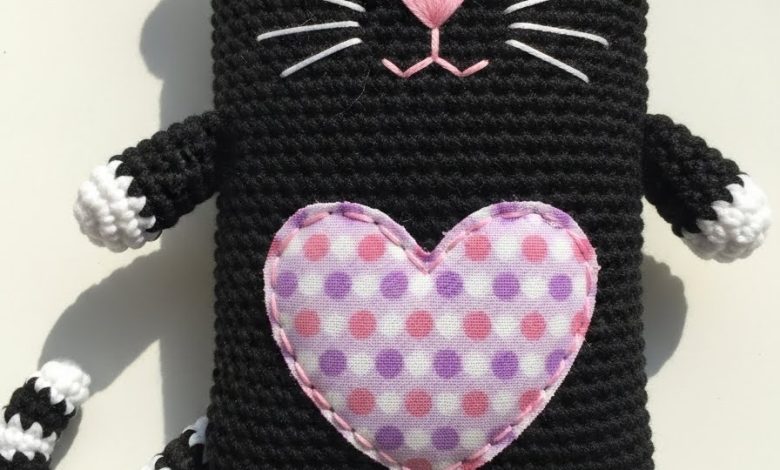
The Complete Shadow the Midnight Cat Pattern
Component 1: Main Body Panels (Make 2 identical)
Note: We work in rows. Ch 1 and turn at the end of every row.
➡️ Row 1: Using Black yarn, ch 21. Starting in 2nd ch from hook, sc 20. (20 sts)
➡️ Rows 2–35: Sc in each st across. (20 sts)
➡️ Row 36 (Start Left Ear): Sc 6, turn. Leave remaining stitches unworked for now.
➡️ Row 37: Dec, sc 4. (5 sts)
➡️ Row 38: Sc 3, dec. (4 sts)
➡️ Row 39: Dec, sc 2. (3 sts)
➡️ Row 40: Sc 1, dec. (2 sts)
➡️ Row 41: Dec. (1 st). Fasten off.
➡️ Second Ear: Reattach yarn at the opposite edge of Row 35. Sc 6.
➡️ Repeat Rows 37–41 exactly as above for the second ear.
➡️ Artisan’s Note: The space between the ears remains unworked to create the flat head shape.
Component 2: The Legs (Make 2)
Note: Worked in continuous rounds.
➡️ Round 1: Using Black yarn, 6 sc in a magic ring. (6 sts)
➡️ Round 2: Inc in every st. (12 sts)
➡️ Rounds 3–9: Sc in each st around. (12 sts)
➡️ Flatten the top of the leg and sc through both layers to close. Fasten off, leaving a tail for sewing.
➡️ Detailing: Using white embroidery thread, stitch three vertical lines on the bottom front of each foot to mimic claws.
Component 3: The Striped Tail
➡️ Round 1: Using Black yarn, 6 sc in a magic ring. (6 sts)
➡️ Round 2: Inc, sc 1. Repeat around. (9 sts)
➡️ Rounds 3–4: Sc around with Black. (9 sts)
➡️ Rounds 5–6: Switch to White yarn. Sc around. (9 sts)
➡️ Rounds 7–8: Switch to Black yarn. Sc around. (9 sts)
➡️ Rounds 9–10: Switch to White yarn. Sc around. (9 sts)
➡️ Rounds 11–12: Switch to Black yarn. Sc around. (9 sts)
➡️ Rounds 13–14: Switch to White yarn. Sc around. (9 sts)
➡️ Rounds 15–18: Switch to Black yarn. Sc around. (9 sts)
➡️ Flatten slightly (do not stuff heavily) and fasten off, leaving a tail.
Component 4: The Paws (Make 2)
➡️ Round 1: Using White yarn, 6 sc in a magic ring. (6 sts)
➡️ Round 2: Inc in every st. (12 sts)
➡️ Rounds 3–4: Sc around. (12 sts)
➡️ Stuff firmly.
➡️ Round 5: Dec around. (6 sts)
➡️ Fasten off, sew hole closed.
Assembly & Final Touches
➡️ The Face: Before joining the panels, take the Front Body Panel. Cut two small circles from white felt for eyes and glue them in place. Glue small black pupils onto the white felt. Embroider a small pink nose and pink cheeks (or use felt circles). Embroider white whiskers (3 on each side).
➡️ The Heart: Cut a heart shape from your patterned fabric. Glue or blanket-stitch it onto the center of the Front Body Panel.
➡️ Joining: Hold the Front and Back Body Panels together (Wrong Sides facing in).
➡️ Insert your hook through both layers at the bottom corner. Sc around the entire perimeter of the cat to join them.
➡️ Important: As you crochet the perimeter, insert the Legs at the bottom and the Paws at the sides between the panels and crochet through them to secure them in the seam.
➡️ Pause before closing the top of the head to stuff the body lightly. It should be squishy, not hard.
➡️ Finish crocheting the seam, join with a sl st, and weave in ends.
➡️ Sew the Tail to the back of the body, near the bottom right or left corner, allowing it to curl forward.
Tips & FAQs
❓ Why does my rectangle look twisted? Ensure you are turning your work the same way each time (e.g., always to the right) to keep edges straight.
❓ Can I use safety eyes? For a true ragdoll look, felt or embroidery is preferred to keep the surface flat, but safety eyes can be used if attached before assembly.
A Final Word
There is a quiet strength in simplicity. This little midnight guardian proves that you do not need complex stitches to create character; you only need consistency and a touch of imagination. I hope he brings comfort to your shelves. Until we meet again, keep your stitches even and your heart open.
— Patricia