There is a quiet magic in the moments before sleep, a tenderness that I have poured into this design. Oliver is not merely a doll; he is a guardian of sweet dreams, dressed in his finest nightclothes and ready to bring comfort to any home. Let us pick up our hooks and shape this gentle friend together.
About This Creation & The Art of Texture
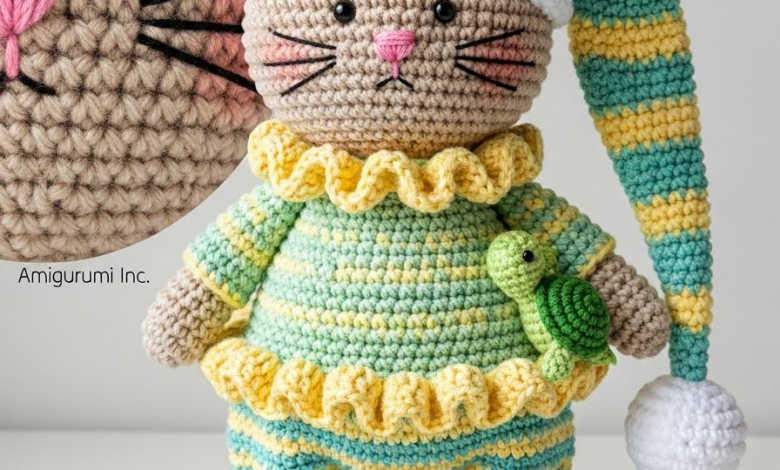
Oliver was born from the idea of “tactile comfort.” We are moving away from stiff, single-texture dolls and embracing the joy of layering. By combining a smooth, sturdy cotton for the body with a softer, variegated yarn for the pajamas, we create a sensory experience that is delightful to hold.
This project is also a masterclass in “character costuming.” You will learn how to structure removable garments that drape naturally, rather than looking painted on. The oversized mouse slippers add a touch of playful humor, ensuring that even in his sleepy state, Oliver brings a smile to the viewer.
Project Snapshot
📊 Difficulty: Intermediate (Requires color changes and clothing construction)
⏰ Est. Time: 12 – 15 Hours of devoted crafting
📏 Size: Approx. 26cm (10 inches) tall, including the nightcap
“A stitch made with patience is a stitch that holds a memory.” – Patricia Poltera
Materials & Tools Needed
🧶 Yarn:
- Color A (Fur): Beige or Biscuit (DK Weight, Cotton/Acrylic blend)
- Color B (Pajamas & Hat): Variegated Pastel Green/Yellow/White (Sport Weight, softer texture)
- Color C (Slippers): Heather Grey (DK Weight)
- Color D (Turtle): Bright Lime Green (Sport Weight)
🪡 Hook: 2.25mm (B) for the doll; 2.5mm (C) for the clothes
✨ Other Materials:
- 9mm Safety Eyes (Black or Deep Blue)
- Dark brown embroidery thread (for nose/mouth)
- Fishing line or stiffened black thread (for whiskers)
- Fiberfill stuffing
- Tapestry needle and stitch markers
Abbreviations & Stitches Used
ch: chain
sl st: slip stitch
sc: single crochet
inc: increase (2 sc in one st)
dec: decrease (invisible decrease preferred)
hdc: half double crochet
blo: back loop only
flo: front loop only
The Complete Oliver Pattern
Component 1: The Sculpted Head
Work in continuous rounds with Color A (Beige).
🧶 Rnd 1: Start 6 sc in a magic ring. (6)
🧶 Rnd 2: Inc in every st around. (12)
🧶 Rnd 3: (Sc 1, inc) x 6. (18)
🧶 Rnd 4: (Sc 2, inc) x 6. (24)
🧶 Rnd 5: (Sc 3, inc) x 6. (30)
🧶 Rnd 6: (Sc 4, inc) x 6. (36)
🧶 Rnd 7: (Sc 5, inc) x 6. (42)
🧶 Rnd 8: (Sc 6, inc) x 6. (48)
🧶 Rnds 9–16: Sc in each st around. (48)
🧶 Rnd 17 (Cheek Shaping): Sc 18, (inc, sc 1) x 6, sc 18. (54)
🧶 Rnds 18–22: Sc in each st around. (54)
🧶 Rnd 23: Sc 18, (dec, sc 1) x 6, sc 18. (48)
🧶 Rnd 24: (Sc 6, dec) x 6. (42)
Insert safety eyes between Rnds 16 and 17, approximately 8 stitches apart (centered on the cheek shaping).
🧶 Rnd 25: (Sc 5, dec) x 6. (36)
🧶 Rnd 26: (Sc 4, dec) x 6. (30)
🧶 Rnd 27: (Sc 3, dec) x 6. (24)
Stuff the head firmly, paying extra attention to rounding out the cheeks.
🧶 Rnd 28: (Sc 2, dec) x 6. (18)
🧶 Fasten off, leaving a long tail for sewing.
Component 2: The Sturdy Body
Work with Color A.
🧶 Rnd 1: Start 6 sc in a magic ring. (6)
🧶 Rnd 2: Inc in every st around. (12)
🧶 Rnd 3: (Sc 1, inc) x 6. (18)
🧶 Rnd 4: (Sc 2, inc) x 6. (24)
🧶 Rnd 5: (Sc 3, inc) x 6. (30)
🧶 Rnd 6: (Sc 4, inc) x 6. (36)
🧶 Rnd 7: (Sc 5, inc) x 6. (42)
🧶 Rnds 8–12: Sc in each st around. (42)
🧶 Rnd 13: (Sc 5, dec) x 6. (36)
🧶 Rnds 14–18: Sc in each st around. (36)
🧶 Rnd 19: (Sc 4, dec) x 6. (30)
🧶 Rnds 20–24: Sc in each st around. (30)
🧶 Rnd 25: (Sc 3, dec) x 6. (24)
🧶 Rnd 26: (Sc 2, dec) x 6. (18)
🧶 Fasten off and stuff firmly.
Component 3: Limbs (Arms & Legs)
Make 2 Arms (Color A):
🧶 Rnd 1: 6 sc in MR. (6)
🧶 Rnd 2: (Sc 2, inc) x 2. (8)
🧶 Rnds 3–15: Sc in each st around. (8)
🧶 Fold flat and sc across the opening to close.
Make 2 Legs (Color A):
🧶 Rnd 1: 6 sc in MR. (6)
🧶 Rnd 2: Inc in every st around. (12)
🧶 Rnd 3: (Sc 3, inc) x 3. (15)
🧶 Rnds 4–6: Sc in each st around. (15)
🧶 Rnd 7: (Sc 3, dec) x 3. (12)
🧶 Rnds 8–16: Sc in each st around. (12)
🧶 Stuff the lower foot firmly, stuff the upper leg lightly.
Component 4: The Pajama Set
Use Color B (Variegated) and the 2.5mm hook.
The Pants (Bloomers):
🧶 Make two leg cuffs: Ch 18, join to form a ring. Sc around for 2 rounds.
🧶 Join legs: Sc around first leg, ch 2, sc around second leg.
🧶 Work 8 rounds of sc around both legs and the chain.
🧶 Decrease evenly in the next round to fit the waist (aim for 30 sts).
🧶 Fasten off.
The Ruffled Tunic:
🧶 Row 1: Ch 31. Sc in 2nd ch from hook and across. (30)
🧶 Row 2 (Armholes): Sc 4, ch 6 (skip 6), sc 10, ch 6 (skip 6), sc 4.
🧶 Row 3: Sc in every st and chain.
🧶 Rnds 4–8: Work in joined rounds, sc in each st.
🧶 Rnd 9 (Ruffle): 3 dc in every st around. Fasten off.
The Long Nightcap:
🧶 Rnd 1: 6 sc in MR.
🧶 Rnds 2–40: Work in continuous rounds, increasing by 2 stitches every 5th round until you reach 30 stitches. (This creates the long taper).
🧶 Rnd 41: Switch to White yarn (if available) or Color A for the brim. Ch 2, dc around.
🧶 Rnd 42: Front post dc / Back post dc alternating for a ribbed effect.
Component 5: The Mouse Slippers
Make 2 using Color C (Grey).
🧶 Rnd 1: Ch 6. Sc in 2nd ch from hook, sc 3, 3 sc in last ch. Turn to work other side: sc 3, 2 sc in last ch. (12)
🧶 Rnd 2: Inc, sc 3, inc x 3, sc 3, inc x 2. (18)
🧶 Rnd 3: (Sc 1, inc), sc 3, (sc 1, inc) x 3, sc 3, (sc 1, inc) x 2. (24)
🧶 Rnds 4–7: Sc in each st around. (24)
🧶 Rnd 8: (Sc 2, dec) x 6. (18)
🧶 Fasten off. Attach tiny circular ears (4 sc in MR) to the front. Glue or sew on small googly eyes or beads.
Component 6: The Tiny Turtle
Shell (Color D): 6 sc in MR, inc around (12). Sc around (12). Stuff lightly.
Head: 4 sc in MR, inc to 8, sc 2 rounds. Sew to shell.
Assembly & Final Touches
➡️ Sew the head to the body securely.
➡️ Attach arms at Rnd 25 of the body.
➡️ Sew legs to the bottom of the body, slightly spaced apart so he can “stand” in his slippers.
➡️ Embroider a pink nose and a simple anchor-shaped mouth.
➡️ Thread the fishing line through the muzzle area to create whiskers.
➡️ Dress him: Pull on the bloomers, slide on the tunic, place the slippers on his feet, and drape the nightcap over one ear. Tack the cap in place with a small stitch if desired.
Tips & FAQs
My slippers keep falling off! You can sew the back heel of the slipper directly to the heel of the amigurumi foot for a permanent fit.
Can I brush the yarn? Yes! Brushing the beige yarn on the head with a pet slicker brush before adding features creates a wonderfully fuzzy “kitten” texture.
A Final Word
Creating Oliver is a practice in gentleness. As you stitch his sleepy eyes and soft pajamas, I hope you feel a sense of calm settle over your own spirit. May he bring peaceful nights to whoever holds him.
Yours in creativity,
Patricia