My dearest maker,
Welcome back to the worktable. Today, we are not merely stitching dolls; we are capturing a memory. This project, “The Sunday Stroll,” is close to my heart because it moves beyond the static poses we often see. We are crafting a moment of quiet connection.
It requires patience—there are tiny buttons to stitch and layers to dress—but the result is an heirloom that feels alive. Pour yourself a tea, find your favorite chair, and let us breathe life into these two souls.
About This Creation & The Heirloom Angle
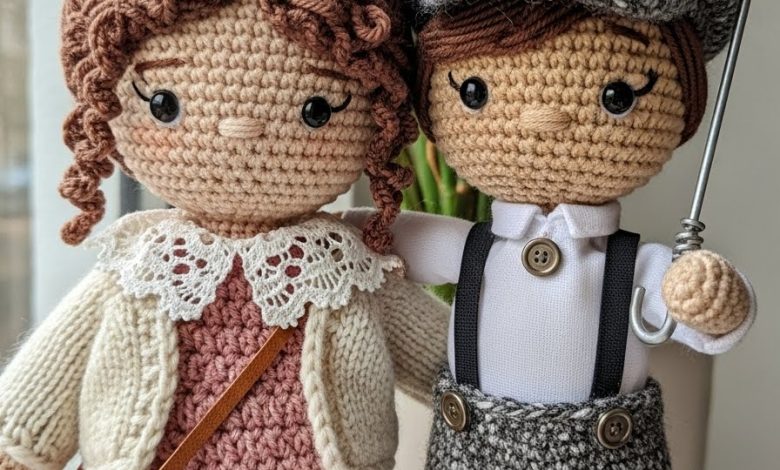
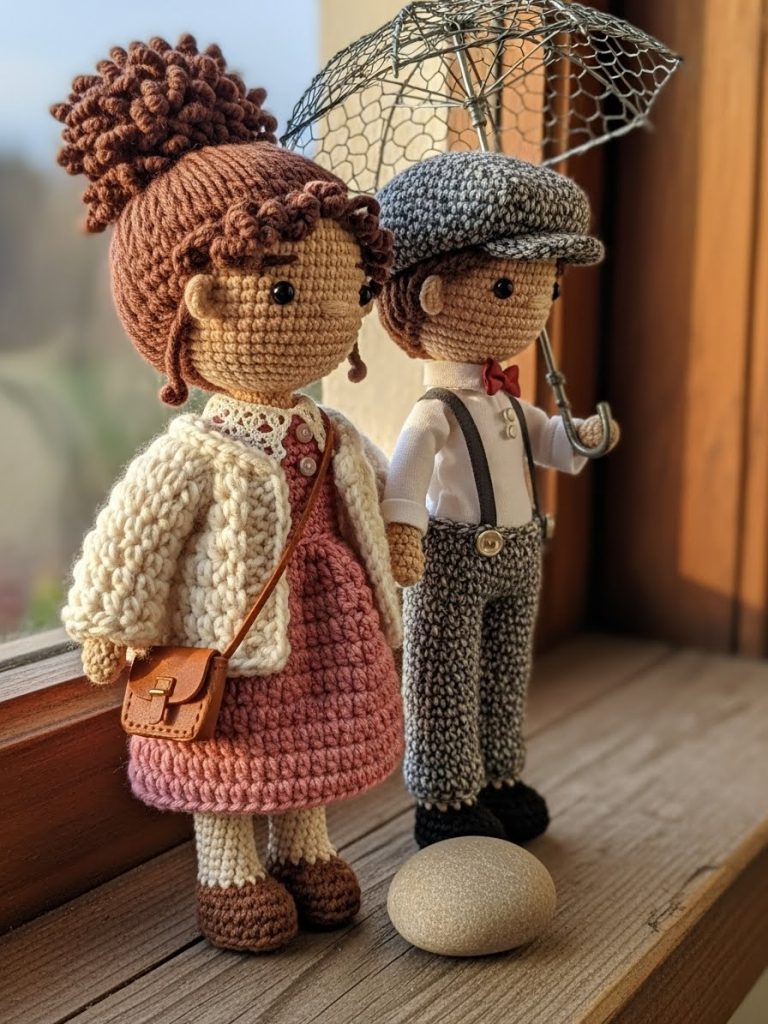
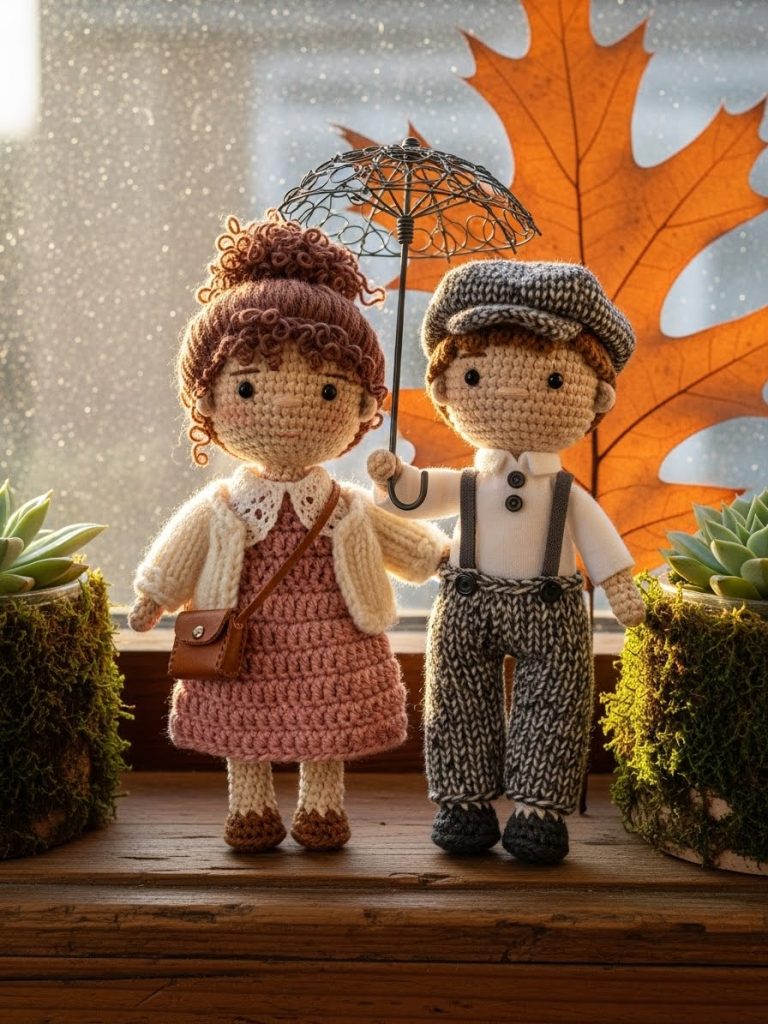
In a world of quick makes, Leo and Elara stand apart as a study in “Slow Crochet.” We are focusing here on texture contrast. We will use different stitch definitions to mimic the rough tweed of Leo’s trousers against the soft, flowing drape of Elara’s dress.
This project is also a masterclass in emotional shaping. By positioning the eyes lower and widening the stance, we create a sense of grounded realism. The accessories—the newsboy cap, the satchel, the umbrella—are not afterthoughts; they are the storytelling elements that turn a toy into art.
Project Snapshot:
📊 Difficulty: Advanced Intermediate (Requires patience with color changes and small details)
⏰ Est. Time: 15–20 Hours (This is a marathon, not a sprint)
📏 Size: Approx. 20cm (8 inches) tall
“Realism is found in the imperfections—the messy bun, the rolled sleeves, the tilt of a hat.” — Patricia Poltera
Materials & Tools Needed
🧶 Yarn:
- Skin Tone: Fine cotton (Sport/Baby weight) in a natural beige or mocha.
- Elara’s Wardrobe: Dusty Rose or Sage Green (Dress), Cream or Oatmeal (Cardigan/Lace).
- Leo’s Wardrobe: Speckled Grey or Tweed Brown (Trousers), Crisp White (Shirt), Charcoal (Cap).
- Hair: Dark Walnut or Chestnut Brown.
🪡 Hook: 2.00mm or 2.25mm (We need stiff fabric to hold the shape).
✨ Other Materials:
- 1mm craft wire (for the umbrella and optional limb posing).
- Embroidery floss (Black, White, Pink for facial details).
- Cardboard or plastic sheet (for flat shoe soles).
- Tiny buttons (3-4mm).
- Fiberfill stuffing.
Abbreviations & Stitches Used
ch: chain
sl st: slip stitch
sc: single crochet
hdc: half double crochet
dc: double crochet
inc: increase (2 sc in one st)
dec: decrease (sc 2 together, invisible method preferred)
BLO: back loop only
FLO: front loop only
Bobble: 3-dc bobble stitch (for thumbs/noses)
The Complete Leo & Elara Project
Part 1: The Heads (Make 2 – Variations noted)
Both begin with the same base structure.
R1: Start with magic ring, 6 sc into ring (6)
R2: Inc in each st around (12)
R3: (Sc 1, inc) x 6 (18)
R4: (Sc 2, inc) x 6 (24)
R5: (Sc 3, inc) x 6 (30)
R6: (Sc 4, inc) x 6 (36)
R7: (Sc 5, inc) x 6 (42)
R8: (Sc 6, inc) x 6 (48)
R9–R18: Sc in each st around (48) [10 rounds for a deep forehead]
R19 (Cheek Shaping): Sc 18, (inc, sc 1) x 6, sc 18 (54) [This widens the face at the cheeks]
R20–R23: Sc in each st around (54)
R24: Sc 18, (dec, sc 1) x 6, sc 18 (48)
R25: (Sc 6, dec) x 6 (42)
R26: (Sc 5, dec) x 6 (36) [Start stuffing firmly here]
R27: (Sc 4, dec) x 6 (30)
R28: (Sc 3, dec) x 6 (24)
R29: (Sc 2, dec) x 6 (18)
R30: (Sc 1, dec) x 6 (12)
R31: Dec around (6). Fasten off, leave long tail for sewing.
Artisan’s Note: For Leo, define the jawline by adding a horizontal stitch pull slightly tighter at R24 during assembly. For Elara, keep it soft. Embroider eyes at R18, 9 stitches apart.
Part 2: Elara’s Vintage Dress Body
We start with the legs/boots and work up.
R1 (Boots): With dark brown, 6 sc in magic ring (6)
R2: Inc around (12)
R3–R5: Sc around (12)
R6: Switch to Skin Tone (BLO). Sc around. (12)
R7–R20: Sc around (12) for leg height. Make 2 legs.
R21 (Join): Chain 3 to join legs. Sc 12 (leg 1), sc 3 on chain, sc 12 (leg 2), sc 3 on chain (30)
R22–R25: Sc around (30) [Hips]
R26: Switch to Dress Color (Sage/Rose). Sc around.
R27: (BLO) Sc around (30) [The front loops will be used for the skirt later]
R28–R35: Sc around (30) [Torso]
R36: (Sc 3, dec) x 6 (24)
R37–R40: Sc around (24)
R41: (Sc 2, dec) x 6 (18). Stuff firmly. Fasten off.
The Skirt: Attach yarn to FLO of R27.
Row 1: (Dc 2, inc) around.
Row 2–10: Dc in each st around for length.
Row 11: (Sc, ch 2, sc) in each st for a lace hem effect.
Part 3: Leo’s Trousers & Shirt Body
Similar construction to Elara, but color changes create the outfit.
Legs: Start with Black (Shoes), switch to Speckled/Grey at R6 for Trousers.
Join: At R21, continue with Grey.
R22–R26: Sc around (30) [High waisted trousers]
R27: Switch to White (Shirt). (BLO) Sc around (30).
R28–R41: Work plain rows in White sc for the shirt.
Collar: At the neck opening, surface crochet a small collar: Ch 2, hdc around the neck rim, sl st to join.
Part 4: The Textured Accessories
The Chunky Cardigan (Elara): Worked in rows. Ch 25. Row 1: Hdc across. Row 2: (BLO) Hdc across to create “ribbing” look. Repeat until wide enough to wrap around Elara’s shoulders. Seam armholes.
The Newsboy Cap (Leo): R1: 8 sc in ring. R2: Inc around (16). R3: (Hdc 1, inc) around (24). R4: (Hdc 2, inc) around (32). R5–R7: Hdc around. R8: Sc around tight. Brim: Work on front 10 stitches only: Sc, hdc, dc, dc, dc, dc, hdc, sc. Fasten off.
The Vintage Umbrella: Use a pipe cleaner or wire for the shaft. Create a small fabric circle: 6 sc in ring, inc to 12, inc to 18, inc to 24, inc to 30. Sc around for 3 rows. Stick wire through center. Curve the handle.
[📸 PASTE IMAGE 3 HERE: Close-up of the hands holding the umbrella and the texture of the cardigan]
Assembly & Final Touches
➡️ The Hair: This is crucial for realism. Do not just sew on a cap.
- Elara: Create a wig cap (same pattern as head R1-R13). Attach individual strands of yarn to the wig cap, pull them back loosely, and twist into a bun. Secure with a few stitches. Pull a few “strays” loose near the ears.
- Leo: Embroider the hair directly onto the head using long satin stitches for a sleek, parted look.
➡️ The Face: Embroider the nose between the eyes (width of 2 stitches). Add blush using real powder makeup or pink chalk—apply to cheeks, nose tip, and tops of ears. Sew the heads to the bodies.
➡️ Dressing: Put the cardigan on Elara. Slide Leo’s suspenders (chains of 20 sc) over his shoulders and cross them at the back. Stitch the umbrella handle to Leo’s hand, and position Elara’s arm through his.
Tips & FAQs
Q: Can I use safety eyes? A: You may, but for the vintage, “illustration” look, embroidered eyes are superior. They allow you to create a softer, more wistful expression.
Q: My doll’s head is wobbling. A: The neck needs to be very firm. Insert a rolled tube of felt or a craft stick inside the neck before sewing the head on to act as a spine.
A Final Word
My friend, look at what you have made. It is not just yarn anymore, is it? It is a story. You have captured the elegance of a bygone era in the palm of your hand. I hope Leo and Elara bring a sense of timeless romance to your home.
Until we meet again at the drafting table, stay inspired.