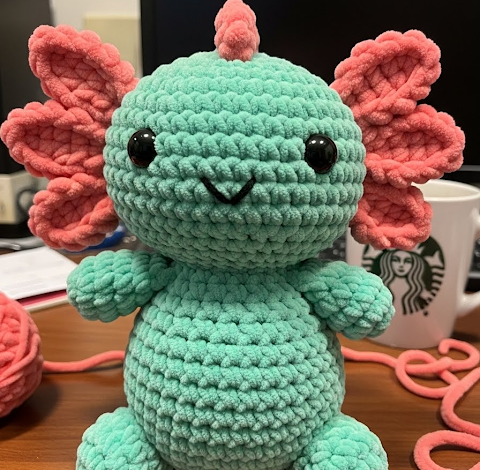
Hey guys! So… I did a thing. 🙈 I decided to mash up a dragon and an axolotl, and honestly? I’m obsessed. He’s obviously not a real animal, but look at that face! I call him the Draxolotl. Grab your softest yarn for this one because he is super squishy. Let’s get crocheting!
About This Creation & Our Angle
Hybrid creatures are currently storming the internet. When you combine two beloved animals, you double the audience and double the charm. Sparkle is designed specifically to stop the scroll.
The pastel colors soften the “dragon” aspect, making it approachable for nursery decor, while the axolotl gills add that chaotic cuteness collectors love. If you are selling finished pieces, these hybrids often command a higher price point because they look custom and unique rather than generic.
Project Snapshot:
📊 Difficulty: Intermediate (Assembly required)
⏰ Est. Time: 4-5 Hours
📏 Size: Approx. 14cm (5.5 inches) tall
“True artistry is finding the harmony between two different worlds.”
Materials & Tools Needed
🧶 Yarn: Chenille or Velvet yarn (Bulky weight) in Mint Sorbet (Main) and Coral Pink (Accents).
🪡 Hook: 4.0mm (G) or 4.5mm depending on your tension.
✨ Other Materials: 12mm safety eyes, polyfill stuffing, yarn needle, stitch markers, black embroidery thread for the mouth.

Abbreviations & Stitches Used
We will be working in continuous rounds.
📍 ch: chain
📍 sl st: slip stitch
📍 sc: single crochet
📍 inc: increase (2 sc in one st)
📍 dec: decrease (invisible decrease preferred)
📍 hdc: half double crochet
The Complete Sparkle the Draxolotl Pattern
Part 1: The Head (Mint Sorbet)
Rnd 1: Start 6 sc in a magic ring (6 sts)
Rnd 2: Inc in every st around (12 sts)
Rnd 3: (Sc 1, inc) x 6 (18 sts)
Rnd 4: (Sc 2, inc) x 6 (24 sts)
Rnd 5: (Sc 3, inc) x 6 (30 sts)
Rnd 6: (Sc 4, inc) x 6 (36 sts)
Rnd 7: (Sc 5, inc) x 6 (42 sts)
Rnd 8: (Sc 6, inc) x 6 (48 sts)
Rnd 9-16: Sc in each st around (48 sts) [8 rounds of plain crochet to build height]
Rnd 17: (Sc 6, dec) x 6 (42 sts)
Rnd 18: (Sc 5, dec) x 6 (36 sts)
Rnd 19: (Sc 4, dec) x 6 (30 sts)
Artisan’s Note: Insert the safety eyes now between Rnds 13 and 14, spacing them about 8 stitches apart. They should look low and wide.
Rnd 20: (Sc 3, dec) x 6 (24 sts)
Rnd 21: (Sc 2, dec) x 6 (18 sts)
Fasten off, leaving a tail for sewing if you prefer, though I usually sew the body to the head using the body tail. Stuff firmly.
Part 2: The Body (Mint Sorbet)
Rnd 1: Start 6 sc in a magic ring (6 sts)
Rnd 2: Inc in every st around (12 sts)
Rnd 3: (Sc 1, inc) x 6 (18 sts)
Rnd 4: (Sc 2, inc) x 6 (24 sts)
Rnd 5: (Sc 3, inc) x 6 (30 sts)
Rnd 6: (Sc 4, inc) x 6 (36 sts)
Rnd 7-11: Sc in each st around (36 sts) [Creating the chubby tummy]
Rnd 12: (Sc 4, dec) x 6 (30 sts)
Rnd 13: Sc in each st around (30 sts)
Rnd 14: (Sc 3, dec) x 6 (24 sts)
Rnd 15: Sc in each st around (24 sts)
Rnd 16: (Sc 2, dec) x 6 (18 sts)
Fasten off and leave a long tail for assembly. Stuff the body, keeping the bottom flatter so it sits well.
Part 3: The External Gills (Make 6 in Coral Pink)
These are the signature axolotl frills. We need 3 for each side of the head.
Rnd 1: Ch 5.
Rnd 2: Start in 2nd ch from hook. Sc, hdc, hdc, sc in the last ch.
Fasten off, leaving a tail for sewing. Make 6 identical pieces.
Part 4: Tiny Dragon Wings (Make 2 in Mint or Coral)
Rnd 1: Ch 6.
Rnd 2: Sc in 2nd ch from hook, hdc, dc, hdc, sc in last ch.
Rnd 3: Ch 1, turn. Sc in each st across.
Fasten off. These are small, vestigial wings just for cuteness.
Part 5: Arms (Make 2 in Mint Sorbet)
Rnd 1: Start 5 sc in a magic ring (5 sts)
Rnd 2: Inc in every st around (10 sts)
Rnd 3-5: Sc in each st around (10 sts)
Rnd 6: Dec x 5 (5 sts)
Fasten off, close hole, leave tail to sew. Do not stuff.
Part 6: Legs (Make 2 in Mint Sorbet)
Rnd 1: Start 6 sc in a magic ring (6 sts)
Rnd 2: Inc in every st around (12 sts)
Rnd 3: (Sc 1, inc) x 6 (18 sts)
Rnd 4-6: Sc in each st around (18 sts)
Rnd 7: (Sc 1, dec) x 6 (12 sts)
Fasten off, leave tail. Stuff lightly.
Part 7: The Tail (Mint Sorbet)
Rnd 1: Start 4 sc in a magic ring (4 sts)
Rnd 2: (Sc 1, inc) x 2 (6 sts)
Rnd 3: (Sc 2, inc) x 2 (8 sts)
Rnd 4: (Sc 3, inc) x 2 (10 sts)
Rnd 5: (Sc 4, inc) x 2 (12 sts)
Rnd 6: (Sc 5, inc) x 2 (14 sts)
Rnd 7: Sc in each st around (14 sts)
Fasten off. Stuff lightly.
Part 8: Dorsal Spikes (Coral Pink)
This is a strip that will run down the back.
Row 1: Ch 15 (or length needed to reach from neck to tail tip).
Row 2: In 2nd ch from hook: sl st, ch 2, sl st in same stitch (picot created), sl st in next stitch. Repeat down the chain.
Fasten off.

Assembly & Final Touches
Pinning is your best friend here. Do not skip it.
First, sew the Head to the Body. Ensure the neck area is sturdy so the head doesn’t wobble.
Next, attach the Legs to the bottom front of the body so Sparkle sits in a tripod stance with the tail. Sew the Tail to the lower back.
Attach the Arms just below the neck seam.
Now, the personality: Sew the Gills to the sides of the head. Arrange them in a vertical fan—top, middle, bottom—curving slightly backward.
Sew the Wings to the back of the body.
Finally, stitch the Dorsal Spikes running from the back of the head down to the tail. Embroider a tiny “v” shaped mouth between the eyes.
Tips & Frequently Asked Questions
Q: My head keeps flopping over, what did I do wrong?
A: This usually happens if the neck connection isn’t tight enough. When sewing the head to the body, go around the neck seam twice. Also, ensure the neck of the body is stuffed very firmly.
Q: Can I use cotton yarn instead of chenille?
A: Absolutely. Cotton will give you much better stitch definition and a smaller, sturdier toy (approx. 9-10cm). Chenille is just for that “squishy” factor.
A Final Word
There you have it—a mythical friend born from your own hands. I hope Sparkle brings a touch of magic to your shelves or your shop. Until next time, keep your stitches tight and your heart open.