My dearest maker,
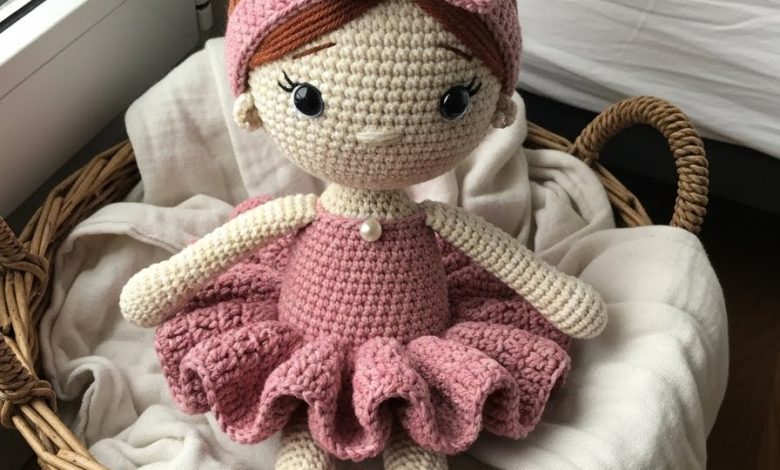
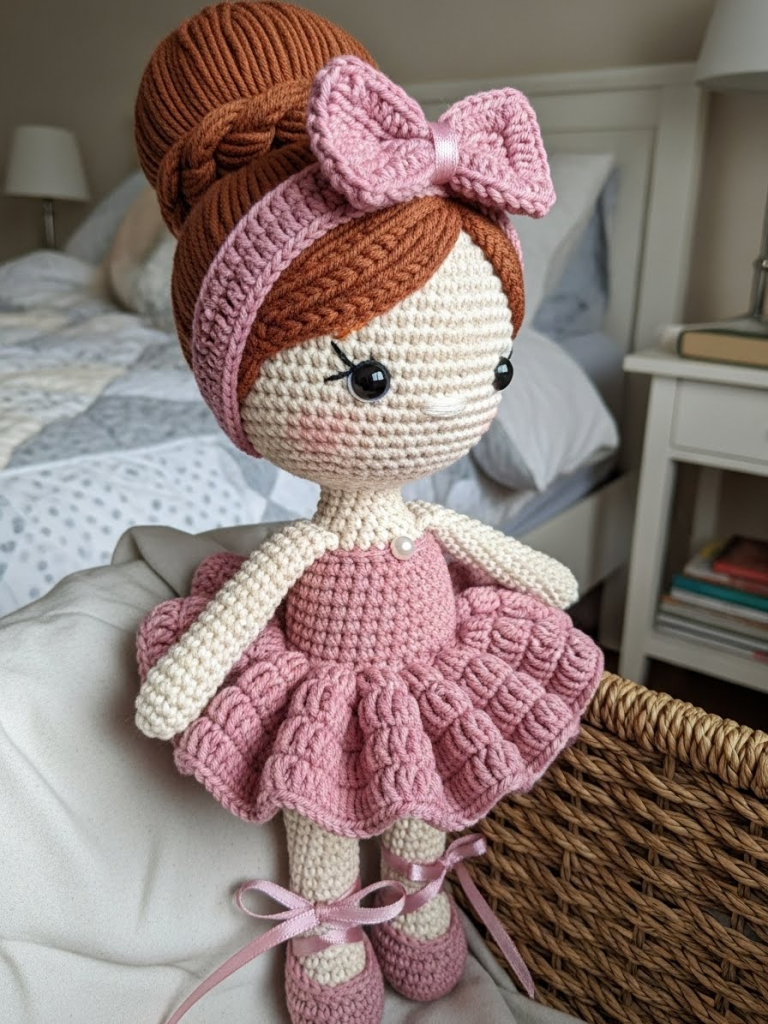
There is something profoundly grounding about crafting a doll that feels as though it has already lived a life—a piece that carries the weight of nostalgia before it is even finished. Elodie is not merely a toy; she is a keepsake. We are trading the stark, modern brights for the dusty, romantic hues of a bygone era. I have designed her with intention, ensuring her silhouette is as graceful as her pose. Let us begin this quiet, beautiful work together.
About This Creation & The Heirloom Angle
In a world of mass-produced plastics, the “Heirloom” aesthetic commands attention. This project is designed to sit comfortably between a toy and a piece of decor. By utilizing a “Dusty Rose” and “Antique Cream” palette, we tap into a sophisticated audience looking for nursery decor that matches a neutral, organic home aesthetic.
The value here lies in the texture. Unlike standard amigurumi ballerinas with simple flared skirts, Elodie features a removable tutu constructed with a dense shell stitch, mimicking heavy vintage lace. This detail alone elevates the perceived value of your finished piece, allowing you to price it higher if you sell your work.
Project Snapshot
📊 Difficulty: Intermediate (Requires shaping and color changes)
⏰ Est. Time: 8–10 Hours
📏 Size: Approx. 22cm tall (using DK yarn)
“Perfection is not in the absence of flaws, but in the presence of soul. Let your stitches breathe.” — Patricia
Materials & Tools Needed
🧶 Yarn: DK or Sport Weight Cotton.
- Color A: Skin Tone (Beige or light Walnut)
- Color B: Antique Cream (Slippers/Bodice)
- Color C: Chestnut Brown (Hair)
- Color D: Dusty Rose (Tutu/Headband)
🪡 Hook: 2.25mm or 2.50mm (keep tension tight)
✨ Other Materials:
- 10mm Safety Eyes
- Polyester Fiberfill (high quality, no lumps)
- Small pearl bead or vintage button (for bodice)
- Pink embroidery floss (mouth)
- Long darning needle
- Stitch markers
Abbreviations & Stitches Used
MR: Magic Ring ch: chain sc: single crochet inc: increase (2 sc in one st) dec: invisible decrease (sc 2 tog through front loops) sl st: slip stitch hdc: half double crochet dc: double crochet BLO: back loop only FLO: front loop only Shell: 5 dc in the same stitch
The Complete Elodie Pattern
Legs (Make 2) We begin with the slippers, shaping the ankle specifically for a graceful silhouette.
Start with Color B (Antique Cream).
Rnd 1: 6 sc in MR (6)
Rnd 2: inc in each st around (12)
Rnd 3: (1 sc, inc) x 6 (18)
Rnd 4-6: sc in each st around (18)
Rnd 7: (Front of foot shaping) sc 5, dec 4 times, sc 5 (14)
Change to Color A (Skin Tone).
Rnd 8: BLO sc in each st around (14) This leaves a ridge to attach ribbon later.
Rnd 9: sc 5, dec 2 times, sc 5 (12) The Ankle
Rnd 10-12: sc in each st around (12)
Rnd 13: sc 1, inc, sc 8, inc, sc 1 (14) Calf increase
Rnd 14-22: sc in each st around (14)
Rnd 23: (sc 6, inc) x 2 (16)
Rnd 24-28: sc in each st around (16)
Fasten off the first leg. Do not fasten off the second leg. Continue to Body.
Body Seamless join for a sturdy torso.
Rnd 29: From second leg, ch 3, join to first leg with a sl st. sc 16 (around first leg), sc 3 (along chain), sc 16 (around second leg), sc 3 (along other side of chain). (38)
Rnd 30: inc on each side of the hips (roughly stitch 8 and 27), sc in rest. (40)
Rnd 31-35: sc in each st around (40)
Change to Color B (Antique Cream) for the Bodice.
Rnd 36: sc in each st around (40)
Rnd 37: BLO sc in each st around (40) Ridge for skirt placement later.
Rnd 38-42: sc in each st around (40)
Rnd 43: (sc 8, dec) x 4 (36)
Rnd 44-45: sc in each st around (36)
Rnd 46: (sc 4, dec) x 6 (30)
Rnd 47: sc in each st around (30)
Rnd 48: (sc 3, dec) x 6 (24)
Change to Color A (Skin Tone).
Rnd 49: BLO sc in each st around (24) Neckline definition.
Rnd 50: (sc 2, dec) x 6 (18)
Rnd 51-52: sc in each st around (18) The Neck
Do not fasten off. Continue to Head.
Head We sculpt the cheeks to give her that sweet, innocent “baby schema” look.
Rnd 53: (sc 2, inc) x 6 (24)
Rnd 54: (sc 3, inc) x 6 (30)
Rnd 55: (sc 4, inc) x 6 (36)
Rnd 56: (sc 5, inc) x 6 (42)
Rnd 57: (sc 6, inc) x 6 (48)
Rnd 58: (sc 7, inc) x 6 (54)
Rnd 59-65: sc in each st around (54)
Rnd 66: (Cheek Shaping) sc 18, (inc, sc 1) x 3, sc 6, (inc, sc 1) x 3, sc 18 (60)
Rnd 67-71: sc in each st around (60)
Insert Safety Eyes between Rnd 66 and 67, roughly 9 stitches apart within the center face area.
Rnd 72: (sc 8, dec) x 6 (54)
Rnd 73: (sc 7, dec) x 6 (48)
Rnd 74: (sc 6, dec) x 6 (42)
Rnd 75: (sc 5, dec) x 6 (36)
Rnd 76: (sc 4, dec) x 6 (30)
Stuff neck firmly (use a chopstick) and stuff head.
Rnd 77: (sc 3, dec) x 6 (24)
Rnd 78: (sc 2, dec) x 6 (18)
Rnd 79: (sc 1, dec) x 6 (12)
Rnd 80: dec around (6)
Fasten off and weave in end.
Arms (Make 2) Delicate limbs with a thumb detail.
Use Color A (Skin Tone).
Rnd 1: 5 sc in MR (5)
Rnd 2: inc in each st (10)
Rnd 3-4: sc in each st around (10)
Rnd 5: (Thumb) 3 dc bobble in first st, sc 9 (10)
Rnd 6: dec, sc 8 (9)
Rnd 7-20: sc in each st around (9)
Stuff lightly only in the bottom half.
Fold opening flat and sc 4 across to close. Leave long tail for sewing.
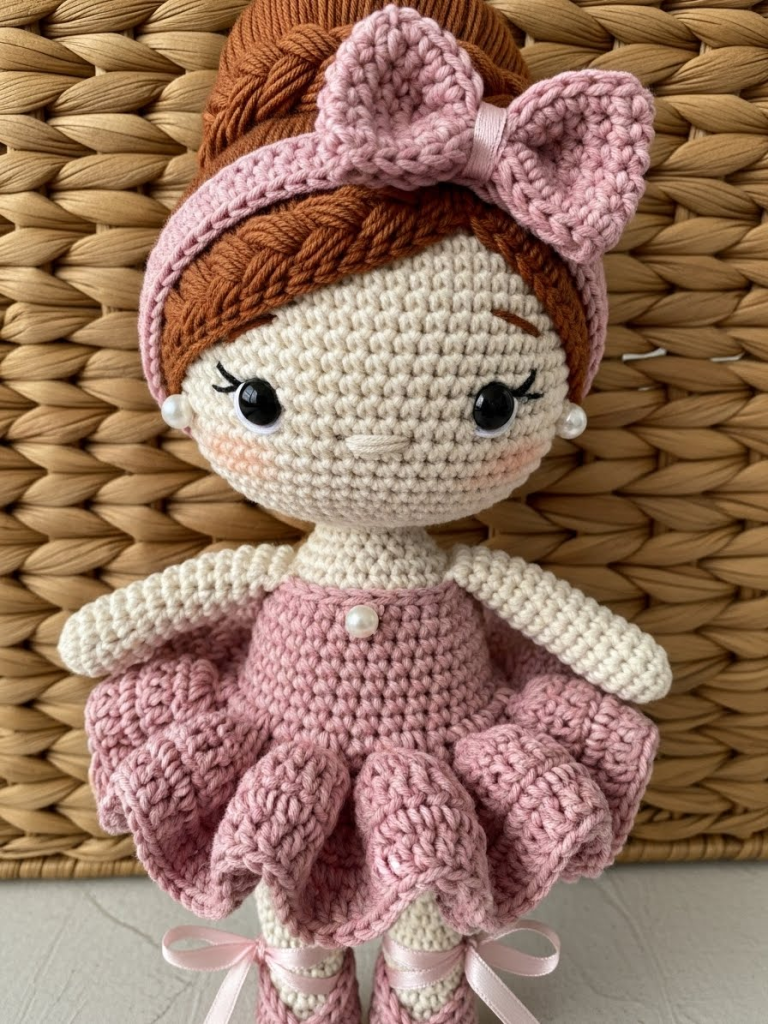
Heirloom Wig Cap & Bun
Use Color C (Chestnut Brown).
Rnd 1: 6 sc in MR (6)
Rnd 2: inc in each st (12)
Rnd 3: (sc 1, inc) x 6 (18)
…Continue increasing securely until you reach (54) stitches (approx Rnd 9).
Rnd 10-18: sc in each st around (54)
Rnd 19: (The Hairline) sl st 1, sc 1, hdc 1, dc 10, hdc 1, sc 1, sl st 1. Fasten off leaving a very long tail.
The Braided Bun: Make a separate tube: Ch 12, join to make a circle. Work sc around in a spiral for 20 rounds until you have a long tube. Stuff lightly. Twist this tube or braid 3 smaller strands if you prefer high texture. Coil it into a high bun shape and sew onto the top of the wig cap.
The Vintage Lace Tutu (Removable)
Use Color D (Dusty Rose).
Chain 42 (check against doll waist), join circle.
Rnd 1: sc in each ch around (42)
Rnd 2: (sc 6, inc) x 6 (48)
Rnd 3: BLO (sc 1, ch 2, skip 1) repeat around.
Rnd 4: (In ch-2 space work: sc, ch 3, sc). Repeat around.
Rnd 5: (Shell Stitch Layer) In every ch-3 loop, work 5 dc. sc in the sc between loops.
Fasten off. You can add a second layer into the front loops of Rnd 3 for extra volume.
Assembly & Final Touches
- Sew Wig: Position the wig cap so the hairline framing is centered. Sew firmly around the rim.
- Attach Arms: Sew arms at Rnd 50 of the body, ensuring the thumbs point forward.
- Face: Embroider a tiny nose (2 stitches wide) with skin tone yarn between the eyes. Use pink floss to stitch a small, flat mouth 2 rows below the nose. Add “blush” using real makeup or pink chalk under the eyes.
- Slippers: Using Color B or a thin ribbon, surface crochet or tie “laces” crisscrossing from the ankle ridge (Rnd 8 of legs) up to the calf.
- Bodice: Sew the small pearl bead or cameo to the center of the chest.
Tips & FAQs
Q: My head is wobbling. How do I fix it? A: Amigurumi necks need very firm stuffing. I recommend rolling a small piece of felt into a cylinder and inserting it into the neck before stuffing around it for an internal “spine.”
Q: Can I brush the yarn for the hair? A: Absolutely. If you use acrylic yarn for the bun, brushing it with a pet slicker brush will give it a realistic, fluffy texture before you coil it.
A Final Word
There is a quiet dignity in this pattern. As you stitch the final row of that lace skirt, remember that you are not just making a doll; you are crafting a companion for someone’s memories. May your tension be even and your heart light.
Until our next session, Patricia 🧶