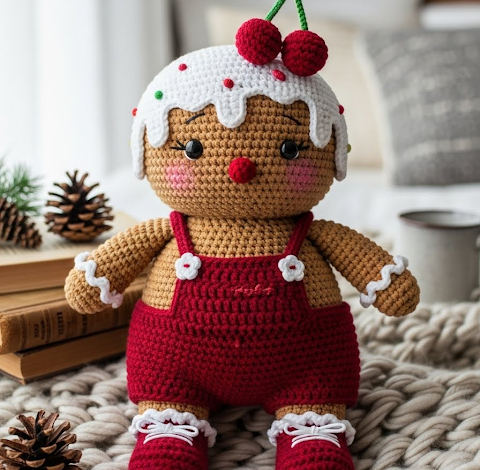
There is a profound comfort in working with the colors of the hearth—toasted biscuit, cranberry red, and creamy white. This project is close to my heart because it captures the innocence of childhood winters without being overly complicated. We are crafting a friend, not just a toy, one who looks as though they have tumbled straight out of a storybook bakery.
About This Creation & Angle
This piece is designed to be an “Heirloom Playmate.” Unlike stiff decorative figures, this Gingerbread Baby is constructed with soft, rounded forms and durable shaping, making it perfect for gentle play or as a centerpiece in a seasonal display. The “dripping icing” technique we will use on the cap adds a high-value, tactile detail that elevates the finish from simple craft to artisan quality. We are balancing the nostalgia of gingerbread with the softness of a plush companion.
Project Snapshot:
📊 Difficulty: Intermediate (Requires color work and shaping)
⏰ Est. Time: 6–8 Hours
📏 Size: Approx. 20cm (8 inches) tall
“It is the imperfections in the icing that make the cookie sweet; do not fear a unique drip or two.” — Patricia
Materials & Tools Needed
🧶 Yarn: Cotton or Cotton-Blend DK weight. Colors: Biscuit (Light Brown), Cranberry (Deep Red), Cream (White), Leaf (Dark Green).
🪡 Hook: 2.5mm or 2.75mm (to keep stitches tight).
✨ Other Materials: 10mm Safety Eyes, Polyfill stuffing, Tapestry needle, Pink embroidery floss, Stitch markers.

Abbreviations & Stitches Used
ch: chain
sl st: slip stitch
sc: single crochet
inc: increase (2 sc in one st)
dec: decrease (invisible decrease preferred)
hdc: half double crochet
dc: double crochet
blo: back loop only
flo: front loop only
The Complete Gingerbread Cherry Baby Pattern
Patricia’s Shop
The Head (Biscuit Yarn)
R1: Start 6 sc in a magic ring. (6)
R2: Inc in all 6 st. (12)
R3: (Sc 1, inc) x 6. (18)
R4: (Sc 2, inc) x 6. (24)
R5: (Sc 3, inc) x 6. (30)
R6: (Sc 4, inc) x 6. (36)
R7: (Sc 5, inc) x 6. (42)
R8: (Sc 6, inc) x 6. (48)
R9: (Sc 7, inc) x 6. (54)
R10: (Sc 8, inc) x 6. (60)
R11–R22: Sc in each st around. (60) [12 rounds of building height]
Patricia’s Note: Insert safety eyes between R17 and R18, about 9 stitches apart. Ensure they sit low on the face for that ‘Gaze of Innocence’.
R23: (Sc 8, dec) x 6. (54)
R24: (Sc 7, dec) x 6. (48)
R25: (Sc 6, dec) x 6. (42)
R26: (Sc 5, dec) x 6. (36)
R27: (Sc 4, dec) x 6. (30)
R28: (Sc 3, dec) x 6. (24)
R29: (Sc 2, dec) x 6. (18)
R30: (Sc 1, dec) x 6. (12)
Fasten off, leaving a long tail for sewing. Stuff firmly, prioritizing a round, ball-like shape.
The Icing Cap (Cream Yarn)
R1: Start 6 sc in a magic ring. (6)
R2: Inc in all 6 st. (12)
R3: (Sc 1, inc) x 6. (18)
R4: (Sc 2, inc) x 6. (24)
R5: (Sc 3, inc) x 6. (30)
R6: (Sc 4, inc) x 6. (36)
R7: (Sc 5, inc) x 6. (42)
R8: (Sc 6, inc) x 6. (48)
R9: (Sc 7, inc) x 6. (54)
R10: (Sc 8, inc) x 6. (60)
R11–R14: Sc in each st around. (60)
R15 (The Dripping Edge): This round creates the melt. Sc 3, hdc, dc, ch 2, sl st in 2nd ch from hook (picot), dc in same st as previous dc, hdc, sc 2. Repeat this pattern around, varying the height occasionally by using tr (treble crochet) instead of dc for longer drips.
Fasten off, leaving a very long tail to sew onto the head.
The Cherry Headdress (Cranberry Red – Make 2)
R1: Start 6 sc in a magic ring. (6)
R2: Inc in all 6 st. (12)
R3: (Sc 1, inc) x 6. (18)
R4–R6: Sc in each st around. (18)
R7: (Sc 1, dec) x 6. (12)
Stuff lightly.
R8: Dec x 6. (6)
Close hole.
Stem (Green Yarn): Ch 10. Sew one end to each cherry.
Leaf (Green Yarn): Ch 6, sc in 2nd ch from hook, hdc, dc, hdc, sc, sl st. Fasten off.
The Body (Biscuit Yarn)
R1: Start 6 sc in a magic ring. (6)
R2: Inc in all 6 st. (12)
R3: (Sc 1, inc) x 6. (18)
R4: (Sc 2, inc) x 6. (24)
R5: (Sc 3, inc) x 6. (30)
R6: (Sc 4, inc) x 6. (36)
R7: (Sc 5, inc) x 6. (42)
R8: (Sc 6, inc) x 6. (48)
R9–R15: Sc in each st around. (48) [Creating the chubby tummy]
R16: (Sc 6, dec) x 6. (42)
R17–R18: Sc in each st around. (42)
R19: (Sc 5, dec) x 6. (36)
R20–R21: Sc in each st around. (36)
R22: (Sc 4, dec) x 6. (30)
R23: (Sc 3, dec) x 6. (24)
R24: (Sc 2, dec) x 6. (18)
R25: Sc in each st around. (18)
Fasten off. Stuff firmly.
The Overalls (Cranberry Red)
Note: These are worked from the bottom up as separate leg holes joined together.
Leg 1:
R1: Ch 20, join to first ch with sl st to form a ring.
R2: Ch 1 (does not count as st), sc in each ch around. Join. (20)
R3: (Sc 4, inc) x 4. (24)
R4: Sc in each st around. (24)
Fasten off Leg 1. Make Leg 2, but do not fasten off.
Joining:
R5: From Leg 2, ch 2. Join to Leg 1 with a sc. Sc around Leg 1 (24), sc across one side of ch 2 (2), sc around Leg 2 (24), sc across other side of ch 2 (2). Total stitches = 52.
R6–R12: Sc in each st around. (52)
R13: (Sc 11, dec) x 4. (48)
R14: Sc in each st around. (48)
R15: (Sc 6, dec) x 6. (42)
R16: Sc in each st around. (42)
Fasten off. Weave in ends.
Straps (Make 2): Ch 20 (measure against body to ensure fit), turn, sc in each ch back. Sew to front and back of overalls.
Flower Buttons (White – Make 2): Magic ring, (ch 2, sl st in ring) x 5. Sew to chest of overalls.

The Arms (Biscuit Yarn – Make 2)
R1: Start 6 sc in a magic ring. (6)
R2: Inc in all 6 st. (12)
R3: (Sc 3, inc) x 3. (15)
R4–R12: Sc in each st around. (15)
R13: Dec x 1, sc 13. (14)
R14: Sc in each st around. (14)
Fasten off, leave tail. Stuff lightly (mostly the hand part).
Cuffs (White Yarn): Join white yarn to R14 of arm. (Ch 3, sl st in next st) around to create a ruffle.
The Legs (Biscuit Yarn – Make 2)
R1: Start 6 sc in a magic ring. (6)
R2: Inc in all 6 st. (12)
R3: (Sc 1, inc) x 6. (18)
R4: (Sc 2, inc) x 6. (24)
R5–R9: Sc in each st around. (24)
R10: (Sc 4, dec) x 4. (20)
R11–R14: Sc in each st around. (20)
Fasten off. Stuff firmly.
The Booties (Cranberry Red – Make 2)
R1: Ch 6. Start in 2nd ch from hook. Sc 4, 3 sc in last ch. Rotate to work on other side. Sc 3, inc in last st. (12)
R2: Inc, sc 3, inc x 3, sc 3, inc x 2. (18)
R3: Sc in each st around in BLO (Back Loop Only) to create sole edge. (18)
R4–R5: Sc in each st around. (18)
R6: Sc 5, dec x 4, sc 5. (14)
R7: Sc in each st around. (14)
Sole Ruffle (White): Join white yarn to the exposed front loops of R3. (Ch 2, sl st in next st) around.
Laces (White): Embroider a small bow on the front of the bootie.
Assembly & Final Touches
- Face: Sew the Icing Cap onto the head. It should sit slightly askew for character.
- Features: Embroider a small berry nose using red yarn in the center of the face. Using pink embroidery floss, add two soft dashes below the eyes for blush.
- Body: Sew the head to the body. Secure firmly so the head does not wobble.
- Dressing: Slide the overalls onto the body. Secure the straps over the shoulders with a few stitches if you want them permanent.
- Limbs: Sew legs to the bottom of the body. Put the booties on the feet (tack them down with a stitch if desired). Sew arms to the sides of the body just below the neck seam.
- Crowing Glory: Sew the cherries to the very top of the Icing Cap.
Tips & FAQs
- Can I brush the yarn? Yes! Gently brushing the biscuit yarn with a pet slicker brush can give it a “baked” fuzzy texture.
- My icing looks messy. Icing is organic! Do not worry if your drips are uneven; it adds to the homemade cookie aesthetic.
- Safety Warning: If making for a child under 3, please embroider the eyes instead of using plastic safety eyes to prevent choking hazards.
A Final Word
There is a quiet magic in watching a bundle of yarn become a character with a soul. May this little Gingerbread Baby bring sweetness to your home and warmth to your hands as you work.