My dearest creator, welcome back to the crafting table. Today we are doing something quite special. We are taking a creature often feared and transforming him into something beloved. Spindle is not here to haunt corners; he is here to be held. Let us begin this gentle work.
About This Creation & The “Cure for Arachnophobia”
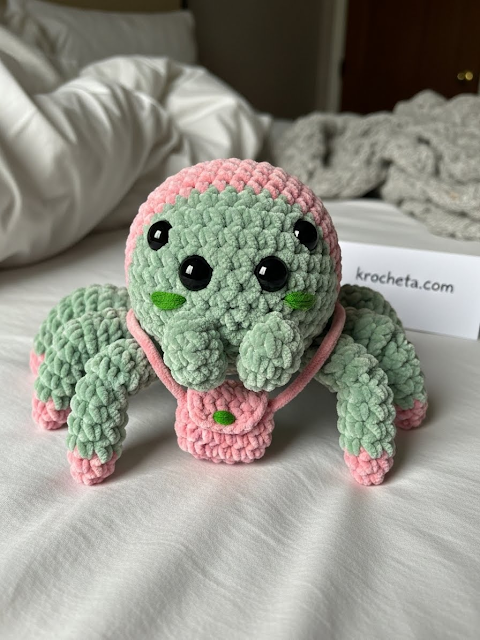
The jumping spider is unique in the natural world because it is undeniably cute, but we are taking that further. Spindle is designed with the “Baby Schema” in mind—large head, low-set eyes, and short, clumsy limbs.
This project is excellent for working with velvet or chenille yarn. The texture mimics the fuzzy nature of a real jumping spider but feels like a luxury cushion. He is the perfect desk companion or a gift for someone who needs to overcome their fear of eight-legged guests.
Project Snapshot:
📊 Difficulty: Advanced Beginner (Working with velvet yarn)
⏰ Est. Time: 3–4 Hours
📏 Size: Approx. 12cm tall x 15cm wide (depending on yarn weight)
“We do not simply make loops; we make friends.” — Patricia
Materials & Tools Needed
🧶 Yarn: Super Bulky (Size 6) Velvet/Chenille yarn.
- Color A: Soft Sage Green (approx. 70g)
- Color B: Blush Pink (approx. 30g)
🪡 Hook: 4.5mm or 5.0mm (use a hook slightly smaller than recommended to keep stitches tight)
✨ Other Materials:
- Four Safety Eyes: Two 16mm (center) and two 10mm (outer)
- Poly-fil stuffing
- Yarn needle (wide eye)
- Stitch marker

Abbreviations & Stitches Used
ch: chain
sl st: slip stitch
sc: single crochet
inc: increase (2 sc in one stitch)
dec: decrease (sc 2 together)
FLO: front loop only
The Complete Spindle Pattern
I. The Head (Color A – Sage Green)
We begin with the face. This must be round and inviting.
Rnd 1: 6 sc in a magic ring. (6)
Rnd 2: inc in each st around. (12)
Rnd 3: 🧶 sc 1, inc 🧶 repeat around. (18)
Rnd 4: 🧶 sc 2, inc 🧶 repeat around. (24)
Rnd 5: 🧶 sc 3, inc 🧶 repeat around. (30)
Rnd 6: 🧶 sc 4, inc 🧶 repeat around. (36)
Rnd 7–11: sc in each st around. (36)
Artisan’s Note: Pause here. Insert the safety eyes between Rnd 8 and 9. Place the two large 16mm eyes in the center with 2 stitches between them. Place the smaller 10mm eyes on either side of the large ones, about 1 stitch away.
Rnd 12: 🧶 sc 4, dec 🧶 repeat around. (30)
Rnd 13: 🧶 sc 3, dec 🧶 repeat around. (24)
Rnd 14: 🧶 sc 2, dec 🧶 repeat around. (18)
Stuff the head firmly.
Rnd 15: 🧶 sc 1, dec 🧶 repeat around. (12)
Rnd 16: dec around. (6)
Fasten off and weave in the end.
II. The Abdomen (Color A – Sage Green)
The body should be slightly larger and rounder than the head.
Rnd 1: 6 sc in a magic ring. (6)
Rnd 2: inc in each st around. (12)
Rnd 3: 🧶 sc 1, inc 🧶 repeat around. (18)
Rnd 4: 🧶 sc 2, inc 🧶 repeat around. (24)
Rnd 5: 🧶 sc 3, inc 🧶 repeat around. (30)
Rnd 6: 🧶 sc 4, inc 🧶 repeat around. (36)
Rnd 7: 🧶 sc 5, inc 🧶 repeat around. (42)
Rnd 8–13: sc in each st around. (42)
Rnd 14: 🧶 sc 5, dec 🧶 repeat around. (36)
Rnd 15: 🧶 sc 4, dec 🧶 repeat around. (30)
Rnd 16: 🧶 sc 3, dec 🧶 repeat around. (24)
Stuff the abdomen very firmly to keep its shape.
Rnd 17: 🧶 sc 2, dec 🧶 repeat around. (18)
Rnd 18: 🧶 sc 1, dec 🧶 repeat around. (12)
Rnd 19: dec around. (6)
Fasten off, leaving a long tail to sew the head to the abdomen.
III. The Chubby Legs (Make 8 – Start with Color B: Blush Pink)
These are not long spider legs; these are little nubbins.
Rnd 1: (Color B) 6 sc in a magic ring. (6)
Rnd 2: (Color B) inc in each st around. (12)
Rnd 3: (Color B) sc in each st around. (12)
Change to Color A (Sage Green)
Rnd 4–7: sc in each st around. (12)
Rnd 8: 🧶 sc 2, dec 🧶 repeat around. (9)
Rnd 9: sc in each st around. (9)
Fasten off. Lightly stuff the bottom of the leg only (the pink part) so the top remains flat for easier sewing.

IV. The Pedipalps (Make 2 – Color A)
These are the tiny “arms” near the mouth. They add immense personality.
Rnd 1: 5 sc in a magic ring. (5)
Rnd 2: inc in each st around. (10)
Rnd 3–4: sc in each st around. (10)
Rnd 5: dec 5 times. (5)
Fasten off and sew closed. Do not stuff.
V. The Dewdrop Bag (Color B – Blush Pink)
A tiny accessory for his travels.
Row 1: ch 7, start in 2nd ch from hook, sc 6. Turn.
Row 2–6: ch 1, sc 6 across. Turn.
Fold the piece in half (bringing row 1 to row 6) and sc along the sides to close the pouch.
Strap: Attach yarn to one corner of the bag, ch 25 (or long enough to cross Spindle’s body), sl st to the other corner. Fasten off.
Assembly & Final Touches
- Body Union: Sew the Head directly to the front-center of the Abdomen. Do not use a neck; the head should look like it is resting against the body.
- Leg Placement: This is crucial. Pin 4 legs on the left side and 4 on the right side of the body (where the head meets the abdomen). They should be close together, fanning out slightly. Sew them firmly.
- Pedipalps: Sew the two small pedipalps on the face, just below the large central eyes. They should hang down slightly to cover where a mouth would be.
- Accessories: Drape the Dewdrop Bag over Spindle’s shoulder.
Tips & FAQs
My velvet yarn is “worming” (loops popping out). Help! ➡️ Use a smaller hook than the yarn label suggests and crochet with tighter tension. This prevents the slippery yarn from escaping.
Can I brush the yarn? ➡️ No, velvet yarn can lose its pile if brushed. It is fluffy enough on its own!
A Final Word
You have done it. You have crafted a creature of the earth and given him a spirit of kindness. Spindle is ready to sit upon a shelf or guard a bookshelf with his many eyes. Thank you for crafting with me today.

