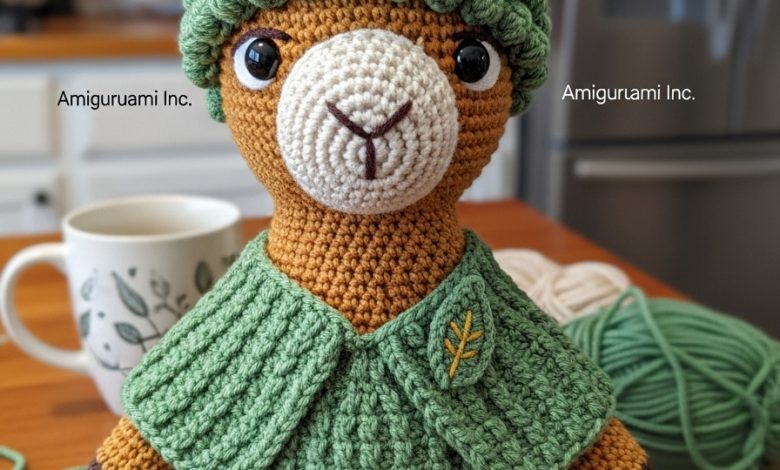
It is a joy to see you ready your hook. There is a profound silence in the high mountains where llamas roam, a quietude I wanted to capture in Barnaby. He is not designed to be rushed. His textured fleece requires patience, and his seated posture demands precise shaping, but the result is a companion who carries the spirit of the earth in his stitches. Let us begin this journey of texture and form.
About This Creation & The Artisan Angle
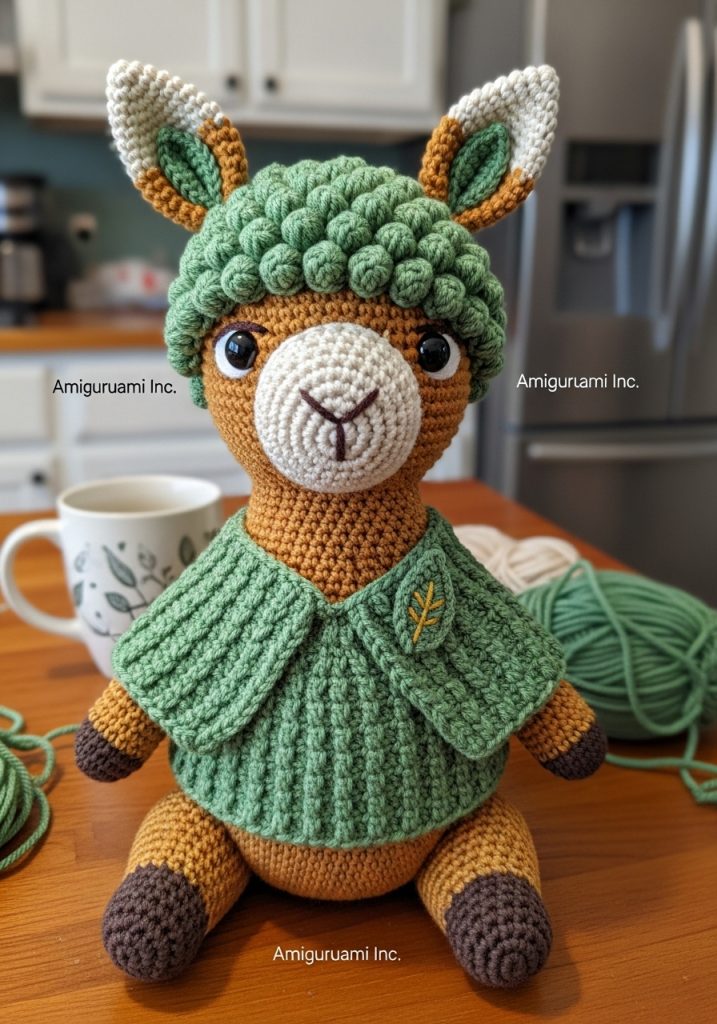
Barnaby is a study in tactile contrast. We are moving away from the standard smooth amigurumi surface to explore the Bobble Stitch, which mimics the dense, woolly coat of a high-altitude alpaca or llama. Commercially, this pattern appeals to the “heirloom” market—toys that look less like factory productions and more like treasured keepsakes.
The removable poncho adds a layer of storytelling. By including a garment with a “knit-look” ribbing and hand-embroidered botanical motifs, we elevate him from a simple doll to a piece of decor. This project is perfect for makers looking to practice texture mixing and advanced seated shaping without wire armatures.
Project Snapshot
📊 Difficulty: Intermediate (Requires patience with Bobble Stitches and color changes)
⏰ Est. Time: 8–10 Hours
📏 Size: Approximately 9.5 inches (24 cm) seated
“Texture is the language of the hands. Let the bobbles pop.” — Patricia
Materials & Tools Needed
🧶 Yarn:
- Color A (Muzzle/Skin): Worsted Weight Cotton or Acrylic blend in Oatmeal or Cream.
- Color B (Fleece): Worsted Weight in Golden Caramel or Camel.
- Color C (Hooves): Dark Mocha Brown.
- Color D (Poncho): Forest Green (DK or Worsted).
- Accent: Scrap gold yarn for embroidery.
🪡 Hook: 3.25mm (D) or 3.5mm (E) for the body; 4.0mm (G) for the poncho to ensure drape.
✨ Other Materials:
- 10mm Safety Eyes
- Polyester Fiberfill (stuff firmly)
- Tapestry Needle (long)
- Stitch Markers
- Embroidery needle
Abbreviations & Stitches Used
ch: chain
sl st: slip stitch
sc: single crochet
inc: increase (2 sc in one st)
dec: invisible decrease (sc 2 together)
hdc: half double crochet
BLO: back loop only
BS (Bobble Stitch): Yarn over, insert hook into st, yarn over, pull up loop, yarn over, pull through 2 loops (2 loops on hook). Repeat 4 more times in same st (6 loops on hook). Yarn over and pull through all 6 loops. Push bobble to the outside (right side) of work. Sc in next st to secure.
The Complete Barnaby Pattern
Component 1: The Head
Use Hook 3.25mm. Begin with Color A (Oatmeal).
🧶 Rnd 1: 6 sc in a magic ring. (6)
🧶 Rnd 2: inc in each st around. (12)
🧶 Rnd 3: (sc 1, inc) repeat 6 times. (18)
🧶 Rnd 4: (sc 2, inc) repeat 6 times. (24)
🧶 Rnd 5–9: sc in each st around. (24) This forms the muzzle.
🧶 Rnd 10: (sc 3, inc) repeat 6 times. (30)
🧶 Rnd 11: (sc 4, inc) repeat 6 times. (36)
🧶 Rnd 12: sc in each st around. (36)
➡️ Color Change: Switch to Color B (Caramel).
🧶 Rnd 13: sc in each st around. (36)
🧶 Rnd 14: (sc 5, inc) repeat 6 times. (42)
🧶 Rnd 15: Begin Texture. (BS, sc in next 2 sts) repeat around. (14 bobbles total).
🧶 Rnd 16: sc in each st around. (42)
🧶 Rnd 17: sc 1, (BS, sc in next 2 sts) repeat around, ending with sc in last st. (Offset bobbles).
🧶 Rnd 18: sc in each st around. (42)
➡️ Insert Safety Eyes between Rnd 11 and 12, roughly 7 stitches apart.
🧶 Rnd 19: (BS, sc 2) repeat around. (42)
🧶 Rnd 20: (sc 5, dec) repeat 6 times. (36)
🧶 Rnd 21: (BS, sc 2) repeat around. (36)
🧶 Rnd 22: (sc 4, dec) repeat 6 times. (30)
🧶 Rnd 23: (BS, sc 1) repeat around. (30)
🧶 Rnd 24: (sc 3, dec) repeat 6 times. (24)
➡️ Start stuffing the head firmly, especially the muzzle.
🧶 Rnd 25: (sc 2, dec) repeat 6 times. (18)
🧶 Rnd 26: (sc 1, dec) repeat 6 times. (12)
🧶 Rnd 27: dec around. (6)
➡️ Fasten off and weave in end.
Component 2: The Ears (Make 2)
Use Color B (Caramel).
🧶 Rnd 1: 4 sc in a magic ring. (4)
🧶 Rnd 2: (sc 1, inc) repeat 2 times. (6)
🧶 Rnd 3: (sc 1, inc) repeat 3 times. (9)
🧶 Rnd 4: (sc 2, inc) repeat 3 times. (12)
🧶 Rnd 5–8: sc in each st around. (12)
🧶 Rnd 9: (sc 2, dec) repeat 3 times. (9)
➡️ Flatten ear. Do not stuff. Pinch the bottom and sew shut.
Component 3: The Body
Use Color B (Caramel). We work from the neck down to the base.
🧶 Rnd 1: Leave a long starting tail (for sewing to head). Chain 18, join to form a circle. sc in each st around. (18)
🧶 Rnd 2–6: sc in each st around. (18) The Long Neck.
🧶 Rnd 7: (sc 2, inc) repeat 6 times. (24)
🧶 Rnd 8: sc in each st around. (24)
🧶 Rnd 9: (sc 3, inc) repeat 6 times. (30)
🧶 Rnd 10: (sc 4, inc) repeat 6 times. (36)
🧶 Rnd 11–12: sc in each st around. (36)
🧶 Rnd 13: (sc 5, inc) repeat 6 times. (42)
🧶 Rnd 14–20: sc in each st around. (42) The Tummy.
🧶 Rnd 21: (sc 6, inc) repeat 6 times. (48) Widening for the seated base.
🧶 Rnd 22–24: sc in each st around. (48)
🧶 Rnd 25: (sc 6, dec) repeat 6 times. (42)
🧶 Rnd 26: (sc 5, dec) repeat 6 times. (36)
➡️ Stuff the neck very firmly. Continue stuffing body.
🧶 Rnd 27: (sc 4, dec) repeat 6 times. (30)
🧶 Rnd 28: (sc 3, dec) repeat 6 times. (24)
🧶 Rnd 29: (sc 2, dec) repeat 6 times. (18)
🧶 Rnd 30: (sc 1, dec) repeat 6 times. (12)
🧶 Rnd 31: dec around. (6)
➡️ Fasten off and close hole.
Component 4: Front Arms (Make 2)
Begin with Color C (Dark Mocha).
🧶 Rnd 1: 5 sc in a magic ring. (5)
🧶 Rnd 2: inc in each st around. (10)
🧶 Rnd 3: BLO sc in each st around. (10)
🧶 Rnd 4: sc in each st around. (10)
➡️ Switch to Color B (Caramel).
🧶 Rnd 5–18: sc in each st around. (10) Stuff the bottom lightly, leave top empty.
🧶 Rnd 19: flatten top and sc through both layers to close. (5)
Component 5: Back Legs (Make 2)
Begin with Color C (Dark Mocha). These are shaped for sitting.
🧶 Rnd 1: 6 sc in a magic ring. (6)
🧶 Rnd 2: inc in each st around. (12)
🧶 Rnd 3: BLO sc in each st around. (12)
🧶 Rnd 4: sc in each st around. (12)
➡️ Switch to Color B (Caramel).
🧶 Rnd 5–7: sc in each st around. (12)
🧶 Rnd 8: (sc 3, inc) repeat 3 times. (15)
🧶 Rnd 9–11: sc in each st around. (15)
🧶 Rnd 12: (sc 3, dec) repeat 3 times. (12) The Knee.
🧶 Rnd 13: (sc 3, inc) repeat 3 times. (15)
🧶 Rnd 14: (sc 4, inc) repeat 3 times. (18) The Thigh.
🧶 Rnd 15–17: sc in each st around. (18)
➡️ Stuff firmly.
🧶 Rnd 18: (sc 1, dec) repeat 6 times. (12)
🧶 Rnd 19: dec around. (6)
➡️ Fasten off, leaving a long tail for sewing.
Component 6: The Forest Cowl (Poncho)
Use Hook 4.0mm and Color D (Forest Green).
🧶 Row 1: Chain 25 (check fit around neck), sl st to join. Ch 2, hdc in each ch around. Join. (25)
🧶 Row 2: Ch 2, Front Post hdc in next st, Back Post hdc in next st repeat around. Join. (Ribbed Collar).
🧶 Row 3: Ch 1. Working in FLO (Front Loop Only): (sc 3, inc) repeat around.
🧶 Row 4: (sc 4, inc) repeat around.
🧶 Row 5–8: hdc in each st around.
🧶 Row 9: sl st loosely in each st around for a clean edge. Fasten off.
➡️ Embroidery: Using gold yarn, stitch three small “V” shapes on the front of the poncho to resemble leaves or wheat.
Assembly & Final Touches
1. The Neck Connection: Pin the Head to the open neck of the Body. Ensure the face is centered. Sew firmly using the yarn tail from the Body.
2. Ear Placement: Sew ears to the head at Rnd 20, slightly behind the eyes. Curve them slightly forward for a curious expression.
3. Limbs:
- Sew the Back Legs to the sides of the body at Rnd 22–24. They should be positioned so the llama sits stable.
- Sew the Front Arms at Rnd 7 (just below the neck), hanging loosely at the sides.
4. The Face: Using Dark Mocha yarn, embroider a “Y” shape on the muzzle for the nose and mouth. Add small eyebrows above the safety eyes for expression.
5. Dressing: Slip the poncho over the head. It should sit snugly on the shoulders.
Tips & FAQs
Q: My bobbles are pushing inside! Make sure to push them out with your finger before working the single crochet that locks them in place.
Q: Can I brush the yarn? Absolutely. If you use wool or acrylic, use a wire pet slicker brush on the body (avoiding the bobbles) for a fuzzier, wilder look.
Artisan Note: Keep your tension tight on the neck to prevent the heavy bobble head from wobbling. If needed, insert a rolled-up piece of felt inside the neck for stability.
A Final Word
There he sits—Barnaby. A creature of texture and charm. You have not just followed a pattern; you have sculpted with yarn. I hope his presence brings a touch of the mountains to your home. Until we meet again at the crafting table, may your tension be even and your heart be full.